Planning For Trees
Gardening is for everyone, and that includes those who want a tree! How can this be? Not everyone has the space for these kinds of big plants. Not so fast-trees also include bonsai and indoor citrus too! Whether you want something decorative, fruiting, or just plain cool, we will help you pick and care for a tree that will thrive!
What To Look For: Location, Location, Location!
Trees are surprisingly delicate plants. Selecting the right plant, planting it at the optimal time, and choosing the ideal location is crucial for a tree to thrive. We’ll first go over site selection. Trees need space both above and below ground. Their canopies need to spread alongside their roots so they can establish themselves easily and live a long time. Keep in mind a tree’s full size before purchasing. If you’re lacking this space, a dwarf tree variety or even a shrub would be better.
Drainage also is important. Most soil in Colorado retains moisture poorly, however there can be areas with poor drainage in any environment. Picking a drought-tolerant tree would be best for soil that poorly retains moisture, the very best being a native tree. For a tree in a wet area pick one that enjoys damp soil, just don’t forget to water during the drier months!
Lastly, sunlight exposure is essential for trees (and generally all plants). Generally, trees need full sun but some don’t like bright hot light and prefer partial shade. Most trees we carry in our nursery will have little information packets attached to their branches about light requirements. If they don’t, our Ricksters are always happy to help!
What To Look For: Healthy Trees Please!
Now we get to the fun part: picking out the tree! Picking a healthy tree will benefit your wallet and the health of your garden or yard. An unhealthy or sickly tree can transmit disease and decay to other plants, so knowing what to look for while shopping is essential for everyone! Tree leaves shouldn’t be wilting, have discolored bark, odd spots, or oddly colored leaves. You shouldn’t buy a tree that has non-beneficial insects, like aphids or mealy bugs, on its leaves, branches, or bark. Trees should have evenly spaced branches and a central branch that acts as the main trunk. The Colorado State Forest Service suggests, “Tree foliage and branches should be distributed on the upper 2/3 of the tree.” Study the tree roots too. Are roots circling, appear pot bound or are suffocating the stem and trunk of the tree? These are all bad signs and this tree shouldn’t be purchased.
Why Natives?
Some trees will do better in Colorado than others. Native trees in particular are hardier and built for our drastic climate. Generally, they will also need less maintenance, like less watering, pruning, and insect control. Natives will thrive in Colorado hardiness zones, though there are always exceptions. A great place to check out native trees and shrubs is at Colorado State University Extension. Alongside pictures, each tab is filled with information about the plant’s preferred elevation, habitat, and more. Click the link to learn more: https://csfs.colostate.edu/colorado-trees/colorados-major-tree-species/
Planting
Trees have specificities when it comes to planting. When you choose to purchase a tree from our nursery, we’ll typically send you home with one of our tree-planting guides. It’s also available on our website, link located here for ease: https://www.ricksgarden.com/wp-content/uploads/2021/04/Ricks-Tree-Shrub-Planting-Guide.pdf .
We want to remind you to NOT FERTILIZE your tree for the first year! This can damage and even kill a tree. Trees are getting established in their new home and this is a stressful time. Applying fertilizer adds unnecessary stress in the first year.
Whether you choose a flowering crab apple or go the native route and pick a tree that easily establishes in our area, finding the right fit tree is what we should all strive for. A chosen tree should be picked to thrive in your yard’s microclimate. Once established, trees return the favor. Providing shade, habitats for animals and birds, cleaning the air and water, and limiting rain runoff are just a few of the reasons a tree can benefit the community. Likewise, trees increase property value and cut noise pollution! Trees are legacy gifts to the environment and to future generations. Whatever your reason is for choosing a tree we’re happy to help you do it right. Happy gardening!

Encouraging Kid’s Green Thumbs
There is a saying that “green thumbs are not born, they’re grown.” And here at Rick’s we heartily agree! Green thumbs come in all shapes and sizes, and even ages. Today we want to encourage younger green thumbs- kiddos! Kids are naturally attracted to dirt, worms, flowers, bugs, watering cans, seeds, berries and even veggies that are unique. It really is quite easy to get them hooked on becoming gardeners. Some may balk at including kiddos in the garden. What if they mess things up? I counter, adults also mess things up in the garden- often without trying. Let the kids learn, experiment, play and succeed in the garden. If you are a parent, teacher, guardian, devoted auntie, grandparent, or other care giver, these tips will get you started on introducing kids to the wide world of science and beauty of plants.
Gardening is an adventure into math, science and art. Math is used when discussing how far and deep seeds are planted, as well as in the conversation of, “If we have three eaters in our home, how many zucchini plants do we need to plant?” There is no right answer for this conundrum, because you typically end up with too many zucchini in general. But having that conversation with a child allows them to think of the production of one zucchini plant, how to extrapolate how many ways they and other eaters can eat zucchini, and to problem solve with what to do with any extras. Maybe the neighbor next door would like some?
Science takes a look at the immediate needs of a plant; nutrients, water and sunlight. But as a kiddo becomes more advanced in their gardening skills, you can begin talking about seed production, pollination, photosynthesis, soil biology, mushrooms, diseases, pests and the list goes on! Perhaps most importantly, it may be wise to share why gardening is so important to embark on in this time and age. This can cover creating habitats and safe zones for pollinators, building food sovereignty and security while avoiding supply chain disturbances, farming for the purpose of carbon sequestration, etc. And the variations on this theme grow infinitely from there.
Of course art goes hand in hand with gardening. Design and edibleness are dependent on aesthetic values. A child will love choosing pansies (some look like tiger stripes!), colorful zinnias, snapdragons, and other annual flowers for their container garden. Consider taking them through the perennials section for in season cut bouquets, including daisies, black-eyed Susans, Penstemons, and Yarrow. They may want to try purple carrots, purple tomatillos, purple beans or peas, or eggplants if the kiddo’s favorite color is, you guessed it- purple! Challenge them to create colorful dishes with the veggies you all grow. “Can you create an all orange meal? All green? Red? Can you have every color of the rainbow represented on your plate?” Growing vegetables for their colors is not only fun, it is healthy! Produce that have unique colors often are chock full of vitamins, antioxidants and other nutrients that we may neglect to get through our Standard American Diet (SAD).
Other ways to encourage the gardener in every child:
- Pick out seeds together to grow by inviting them to take a look at a seed catalog or a seed company’s website. If you are looking for wild and very colorful seeds, Baker Creek Seeds is a great start!
- Grow sprouts or microgreens if you are lacking space, but want a child to see the life of a plant from seed to germination to the plate. See our other blog this month for details on how to grow microgreens!
- Grow things that create awe and wonder like:
- Sunflowers
- Beans
- Pumpkins
- Small cherry tomato varieties (Spoon is a great variety, because it is abundant and kiddos love the “baby” tomatoes)
- Raspberries and blackberries
- Plant a tree, and talk through how trees are important for creating habitat, providing oxygen, cooling of the climate and are a generous resource for paper, fruit, and wood.
- Plant fall or spring bulbs for children who may need an example of delayed gratification. Plant the popular daffodils in the fall and watch them bloom in the spring. Or plant gladiolas now and watch them pop up late summer.
- Build an observation habitat: Plant flowers and other plants that will attract hummingbirds or other pollinators that the children love (butterflies, bumble bees, etc). Place a bench beside the habitat and have children tell you what they see, hear, smell, feel, etc. This prompts quiet patience and the building blocks for scientific inquiry.
- Begin a worm or compost bin. Collect kitchen scraps, shred old school work, or bills and throw in a generous community of worms. Children will be amazed to watch these items turn into worm castings, or worm poo, and how it can be used in the garden or with house plants.
A kiddo who eats their first carrot or snap pea from the garden will never forget that moment. While gardening is magical as a child, being an adult and witnessing the magic is priceless. Green thumbs can grow at any age and stage, but it is a true gift to give the love for gardening to a child. They have the rest of their lives to grow with it!
Rick’s Garden Center believes in the power of people and plants. All of our blogs and content are written and edited by real humans with their own unique creative perspectives. Any use of our publications to ‘train’ generative artificial intelligence (AI) technologies to generative text is expressly prohibited. Any typos or errors are our own
On Crop Failure
By Emma Seibert
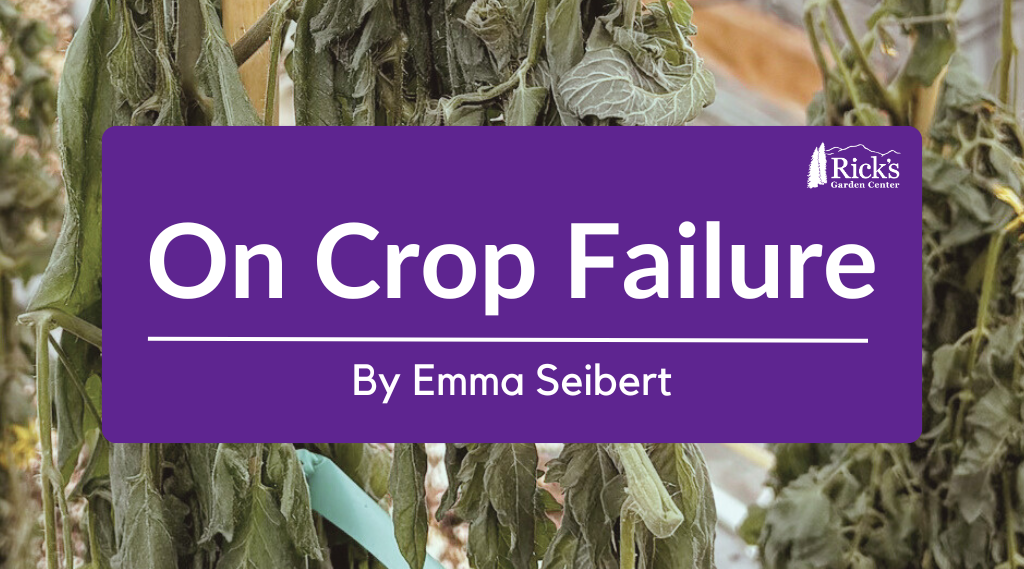
A few nursery Ricksters had been growing tomatoes in our greenhouses this winter as an experiment. In hopes of helping gardeners sample certain varieties before they commit to growing, nursery crew member Emma was dedicated to growing tomatoes and selling them as produce over the winter. Accidents happen to the best of us, however, including garden centers. Though crop failure is tragic, it’s not a sign to stop growing. Rickster Emma will talk you through her recent experience with crop failure…
A regular part of my job, especially in the summertime, is helping customers troubleshoot the issues they are seeing with their vegetable gardens and flower beds. Sometimes customers come in and I am able to recommend different caregiving techniques that can help bring their plants back to full health. Other times, I have the unfortunate job of bearing the news that the plant in question is either beyond saving, or even more heart wrenching, that it is dead. And that is what I wanted to talk about today. Dead plants are a rather sensitive topic for most growing enthusiasts; whether you’re a farmer and the health of your crop determines your livelihood or you’re just beginning your houseplant collection, crop failure is painful.
On August 26th, 2024, I seeded 32 tomatoes to plant them in large farm troughs in one of our greenhouses, with the intention of sharing the organic, local greenhouse-grown fruit with you all during the cold winter months. We wanted to provide our community with locally grown, ‘out of season’ produce that was flavorful and that you all could feel good about purchasing, knowing exactly where it was grown.
On January 13th, 2025, the tomato plants were nearly touching the roof of the greenhouse. They were blossoming and nearly every plant was fruiting. The green globes that hung from the tender stems had a yellow hue, indicating that ripening was mere days away. The stripes on the Purple Bumblebee tomatoes were starting to darken and the folds in the skin on the Sub-Arctic Plenty were beginning to smooth out, firming up the skin and giving it a glossy appearance. The first harvest date was so close I could nearly taste the tang of the Sweetie cherry tomatoes.
Then that same evening, the heater in the greenhouse wouldn’t turn on, despite the thermostat readings dropping. For some reason the thermostat and the unit heater were not communicating, but we couldn’t figure out why. As I got in my car to go home that night, I tried to remain hopeful that something would kick on, that someone would be able to figure out what was wrong in the next 20 minutes before the store closed for the night; all while watching the temperature readings in my car drop below 32 degrees.
The morning of January 14th, I hustled to the greenhouse as quickly as I could. Before I could even open the door, I knew it was done. There was frost coating the inside of the greenhouse walls; it had gotten cold enough inside for the condensation from the previous day’s healthy plant transpiration to freeze, indicating to me that every tomato plant inside must be frozen too. I went inside anyway and saw what I already knew to be true; every beautiful plant was frozen in time. The leaves were slightly wilted but maintained their vibrant green color, iced over in the moment of their last breath. It turns out that the safety fuse in the greenhouse heater blew out the previous day, preventing the heater from turning on despite the thermostat telling it to do so. We were unable to replace it in time for that night’s low of 10 degrees. As the daytime temperatures rose, the cell walls thawed and tomato plants flopped in defeat, their fruit turning to mush in my hands.
I cried, really hard. For a long time. I am not telling you this story to make you sad or say woe is me and my little crop of tomatoes. I am telling you to try to be of comfort; crop failure happens and hurts at every stage. I am telling you because I want you to know that yes, crop failure is a fact of life in the horticulture world. And also, the pain associated with such loss is a fact of that life too. So if you come in to show me your plant that is struggling and I tell you that it is dead, know that I understand that pain too. And I will do my best to help you pivot your crop, like I did with mine.
After the sore task of digging up all of the spent tomato plants, I went back and seeded some other, more cold-tolerant crops. And soon, the greenhouse will be a miniature forest again, but this time of kale and spinach, lettuce, and Swiss chard. I am not perfect, and neither are you, and neither is anyone no matter the extent of their experience. We all have to pivot sometimes and just know that the pivot can be the seed for new success.
Norfolk Pine
Ah- the Norfolk Pine! The perfect gift for someone who has just moved into their first home around the holidays. The Norfolk Island Pine is also an elegant house plant to welcome into a home for year-round interest!
Also known as Araucaria heterophylla, this plant is not a pine at all. Beautiful and graceful, the Norfolk Pine was originally found on Norfolk Island in the South Pacific, adjacent to Australia. This island is the only natural and known occurrence of the plant. This conifer evergreen tree keeps a symmetrical and compact habit. Due to its branches that present a spiraled and stepped appearance, the tree has a tidy and pyramidal canopy. The needles are fine and almost fern-like, adding a delicate touch. It is so easy to fall in love with this tropical tree! Below you will find care tips for this unique plant.
Moisture:
Norfolk Island Pine’s native habitat is tropical and very humid (50-60%). Our climate is difficult for them, so supply additional humidity through daily misting, a humidifier on a timer, or a humidity tray (set your plant on a tray of water with pebbles). The Norfolk Pine does not like their roots to be waterlogged so make sure you are not over-watering, only watering when the top inch of soil is relatively dry.
Light:
Colorado has very bright light. The Norfolk Pine prefers bright indirect light. Place a Norfolk Pine by a window that receives a good amount of light, but shift the plant away from any direct light, since they are susceptible to sunburn. Many people find that a west or east-facing window is the perfect spot!
Temperature:
Araucaria heterophylla needs a temperature range between 60°F and 70°F. Do not place this tree by a window that transfers cool air inside or a heat vent that could cause scorching or excess drying out of the plant, and its needles. Even slight fluctuations in temperatures can cause stress, so make sure to keep your Norfolk Pine under careful watch. The first sign of stress is needle drop or loss of lower limbs. These lost limbs will not grow back.
Soil:
This beautiful tree would enjoy a well-draining potting mix. The key is moisture retention without becoming waterlogged. Consider a blend of peat moss or finished homemade compost, perlite, and sand. We often also recommend fine-grade orchid bark instead of perlite, since this mimics its native soil.
Fertilizing:
Since Norfolk Island Pines are very susceptible to burning by other means, it should be expected that it’s sensitive to nutrient burn as well. To combat this risk, it is recommended to only fertilize during the growing season (spring and summer, here), and with a diluted half-strength water-soluble fertilizer formulated specifically for house plants. The cadence of fertilizer application is roughly once a month.
Other notables:
The Araucaria heterophylla is sensitive to changes in its environment. Swings in temperature, changes in light intensity, and even moving the plant to different rooms can elicit needle drops. Another thing to note is that this plant is difficult to transplant. We typically recommend delaying transplanting into a larger pot for as long as possible. It is also preferred to up-pot during the growing season. With other houseplants, we usually recommend transplanting into a pot 2 inches larger than the existing pot. For Norfolk Pines, we recommend a pot up to 4 inches larger than its original sized pot. This allows you to reduce the number of up-pots the tree will experience in its lifetime.
While it is hard to keep tropical species like the Norfolk Pine happy in Colorado’s climate, it is well worth it. This tree is festive in the winter months, and a beautiful companion the rest of the year!

Rescuing Houseplants
Listen…shhhhh…if you listen closely, you can hear that neglected plant in the corner crying for help. You did not mean to cause harm. Whether you left for your holiday travels in a rush and failed to give your plants some extra TLC before you left, or you do not know the plant’s needs, the stress is equally killing you. You are at the point of not knowing what to do to make your plants happy again. No worries! We got you.
First:
Get nerdy. Pretend you are a scientist. Observe the plant. See what its symptoms include. What is it trying to tell you? Do research by using reference guides. We recommend The Plant Rescuer: The Book Your Houseplants Want You to Read by Sarah Gerrard-Jones (available at the Pikes Peak Library District). This book has helpful decision trees that will help you decipher your plant’s calls for help. Also, feel free to search the web on general care for your species of plant. Cross-check with multiple sources, so you are getting good and correct information on what your plant needs. Academic sources and search engines, like Google Scholar, are excellent places to find accurate knowledge. And plant communities on Reddit surprisingly are always insightful. Feel free to bring photos to us, and we can help diagnose what is occurring!
Second:
Based on the initial sleuthing you did through observation, reference books, internet searching, and inquiry, come back to the plant. Address the habitat first. Habitat includes light, moisture, heat, and humidity. Is your cactus in a dark corner? Is your Norfolk pine crisping up because it is in direct sun? How about moisture? Does your plant look like it is dehydrated, and needs a drink? Or conversely, has it seen too much water and would love to dry out its feet? Is your plant feeling a chill because it’s by a cold window? Or is it dropping dry leaves because it is in proximity of a heater vent? Some plants do not want to be drenched with water, but like the daily mist of a shower, a spritz of a spray bottle, etc. Are you giving those plants the humidity they need? If you have adjusted the habitat of the plant to fit its individual needs, and still do not see improvement in 7-14 days, move on to the next tier of help.
Third:
This next tier of inquiry is about pests, plants that are rootbound, and fertilization. Typically plants that were left for themselves for a couple of days and look sad will not need help from this stage of help. Plants that have fended for themselves for weeks while you were working on that big project, or you have mistakenly overwatered several times, or are just ready to go to a larger home are typically when you will see any of these concerns.
Pests come in all shapes and sizes. The most common pests you will encounter are house gnats, white flies, aphids, thrips, mealybugs, and scale. Another pest that occasionally shows up is various fungi. Some of these concerns are easy to get rid of, and some are extremely difficult. While this article does not have the space for the breadth of how to address each of these species, you should consult your resources (like The Plant Rescuer, or give us a call!).
Rootbound plants may present as under-watered but are typically not happy even after you have watered them. Check for roots poking out of the bottom of a drainage hole, or pull the side of the soil away from the pot to see if roots have encircled the base of the pot. If the plant is rootbound, up the pot to a container 2 inches wider than the current size.
Finally, nutrients may be what your plant is asking for. A nutrient deficiency can present as yellowing leaves, absence of blooms (as an example, begonias typically need fertilization to bloom), slowed growth, or languishing properties. Find a fertilizer that will suit your plant (cacti and succulents do not need a whole lot of fertilizer, so do not go straight for the all-purpose 20-20-20.) If you are not sure that your plant needs fertilizing, start with a diluted or lesser amount than advised on the container. You can always make a situation worse.
If at any point you lose a plant along the way, know it happens to the best of us. Take heart, there are other plants out there, and this is not an indication of your skill level as a plant person. Part of the journey is losing plants occasionally, sad as it is. Say last rites, find a peaceful resting spot for the plant (the compost is a nice spot), and fill the empty corner with a new plant friend. If it is too soon for that, take the time you need. We will be here when you are ready. Peace, Love & Plants.
New School Fall Gardening Stretegies
By Katherine Placzek
With fall approaching, many of you are getting ready to put your garden beds and other portions of the landscape to bed. With a more eco-friendly mindset, we would like to suggest a couple of tweaks to your typical routine.
Old school: Raking and bagging leaves, tossing them out for the trash.
New school: Rake leaves from below trees, and use them as mulch around your perennials, shrubs, or on top of your vegetable garden beds. You can also run these over with a lawn mower to mulch them into your grass.
Why: Organic matter, including yard waste, is the most prolific item in United States landfills. Consequently, this unsustainable practice directly contributes to greenhouse gas emissions. Conversely, organic material returned to the soil reduces your environmental impact while providing a useful garden resource. These local sources of organic material and nutrition (from your own yard’s leaves) will feed and insulate your yard all winter long! Decomposing leaf matter enriches the soil, adding carbon and nitrogen to the soil, while plants “sleep.” Leaves also create safe places for native bees and other pollinators. Did you know that almost three-fourths of Colorado’s native bees nest and overwinter underground? Tip: Deeply water the leaf litter in after it has been placed. This creates a wet decomposing mat that will not blow away as easily.
If you have excess leaves that you are not going to be using, please feel free to bring your bagged leaves by our nursery gate (located at 600 N. 18th St. Colorado Springs, CO 80904). This is a community pile that other members come to gather for their own gardening usage.
Old School: Trim any perennials and remove them before the first snow.
New School: Leave all of your woody stalks, leaf matter, and ornamental grasses all winter long!
Why: This allows for winter interest and provides shelter for any hibernating insects. This is especially true for native plants that act as habitat for many native and beneficial insects. Larger life forms, including birds and mammals, will also benefit from grass seed heads left standing, and other plants that provide shelter in the harshest months. If this is unsightly for you, trim your plants, but leave the stems and other leaf matter on the ground to help create shelter throughout the winter. When soil temperature has reached 50 degrees Fahrenheit it’s the preferred time to begin trimming these perennials in the spring, after many insects have completed their wintering cycle.
Old School: Let the winter snows water your outdoor plants.
New School: Water trees, shrubs, and perennials on nice days throughout the winter.
Why: Unfortunately Colorado Springs does not get enough reliable winter moisture to overwinter many plants. This is especially true for newer plants that do not have an established root system yet. Many trees and shrubs, even those that are well-established, should continue to be watered on warm winter days from October through March. When it gets up to 40 degrees Fahrenheit, pull out a hose or dust off your watering can and soak up some of those winter rays, yourself, while you water. Make sure you unhook any hoses after use, as temperatures can cause freezing in the hose bib and other hardware.
Old School: Say goodbye to gardening until spring.
New School: Fall and winter sow, including vegetable and perennial flower seeds.
Why: Many annual vegetables and perennial flowers have a natural cycle where they drop seeds or fruit in the fall. Mimic nature and plant some of your own seeds in the fall to see what comes up earlier and hardier in the spring! In the vegetable garden, this especially works for cold hardy greens. Think spinach, lettuce, arugula, radicchio, etc. For perennial flowers, like wildflowers, it is recommended to put these seeds down in the fall, as many of our native flowers require a cold stratification period. While many people may set up sections in their freezer and fridge for cold stratification processes, direct seeding in the fall eliminates the juggling of space in your fridge/ freezer. Let the ice cream stay where it is!
Old School: Wait until spring to amend any of your garden beds.
New School: Amend your garden beds in the fall so you can plant right away in the spring.
Why: Fall is a good time to test your soil so you know how to amend your beds. Our soils typically fall in the basic pH range here in the greater Colorado Springs area. This can impact how readily available nutrients are to our plants. Do your research and get your soil properly in shape for your spring! Remember that you can also amend with what nature provides; leaves, manure, compost, and other organic matter. These sources do not have a precise N-P-K (macronutrients: nitrogen, phosphorus, potassium), nor spelled out micronutrients (calcium, magnesium, iron, etc) so it is recommended to test your soil in the spring again to see how your soil has changed due to any unregulated organic material. We offer pH and N-P-K, testing in-store, but the CSU extension office also offers a wide range of soil tests.
Now that you know these new school techniques, you might just try other new gardening techniques in the growing season. I know, I know- I am getting ahead of myself! Happy gardening!
Protecting Our Watershed While Gardening & Landscaping
By Katherine Placzek
Every item that we use in our green spaces– fertilizers, pesticides, sprays, powders and granules, etc. all make their way into the water, after it rains or when we water our plants. This means a myriad of compounds, organic and synthetic, are making their way in our or someone’s drinking water. Yes, most of our drinking water is filtered, but this also impacts lakes, streams, aquifers, wells, and other sources of water that can be a habitat for other living organisms, big and small. While this may feel overwhelming initially, we have the power to make little meaningful changes in the way we manage our landscapes.
Lawn and Garden Fertilization
Three things make a difference here. Quantity, quality and timing:
Quantity: When you use fertilizer, always use the instructed amount of fertilizer or a diluted/ lesser amount. This ensures that your plants can take up the applied fertilizer and that excess is not making its way into our waterways. Excess fertilization can stress plants and negatively impact water quality. Over fertilizer use through agriculture, golf course maintenance, and community landscaping have contributed to dead zones in waterways. A dead zone is where all aquatic life ceases to exist. First, expansive algae blooms occur that crowd out sunlight, which choke oxygen out of the environment, causing inhabitable levels for any life, plant or animal. While some dead zones do occur naturally, the second largest one in the world is in the Gulf of Mexico, where many of North America’s waterways meet. This dead zone is widely attributed to human causes.
Quality: When choosing a fertilizer, it is advisable to read the ingredients, similar to reading food labels. If you cannot recognize an ingredient, know it is likely synthetic. Not all things that are human made are bad, but do your research. You may decide that you do not want some of these ingredients in your garage, home, yard, and local ecosystem. This is why Rick’s is proud to continue to carry our Organic Lawn and Garden fertilizers. Both of these are gentle fertilizers, with low nitrogen levels, and contain ingredients such as chicken manure, bone meal and blood meal.
Timing: Never fertilize before a severe rainstorm where run-off can take the majority of your fertilizer downstream. This is also cost prohibitive. If you plan on putting fertilizer down before predicted moisture, consider prior to a snowfall, where the melting snow can bring the fertilizer into the ground gently. Also read the instructions. Many fertilizers recommend a fertilizing schedule. Follow this, or see if you can stretch the schedule out further, to reduce the amount of fertilizer that you have to buy and apply throughout the year. Never fertilize more than what is recommended, this can stress the plant, and excess product will be absorbed into the waterways.
Pesticide Use
Pesticides include insecticides, herbicides, and fungicides. Similar to fertilizing, follow the same wisdom regarding quantity, quality and timing. We have said it before, but just to remind you: “While pesticides are convenient and sometimes necessary especially when mitigating invasive plant species, pesticides negatively impact pollinator numbers…. It is important to remember that while applying control products at night can reduce pesticide exposure to several pollinators/ beneficial species, this does not protect nocturnal pollinators such as moths and bats. When we use pesticides there is no current method that does not negatively affect pollinators or their second tier predators, who are further up the food chain (Excerpt from our March 2024 newsletter).” All of these pesticides reach water sources that are drinking water for pollinators and larger organisms: birds, fish, fox, deer, etc. Many of the chemicals used in popular pesticides, including glyphosate do not break down with water. This means the problem is washed downstream, but never away, and can exist in our waterways indefinitely. Manual removal of weeds is no fun- we all know this. When we choose conventional pesticides, we give up clean water. Limiting the amount of pesticides we use in our yards is one step to keeping our watershed less polluted.
General Maintenance
When you mow your lawn, consider mulching the cut grass instead of bagging it unless you use the cut grass in your compost. Mulched grass that has been chopped by the mower multiple times and is spread evenly over the lawn acts as a wonderful additive of organic material to the soil. This method improves water retention, and overall soil health, decreasing your need for fertilizer. If you mulch the cut grass, but leave large clumps of thatch, this can burn your grass and be swept away into a waterway. This process can act similarly to over fertilization, causing algae blooms downstream. Use the same logic with fall leaves. Mulch leaf litter and either use it on your lawn or in your garden, to add nutrition to the soil. Avoid abandoning leaves in gutters, and storm drains, as it increases excess nitrogen in the watershed. In the winter, make sure you are using a low saline and non-toxic ice melt as well. Water guardianship takes place in all four seasons!
Plant Selection
Finally, the fun stuff! Select plants and grasses for your landscape that are resilient to the Rocky Mountain circumstances. When we do this, we automatically reduce the need for mowing, fertilizing and the use of pesticides. Native plants especially, have been living here in the Colorado landscape much longer than any human lifespan. They have been taking care of themselves without any of our human care measures, such as fertilization, and will continue to do so into the future. I believe that by choosing to plant native plants in a landscape, you are actually simplifying your overall workload in the yard. You will fertilize less, you will use pesticides less, and regarding grass, you will mow less. That means more money in your pocket and more sitting on the back porch, sipping on a cold beverage. Cheers!
Blossoms on Your Plate
Are you ready to elevate your gardening game to a whole new level of deliciousness? Well, we’re about to dive into the vibrant world of edible flowers that will not only make your garden pop but also your plate! Many of them are easy to grow, forgiving of rookie mistakes, and will reward you with an explosion of colors and flavors.
Nasturtiums (Tropaeolum majus): These deep burgundy to buttery yellow blooms have a peppery kick, perfect as a spicy twist to salads, tacos, and avocado toasts. Bonus: They’re easy to grow, thriving in poor soil and other neglect. These flowers are high in vitamin C. The entire plant is edible- so try out the lily pad-like leaves also! Deer resistant.
Calendula (Calendula officinalis): Often called “poor man’s saffron,” the golden petals of calendula add a subtle saffron flavor to rice dishes and soups. They’re sun lovers and can tough it out in the Rocky Mountain soil. This flower is also known for its skin-healing properties, consider making a toner with calendula flowers. Deer are typically not a fan of these flowers.
Pansies (Viola tricolor): These adorable flowers come in an array of colors and have a slightly sweet, grassy taste. Scatter them over desserts after dipping them in water and then sugar for a delicate but sweet touch. Or freeze them in ice cubes for fancy drinks. Pansies are cold-hardy and can withstand our unpredictable mountain weather. We had a pot of pansies survive the entire winter, even when temperatures dipped below 20 degrees!
Lavender (Lavandula angustifolia): Known for its calming aroma, lavender adds a delicate floral flavor to desserts, teas, and even cocktails. It thrives in well-drained soil, making it a great match for rocky gardens. We have several varieties that will survive year-round in our nursery area. Look for varieties such as Munstead, Hidot Blue, and Phenomenal. Due to the fragrance of these flowers, deer typically leave them alone.
Rose (Rosa spp.): Beyond being a symbol of romance, roses can be used in various culinary creations. Make tea with their dried petals, infuse honey with their fragrance, or toss the petals into desserts. The rose hips that are produced in the fall are also edible and high in vitamin C. You can make tea from the rosehips as well. We have several varieties of roses, some more bred for their blooms, others are cultivated to be hardy for our mountainous climate.
Borage (Borago officinalis): With its brilliant blue flowers, borage adds a refreshing cucumber taste to salads, drinks, and desserts. The best part? Borage is a self-seeding annual, making it a low-maintenance addition to your garden. The pollinators will also feast on these blooms! Deer typically avoid this plant.
Chamomile (Matricaria chamomilla): Beyond being a bedtime tea, chamomile flowers can be used in salads or infused into syrups that go well in cocktails, over ice cream, or on pancakes. These sun-loving plants will thrive in our bright sun. Deer tend to avoid this plant due to its fragrance.
Dianthus (Dianthus spp.): Also known as pinks, or sometimes recognized as carnations, these flowers have a mild clove-like flavor. Add them to fruit salads, and desserts, or dry them and add them to various spice blends (za’atar, is a great example). Dianthus are hardy perennials, returning year after year. They are also deer-resistant.
Hibiscus (Hibiscus rosa-sinensis): Hibiscus flowers make a delightful and tropical addition to beverages, jams, and desserts. We carry gorgeous hardy hibiscus that will winter as a perennial shrub. Hibiscus also has high levels of vitamin C and is an excellent herb for overall health.
Daylilies (Hemerocallis spp.): Despite their fleeting beauty, daylilies are edible and offer a slightly sweet flavor. Stuff the blossoms with a soft cheese, or add them to stir-fries. Do your research on whether you have a daylily, before digging into a meal. Not all species of lilies are edible. These hardy perennials are a reliable choice in our climate.
Elderflower (Sambucus nigra): Fragrant elderflowers can be used to make refreshing beverages like elderflower cordial or add a subtle floral note to desserts. Elderflowers come from elderberry bushes, so you will also be able to eat elderberries if the birds don’t beat you to it! These shrubs are well-suited for the mountain environment, making them a great choice for your garden.
So, whether you’re a seasoned horticulturist or a budding green thumb, dive into the world of edible flowers and turn your garden into a culinary masterpiece. After all, why just stop and smell the roses when you can toss them in a dish too? Happy gardening and bon appétit!

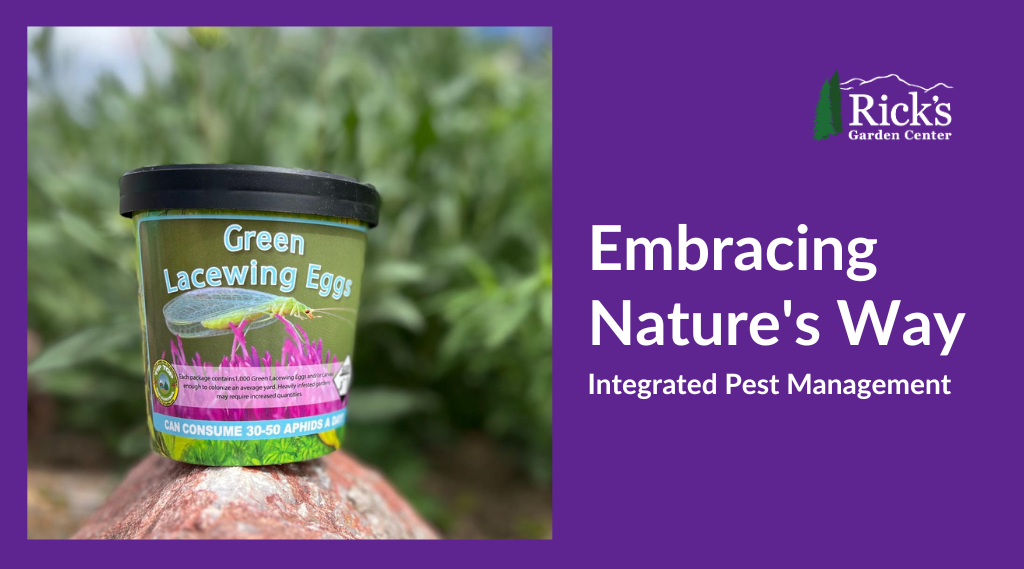
Embracing Nature’s Way: Integrated Pest Management
Integrated Pest Management is like the Gandalf of gardening – a wise, all-encompassing strategy that balances the forces of nature to keep your greenery flourishing. At its core, IPM is a holistic approach that combines biological, cultural, and physical/ mechanical control methods to manage pests and diseases. Instead of reaching for a pesticide or other control products, we tap into the power of Mother Nature herself to maintain a thriving and balanced ecosystem.
Some of our IPM practices include:
- Biological: Releasing ladybugs or other beneficial insects inside our greenhouses, or hoop houses to feast on those insects that are a bother; aphids, scale, mealy bugs, leafhoppers, etc. We also let spiders do their good work eating larger insects, like grasshoppers.
- Cultural: Reducing watering if fungal or pest problems crop up.
- Mechanical: Manually removing bugs from plants by hand or with water (aphids, mealy bugs, scale, potato bugs, etc)
While we lean into biological, cultural, or mechanical solutions, the last part of IPM is responsibly utilizing chemical products to rid of pests. This means we use more natural controls, such as Neem oil or Spinosad Soap, before other products. It is also important for us to factor in when pollinators or other beneficial insects may be around. So we try to spray when these individuals are not active. We also follow recommended application methods to avoid pollution of our environment or incur undue costs.
Why does Rick’s Garden Center Choose IPM Over Pesticides?
Environmental Harmony:
- Pesticides can disrupt your garden’s delicate ecosystem – effective, but with unintended consequences. IPM, on the other hand, dances with nature rather than against it. By embracing natural predators, beneficial insects, and environmentally friendly practices, we create a harmonious balance that keeps the pests at bay without harming the environment. By mostly avoiding synthetic chemicals, we reduce the environmental impact and create a garden that’s both beautiful and a haven for beneficial insects and wildlife.
Economic Sense:
- Let’s face it – pesticides can burn a hole in our pockets. IPM, however, is cost-effective in the long run. By relying on natural solutions, we reduce the need for constant reapplication of expensive chemicals, improving our bottom line.
Happy and Healthy Plants:
- Picture this: a garden where plants are not only surviving but thriving. That’s the magic of IPM. By addressing the root causes of pest problems and fostering a healthy soil environment, we ensure that your green companions are resilient and ready to face whatever life throws their way.
Community Connection:
- We believe in building a community that shares our love for the earth. By choosing IPM, we invite our customers to join us in creating a garden that is a testament to the power of working hand in hand with nature.
At Rick’s Garden Center, IPM isn’t just a gardening strategy – it’s a philosophy. It is about embracing the rhythms of nature and inviting others to join us toward a more sustainable future. So, next time you visit, know that you are not just buying plants; you are becoming a part of our eco-minded family.