Pond Plant 101
By PFC
Having a pond with plants seems at odds with our drought-ridden state, yet it can be a boon to any garden across the western slope. Ponds create a calming atmosphere and provide homes for wildlife, such as dragonflies and frogs, when stocked with the right plants. What makes our state special is its connection to wilderness, so why not try to replicate our waterways, too?
We likewise understand some are more interested in aesthetics. We also supply visually interesting and beautiful pond plants, though a majority of these beauties are not native, sadly. That doesn’t mean native insects and other animals don’t benefit from these plants, however! We’ll provide information on how to care for pond plants, along with some factoids on our favorite native and non-native varieties. Plus, how to safely handle non-native (and often invasive) pond plants. Happy gardening!
Creating A Pond
Creating a pond is easier than you think! If you lack space or want a cheaper option, consider creating a patio pond. These container-sized ponds are made with just that, a container, though it should be fully sealed to prevent water leakage. A pot that lacks a drainage hole, an old bird bath top, or a fountain basin are prime examples. This container should be at least 12” across and 10” deep to provide adequate space for aquatic plants (CSU, “Water Gardens”). For large plants, such as Victoria waterlilies, this may not be an optimal home for their size (CSU, “Planting”). For large ponds, you will have to dig out an area of the garden and line this spot with pond liner to prevent water from seeping into your soil and potentially eroding foundations (Wildlife Trust). To avoid puncturing the liner, remove sharp stones found embedded within the dug-out pond’s soil (Wildlife Trust). Here is an easy how-to guide on creating a pond: click here!
Substrate
Now that we have our container, the next step is substrate! Many aquatic plants, such as water hyacinth and hornwort, don’t require substrate because their roots are free-floating, acting similarly to gills. Things like our taro, zebra rush, and rain lily do require substrate for their survival. Pond substrates come prepacked, or you can forage your own! For packaged substrate, we actually sell bags of our recommended types in the pond section of our store. If you’re looking for more than 2 cu ft, however, we recommend visiting an actual pond store. Our local favorite is Crystal Ponds! (Click here). Sand likewise works as a substrate! Avoid any substrates with perlite, peat, moss, or bark, which will float to the pond’s surface (CSU, “Planting”). When it comes to foraging substrate for a pond, no need to visit a wild lake or aquatic habitat. In fact, the best substrate may just have been under your feet the whole time! Soils beneath cool-season grasses, like the standard bluegrass, make excellent pond substrate (CSU, “Planting”).
Planting
Regardless of substrate type, planting should take place in the shade or on an overcast day to avoid drying out the roots of aquatic plants (CSU, “Planting”). Depending on the type, pond plants must be planted at specific times of year. Hardy pond plants can be planted from mid-April through May, while tropical pond plants should be planted mid-June, when water temperatures are a constant 68 degrees Fahrenheit (CSU, “Planting”). Tropicals can remain in the pond until the first frost. Hardy pond plants can remain in large ponds over the winter after being pruned, yet pond plants in patio pots should be discarded at the end of the season because they will not return the following year (Zuri). If you wish to try keeping tropical pond plants happy in winter (which is incredibly difficult), they can be stored indoors in a makeshift container pond that must have full sunlight and continually warm water temperatures, at least above 60 degrees Fahrenheit (Zuri). Hardy waterlilies should have old foliage removed and dropped within the deepest part of the pond over winter, where they’ll attain dormancy until the following spring (Zuri).
Feeding Pond Plants
Fertilizing pond plants is one of the most difficult aspects of maintaining aquatic plants. This is especially true if you choose to keep fish, as fish (and other aquatic animals like snails and insects) are sensitive to chemicals found in fertilizers, both synthetic and organic. If you have a pond that does not have any animals contained within it nor is it near any wild waterways, you may fertilize pond plants with aquatic plant food tablets. The brand and its ingredients will determine how frequently you can fertilize. A pond with fish can be fertilized but under specfic guidelines. Fertilizer should be organic and animal-friendly! We sell API products, which are animal-friendly pond fertilizers and cleaners. Here is more information on them: click here! We do not recommend fertilizing ponds that are muddy or have undesirable plants within them (MSU). Fertilizer is non-selective, so it will end up feeding weeds and mud (MSU). Mud actually binds phosphorus from fertilizer, causing plants to become unhealthy (MSU).
Native Pond Plants:
This section’s a bit misleading, as at the moment we don’t have any truly native wetland or aquatic plants in stock. We, however, have a solution for you! We highly recommend you visit Highlands Plains Environmental Center (HPEC for short) either in person or on their website for anything native plant-related! We love this place and sell a few of their perennials ourselves, though nothing aquatic yet. To make it easy, we’ve provided a link for you to visit their website: click here!
Hornwort (Ceratophyllum demersum)
If you want to increase oxygen in your pond, look no further than the humble hornwort! This aquatic plant is native to all continents, save for Antarctica, though it’s considered invasive in Tasmania, Australia, and New Zealand (Monk).* Also known as coontail, hornwort is effective at maintaining a healthy pond environment through photosynthesis, absorbing CO2 and releasing O2 back into the water (thewatergarden.com). Highly oxygenated water improves clarity and reduces the risk of algae, positively impacting the health of your pond’s environment (thewatergarden.com). Because of its versatile nature and ability to survive both in pond substrate or floating in water without roots, hornwort spreads rapidly and easily. In the wild, hornwort forms large clumps in lakes, ponds, streams, and rivers, which create safe hideaways for fish hatchlings, dragonfly larvae, and daphnia (MDC). Waterfowl also love consuming hornwort (MDC). This is one of the most essential pond plants there is! These plants are cold sensitive, so they’ll do best in a heated pond. Plant them at a similar time to tropical plants, as they dislike cold.
Non-Native:
Water Hyacinth
A favorite amongst our aquatic gardeners! Known for its impressive growth, the water hyacinth produces beautiful purple flowers. Though the bulbous foliage can look unsightly, the bulbs are filled with air sacs, which increase the water hyacinth’s buoyancy (Michigan.gov). This, along with their feathery roots, incredible growth rate, and asexual reproduction, makes the water hyacinth one of the fastest-growing plants in the world, and thus an excellent invasive plant, which isn’t good for our local waterways (Gladisitch). Keep water hyacinth contained properly and avoid contact with wild waterways.
Taro
Another non-native pond plant. If you’ve visited the Denver Botanical Gardens, you may have noticed these lush-leaved plants alongside the aquatic scapes. They’re also often sold in corm form under their Latin name, Colocasia esculenta, and look very similar to Alocasia. Oftentimes, as demonstrated by the few featured taro within the pond area of the store, they come with colorful or patterned leaves, ranging from “black” colored foliage to leopard-like variegated spots. The taro, so long as it is kept properly wet in pond shallows, can tolerate high heat due to its tropical origins (Pondmegastore.com). It rarely becomes invasive in Colorado, but in Southern states it’s considered invasive. However, unlike many other tropical pond plants, the taro can make an excellent and extravagant houseplant! Its soil should remain continually moist, its lighting should be bright, and humidity is a must if you’re interested in overwintering taro.
Yellow Rain Lily
Though not truly native to Colorado, the yellow rain lily is native to the tropical Americas, primarily Central and South America (Wiki, Nov 2024). The rain lily is also known as magic lilies because they appear right after a heavy rain, blooming from thin air (Chalily). The flowers appear similar to crocus flowers, bright and cheery! In addition to their delightful visuals, certain rain flowers bear a sweet fragrance, particularly at night, which attracts nocturnal pollinators such as moths and beetles (Wiki, June 2024). There are over 3,000 moth species in Colorado, and many are essential to our garden’s health (Powell). Though there is potential for the yellow rain lily to become invasive, if handled with care, it is highly unlikely.
Water Spangles (Salvinia minima)
Also known as water velvet, water spangles are a type of floating fern which behaves similarly to duckweed (ISSG). Originally from South & Central America, water spangles behave similarly to duckweed; thus, they can spread excessively and are considered incredibly invasive (Tulane). It does have an attractive appearance, however, and can make a great cover for fish within ponds and aquariums so long as parts of the plant are occasionally removed to prevent overcrowding (Aquatic Arts). If left untreated, water spangle can easily smother a pond or aquarium, limiting O2 and potentially harming aquatic life, from fish to bugs to other plants. Due to its nature, water spangle should NEVER be near wild waterways.
Working With Invasive Pond Plants
In order to prevent the spread of non-native pond plants into our waterways, you must manage the keeping of and disposing of these plants with utmost importance. Any plant that grows rapidly must be safely disposed of to prevent overcrowding. While you may feel guilty about disposing of these plants, you are being a hero to our native flora and fauna, allowing them to thrive in their natural habitat by preventing ecological competition. There are a few ways to get rid of aquatic plants safely; the best practice is to “cook” invasive plants or to compost them (Mattrick). To cook a plant, simply leave it on a concrete surface and pin it down with a rock (Mattrick). Allow the sun to fry the plant for a month until it’s completely dead, and then it can safely be disposed of (Mattrick). To compost, simply add invasive aquatic plants to the top of the compost pile to dry out and eventually decompose. This should only be done with invasive aquatic plants, as invasive terrestrial plants can still spread seed via compost (Mattrick).
*Hornwort may be native to North America however this variety isn’t historically found in Colorado. Hornwort has adapted to Colorado waterways and isn’t considered invasive
Aquatic Arts. “Water Spangles (Salvinia Minima), Aquatic Arts Grown!” Aquatic Arts, 2026, aquaticarts.com/products/water-spangles-salvinia-minima-aquatic-arts-grown?srsltid=AfmBOorcqi3gRLve-PJDeVJlkSiPGllf7hz0_dEUGKPvzA-lCR7PxO5D. Accessed 29 June 2026.
Gladitsch, Haley. “Water Hyacinth (Eichhornia Crassipes).” Long Island Invasive Species Management Area (LIISMA), 18 July 2022, liisma.org/water-hyacinth/.
“Hornwort. One of the Best Oxygenators You Can Have!!!.– the Water Garden.” Thewatergarden.co.uk, 2024, thewatergarden.co.uk/hornwort-one-of-the-best-oxygenators-you-can-have/.
“How to Build a Pond | The Wildlife Trusts.” Www.wildlifetrusts.org, www.wildlifetrusts.org/actions/how-build-pond.
ISSG. “Issg Database: Ecology of Salvinia Minima.” Archive.org, 2026, web.archive.org/web/20121116204858/www.issg.org/database/species/ecology.asp?si=570&fr=1&sts=&lang=EN. Accessed 29 June 2026.
“Louisiana Invasive Species.” Tulane.edu, 2026, is.cbr.tulane.edu/Species_CommonSalvinia.html. Accessed 29 June 2026.
Mattrick, Christopher . “Managing Invasive Plants: Methods of Control.” Conservation Notes of the New England Wild Flower Society, 1 Feb. 2008. Accessed 29 June 2026.
MDC.“Coontail (Hornwort).” Missouri Department of Conservation, mdc.mo.gov/discover-nature/field-guide/coontail-hornwort.
Monk, Emma. “Hornwort | MPI Biosecurity New Zealand.” Archive.org, Biosecurity New Zealand, 2026, web.archive.org/web/20121205035215/www.biosecurity.govt.nz/pests/hornwort. Accessed 22 June 2026.
“POND|PLANTS|WATER LILIES|WATER|GARDEN|PLANTS|LOTUS.” Pond Megastore, 2026, pondmegastore.com/collections/taro-plants?srsltid=AfmBOopfWXy9FYwzzHfuMhQZRcFz-il_N5m8yzQRNLPUg5Brn0utQHni. Accessed 29 June 2026.
Powell, Lori. “Discovering the Hidden World of Nocturnal Pollinators – Cottonwood Institute.” Cottonwood Institute, 22 June 2026, www.cottonwoodinstitute.org/upcoming-events/hidden-world-of-nocturnal-pollinators/. Accessed 25 June 2026.
“Yellow Rain Lily Shallow Water Plant – Chalily Ponds & Gardens.” Chalily, 22 June 2026, www.chalily.com/product/rain-lily-yellow/?srsltid=AfmBOoqAv_BJILgcYmduz-zWJ1ocGBDGXu6dJtK67K81_kUDiD6-mI_d. Accessed 22 June 2026.
“Water Hyacinth.” Www.michigan.gov, www.michigan.gov/invasives/id-report/plants/aquatic/water-hyacinth.
“1026 – Water Gardens: Planting Aquatic Plants – PlantTalk Colorado.” Colostate.edu, 2026, planttalk.colostate.edu/topics/annuals-perennials/1026-water-gardens-planting-aquatic-plants/. Accessed 27 June 2026.
Wikipedia Contributors. “Zephyranthes.” Wikipedia, Wikimedia Foundation, 29 Nov. 2024.
Zuri, Jennifer. “5 Ways to Prepare Your Pond Plants for a Healthy Winter.” Aquascape, Inc., 22 Sept. 2025, www.aquascapeinc.com/water-gardening/pond-plants/5-ways-to-prepare-your-pond-plants-for-a-healthy-winter?srsltid=AfmBOoo7pwUTah2xSzrEjzrYzZIuLbP0gRZHfq56yqZV4qKgke7Mq5Xg. Accessed 27 June 2026.
Establishing Roses 101
This year is a big year for roses because we’ve totally revamped our rose selection. Now, our rose selection is handpicked just for front-range planting. A concern for growing roses this year is the wishy-washy weather. Because we had an extreme La Niña winter, warm and dry, there’s no saying how our spring will be. Whether cold or hot, roses need help getting established, even despite the term “hardy” on a rose’s label. They retain their hardy nature as the plants are establishing, but all plants, from the rose to trees, need help getting established. In this article, we’ll walk you through our techniques.
Planting Location
Before you plant a rose, first pick a spot. We presume you have the perfect spot for roses; however, if not, or if this is your first time planting a rose shrub, we’ve got you covered. Location is determined by the rose variety. If it’s a shrub-style rose, pick a spot that allows for room to grow and spread out. If it’s a dwarf shrub rose, you can look for spots between hedge rows or close to a house. The roses should have labels that display their full mature size and space requirements. Avoid planting under a tree, as the established tree will compete with the rose for nutrients and win (American Rose Society). A climbing rose, on the other hand, will require a structure to climb on, like a trellis, pergola, wall, etc. A climbing rose will likewise need to be trained to climb a wall, via placing horizontal wires for the rose to anchor to or stakes (Edmonson). Tying the roses with garden twine, tape, or wire is perfect for a trellis and an obelisk.
The amount of sunlight a rose receives, its protection from winter winds, and soil health likewise determine the rose’s health and lifespan. Roses need 6 to 8 hours of full sun, save for a few shade-tolerant varieties. Strong morning sun is the best for roses as it’s unlikely to fry foliage (Nelson). They also need well-draining soil, as roses dislike clay-heavy soils (Stark Bros). You should not plant roses in heavy clay soil.
Acclimating Roses
It’s not uncommon for roses to be grown in a greenhouse. A few we receive will probably be grown in one, though these roses will never be labeled as such. To be safe, it’s best to treat ALL new roses as though they’ve been grown in a greenhouse. Thus, they’ll need extra TLC to adapt to your yard or garden. First, you should allow a few days for roses to acclimate in ideal weather. There shouldn’t be any rain, snow, sleet, frost, or extreme heat in the forecast. Likewise, you should allow the soil to reach a consistent 50 degrees both during the day and overnight before planting roses (Stark Bros). A rose can survive in various soil temperatures once acclimated; it’s just sensitive for the first year. If temperatures are expected to drop below zero, bring the rose inside.
The delivery teams that transport roses from their greenhouses to our nursery don’t water the plants during transport, so we water them as soon as they arrive at Rick’s. Do the same when you bring them home. As long as they remain in containers, allow roses to dry out between watering to help them harden off. Place roses in the shade or semi-shade for a day or two before planting (Stark Bros). The rose can then be moved to a sunny spot for another day or two, still remaining inside the pot. A light breeze should be felt in spots where roses are placed during this “adaptation” period, as wind likewise helps roses harden off.
Roses can be planted after acclimation and once soil temperatures are consistently 50 degrees. You may see signs of stress, such as wilt or leaf loss, which is common as plants undergo transplant shock. The acclimation process, however, should help alleviate major leaf loss and transplant shock.
Planting Roses
A rose’s planting depth and hole size relate to location. If you plant a rose in a raised bed or location with prepared soil (soil has been repeatedly treated with amendments), dig between 18 to 24 inches in diameter and 14 to 15 inches deep (Nelson). The height of the bud union will determine the depth of potted roses (Nelson). A bud union is the location where new canes emerge and is covered in mulch or soil in cold climates (Arena Rose Company). To accommodate the size of the roses’ roots, give or take a few inches to these measurements if need be. When planting in compacted or untreated soil, the hole should be about 36 inches in diameter and 18 inches deep (Nelson). Aerating near the hole before planting is likewise helpful for loosening compacted soil.
A potted rose should then be carefully removed from its nursery container, gently breaking apart its roots if tightly bound. This is to avoid root encircling, which can be detrimental to any plant’s lifespan (Nelson). Place the rose in the hole dug for it, making sure the bud union is 2” below ground level (Nelson). Cover the bud union when returning dirt to the hole and water the plant thoroughly. Water daily for 3 weeks, especially if temperatures are over 80 degrees (Roebken). You can then limit watering to 2 to 3 days for 12 weeks, until the rose is considered fully established and needs only weekly watering (Minnesota). Water close to the base of the plant and avoid wetting foliage, because it attracts fungus and disease (Roebken). Winter watering is essential for the rose and should be done 3 to 4 times a month until temperatures are above 60 degrees. This technique will also work with bare-root roses; you must plant them either in April or late fall (Nelson). Cover roses with mulch for insulation and water retention.
Fertilizing Roses
Fertilizing roses the first year requires certain rules. You should never use a fertilizer with a high NPK ratio in the first year, which appears on fertilizer bags as a set of three numbers. For example, an NPK ratio of 10-10-10, 20-20-20, or 12-10-11 is too high for the first year. You should look for a slow-release, organic fertilizer (Roebken). One made with chicken manure is perfect! An ideal NPK ratio would be something like 4-5-2, 4-4-4, or 4-5-3. Sprinkle the recommended amount of fertilizer for a newly planted rose (the fertilizer company will have this information on the packaging), and every time you water, the fertilizer goes into the soil to feed the rose. During planting, use as much original soil as possible, opting for topsoil if it’s the only other option. Avoid planting with compost or spreading compost over the bud union in the first year. Fertilize the year after, during early spring and mid-fall. Avoid liquids the first year because of how chemically harsh they can be (Roebken).
Even though it can be daunting, perfecting the planting technique is essential for a rose’s health. Roses are a timeless garden staple that add color and elegance to any garden. Just because they require extra TLC doesn’t mean they should be avoided! If you’re interested in further reading, we’ve provided our sources below for reference. Happy gardening!
American Rose Society. “Right Rose – Right Place – American Rose Society.” American Rose Society, 18 Jan. 2023, rose.org/right-rose-right-place-2/.
Arena Rose Company. “The Anatomy of a Bare Root Rose,” Reagan Nursery. Com, 2000, www.regannursery.com/index.cfm/fuseaction/home.anatomy/index.htm. Accessed 30 Apr. 2026.
Edmondson, Megan. “How to Train and Tie-in Climbing Roses.” David Austin Roses – US, 8 Aug. 2024, www.davidaustinroses.com/blogs/rose-care/how-to-train-and-tie-in-roses. Accessed 1 May 2026.
Nelson, A.W. “Selecting and Planting Roses | Colorado State University Extension.” Colorado State University Office of Engagement and Extension, 10 June 2025, extension.colostate.edu/resource/selecting-and-planting-roses/. Accessed 30 Apr. 2026.
Roebken, McKinsey. “Rose Article.” Received by PFC. 1 May 2026. Email Critique.
(McKinsey is one of our favorite landscapers to work with. Her company is 2 In The Garden, her company phone number is (719)761-0289.)
Stark Bro’s. “Choosing a Location for Roses – Stark Bro’s.” Stark Bro’s Nurseries & Orchards Co., 2026, www.starkbros.com/growing-guide/how-to-grow/garden-plants/roses/location. Accessed 27 Apr. 2026.
University of Minnesota. “Watering Newly Planted Trees and Shrubs.” Umn.edu, 2018, extension.umn.edu/planting-and-growing-guides/watering-newly-planted-trees-and-shrubs.
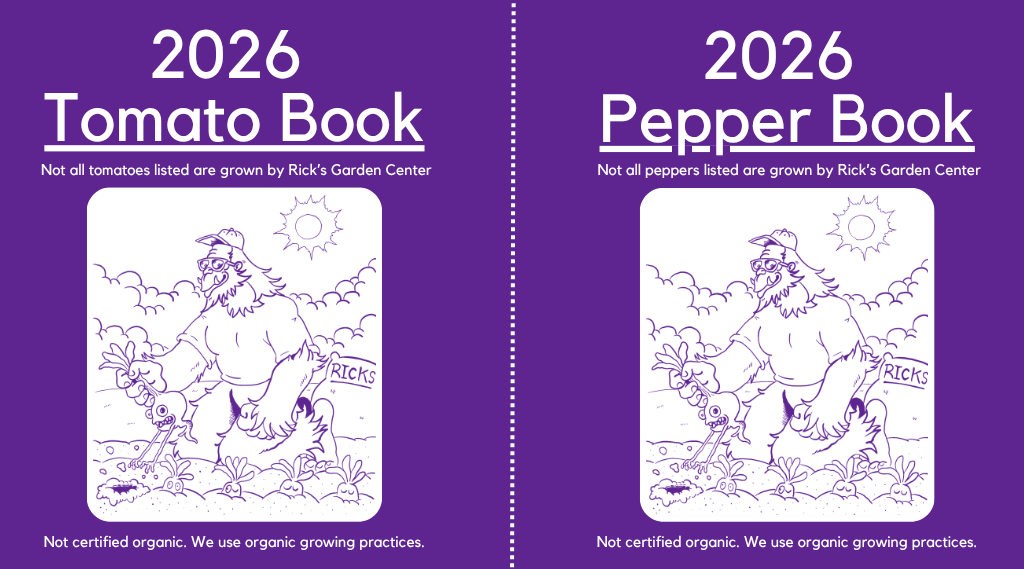
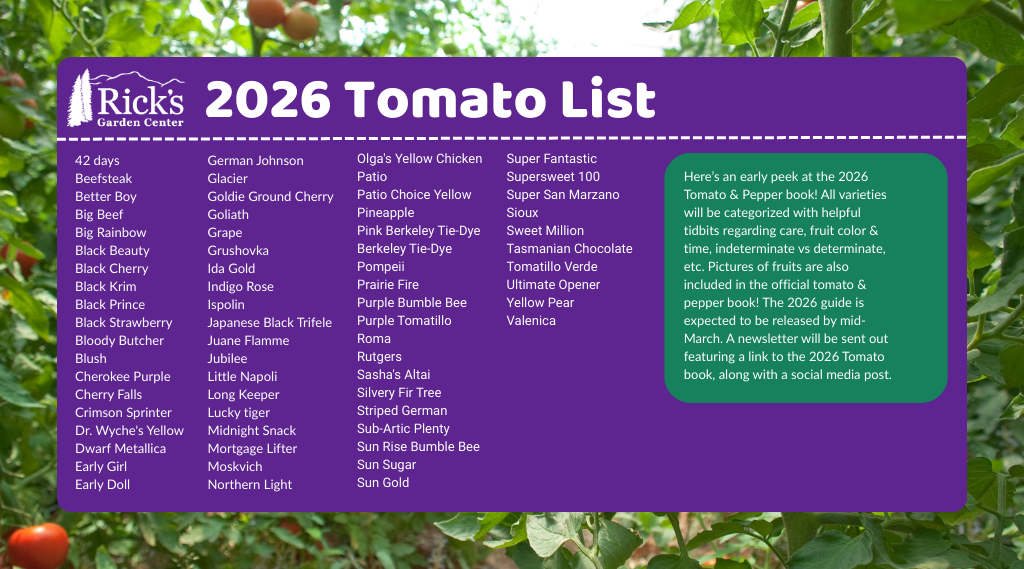
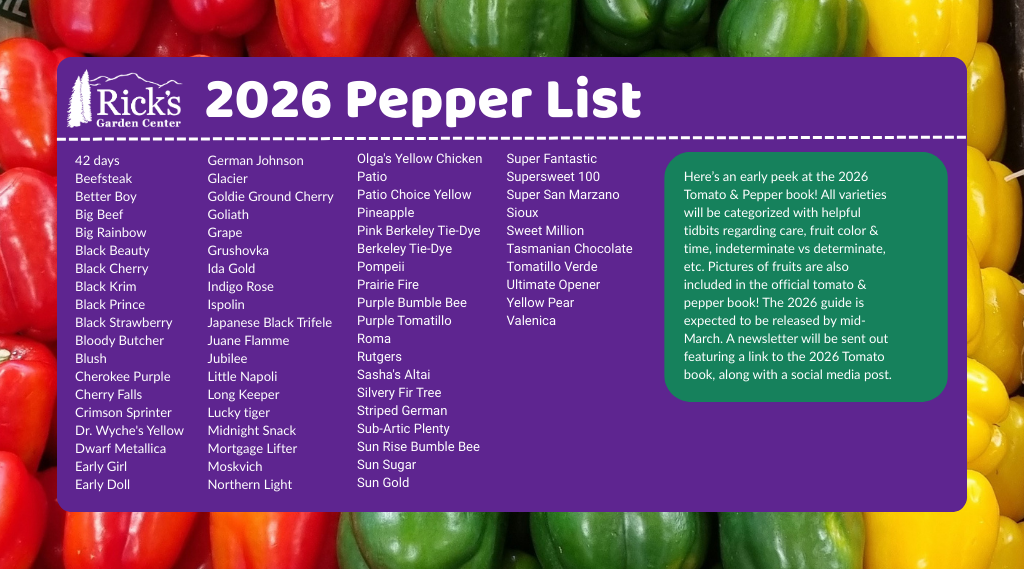
2026 Tomato & Pepper List
Protecting Tomatoes Against Heat
Temperatures are rising, and plants are taking a beating, especially tomatoes. From blossom loss to poor growth, this South American fruit can’t always beat the heat. “Tomatoes grow best at uniformly moderate temperatures between 65 to 85 degrees Fahrenheit,” claims Colorado State University, “This is why a high altitude, semiarid climate like Colorado with wide daily temperature swings is not a favorable area for tomato growing (PlantTalk, 2025).” It’s important to identify heat stress compared to fungal issues. We’re going to go over some techniques for identifying heat stress and keeping tomatoes cool!
Heat Stress Signs
Are your blossoms falling off the tomato plant? Or has their growth suddenly halted? What about wilting? These are all signs of heat stress in tomatoes. Blossom loss is caused by high temperatures interfering with pollination. Dry winds don’t carry pollen well, so blossoms go unfertilized and die off. Halted growth is caused by cool night temperatures and scorching hot day temperatures, the contrast induces stress. And wilt is caused by numerous factors, not just heat. If the soil is dry, then it may be caused by accelerated evaporation due to heat. Fungal wilt disease is another issue caused by heat, due to the combination of a moist environment and then sudden heat. There are several varieties of fungal wilt, so we recommend checking out this article to fight them accordingly: Click here!
Fighting Heat
Time to beat the heat! Anything that retains moisture and shields plants from the sun will protect your tomatoes. We recommend a shade hail cloth, preferably one with a percentage like 30% light blockage. This filtered shade cloth will allow the tomatoes to get enough light while also creating a cool environment. Shade cloth shouldn’t be draped on the plant, it should be supported by PVC pipe or a tomato cage. Plus, it will also protect against hail when it hits!
Applying mulch will help retain moisture. Apply mulch in vegetable beds and containers. Make sure not to layer mulch right against the stem of the plant. Leaving space between mulch and plants helps prevent further fungal infections. Make sure the mulch isn’t dyed either. Dye isn’t safe for human consumption. Leaf mulch will also do the same thing! Leaf mulching involves shredding leaves that fall from trees to make your own mulch! It retains moisture like shredded wood mulch but also gives back precious nitrates, helping your tomatoes grow! To make leaf mulch you can buy a leaf mulcher or smash them with a weed whacker or mower. It’s obviously July, so leaves aren’t expected to fall until autumn but garden centers often have leaf mulch piles people drop off for others to take. We certainly do! Give us a call before driving home to make sure we have bagged.
Regardless if you choose to add mulch you may have to water more as the heat increases. We recommend following Colorado Springs Utilities for watering times. But when watering, water deep. Use a bubbler sprinkler or slow-release irrigation system and water in intervals. This is so the water penetrates the soil and soaks deeper, ensuring lower evaporation rates. This also helps strengthen roots and drought immunity in the plant!
Fighting heat isn’t easy, Colorado is a semi-arid high desert after all. Not all tomatoes will survive super hot summers, but these cool techniques will help preserve them! Plus, these techniques can be used on other plants too, from vegetables to annuals!
“Colorado State University.” PlantTalk Colorado. Accessed June 26, 2025. https://planttalk.colostate.edu/topics/vegetables/1835-tomato-questions-abound-heat/.
Preventing Water Loss
We understand it’s not easy to garden this year-especially with how expensive watering can be. Trust us, it’s no easy feat to maintain watering our plants either. But we don’t think you should have to give up gardening entirely. Knowing and understanding water loss will help prevent it, saving you money and protecting the environment! Gardening is for everyone and water costs shouldn’t stop you.
Reduce Evaporation
Colorado is notoriously dry. Combined with a hot summer, it creates treacherous environments for gardens. “Thanks to capillary action throughout the soil, which draws water up from below,” says Rhonda Massingham Hart, author of “The Dirt Cheap Green Thumb,” “evaporation can deplete water from deep in the ground.” If you don’t want water to leave your soil, mulch over the top. Gorilla hair maintains water the best and as a perk clumps, so it won’t blow away either. Another good mulch is straw! And if you lay gravel on top, which is also an excellent mulch, it will keep the straw down for you. Gravel mulch however retains heat. In the dog days of summer, this can lead to trouble. If you’re interested in free mulch and willing to work up a sweat, check out the cities free mulch pile: Click here!
Likewise, consider putting down a drip system or soaker-style sprinkler head. Sprinklers that disperse through the air lose more water than these close-contact irrigation systems. If you don’t have the funds for an irrigation system consider purchasing or making olla pots! This technique hails from ancient Northern Africa & China and involves an unglazed terra cotta pot used for underground irrigation. Due to the porous nature of the unglazed terra cotta, the water leaches slowly into the soil. And because the olla put is partially buried or almost totally buried underground, water is less likely to evaporate. To make your own gather terra cotta pots (they cannot be glazed), plug the drainage holes, and place a lid over the top of it. To learn how to make your own olla pot, watch this short video: Click here!
You can also use plastic containers, like old milk jugs, to create olla pots. Wash out milk containers then puncture three holes on the bottom with a hammer and nail, knife, or other cutting tool. These holes shouldn’t be large. Bury the container up to the neck and remove the cap. Fill with water, screw the cap back on, and viola! Plastic olla pot! Keep an eye on when to refill your olla pot and tailor the size of the container to the plant. This too goes for terra cotta olla pots.
Amendments & Native Plants
You can add amendments to your soil to retain and even attract water. Ever heard of humus? Humus is essentially composted plant and animal matter, yet it’s different from typical compost. Our brand of humus we sell is made only with plant product and is one of thew few vegan style compost we provide. Dark in color and rich in nutrients, humus is also excellent at conserving water. Its presence within your soil lessens water percolation and keeps it “in reach” for plants. Likewise, it also slowly releases nitrogen, sulfur, and other essential amendments to plants over time. If you’d like to learn more about humus, read this article and scroll to pages 212-3: Click here!
On hot summer days, plants sweat like us. “One large shade tree can transpire several hundred gallons of water through its leaves,” remarks Rhonda Massignham Hart. While this tidbit of information seems contrary to the information above about reducing water evaporation, misting plants on especially hot days will likewise retain water. This shouldn’t be done every day however, reserve misting for only the hottest and driest of summer days. Native plants are less likely to transpire as non-native because they are adapted to Colorado’s semi-arid climate. If you’re tight on cash for water yet are looking to plant something new, always always ALWAYS choose native. Not only will these plants be saving you money but also you’ll also be helping the environment by returning native plants to the ecosystem! Don’t be surprised if your plants attract more beneficial bugs, birds, and even larger wildlife. Here at Rick’s we’re especially focused on trying to increase our native perennial selection for this reason. If you want certain qualities of native plants, here is a great way to select what you want before shopping at Ricks: Click here!
Conserving water doesn’t have to be scary or expensive. With these hacks, you’re sure to save on your water bill. Here at Rick’s, we’re excited to share more gardening tricks and tips. No one should ever have to give up gardening due to money or to the environment. Gardening is for everyone!
Protecting Our Watershed While Gardening & Landscaping
By Katherine Placzek
Every item that we use in our green spaces– fertilizers, pesticides, sprays, powders and granules, etc. all make their way into the water, after it rains or when we water our plants. This means a myriad of compounds, organic and synthetic, are making their way in our or someone’s drinking water. Yes, most of our drinking water is filtered, but this also impacts lakes, streams, aquifers, wells, and other sources of water that can be a habitat for other living organisms, big and small. While this may feel overwhelming initially, we have the power to make little meaningful changes in the way we manage our landscapes.
Lawn and Garden Fertilization
Three things make a difference here. Quantity, quality and timing:
Quantity: When you use fertilizer, always use the instructed amount of fertilizer or a diluted/ lesser amount. This ensures that your plants can take up the applied fertilizer and that excess is not making its way into our waterways. Excess fertilization can stress plants and negatively impact water quality. Over fertilizer use through agriculture, golf course maintenance, and community landscaping have contributed to dead zones in waterways. A dead zone is where all aquatic life ceases to exist. First, expansive algae blooms occur that crowd out sunlight, which choke oxygen out of the environment, causing inhabitable levels for any life, plant or animal. While some dead zones do occur naturally, the second largest one in the world is in the Gulf of Mexico, where many of North America’s waterways meet. This dead zone is widely attributed to human causes.
Quality: When choosing a fertilizer, it is advisable to read the ingredients, similar to reading food labels. If you cannot recognize an ingredient, know it is likely synthetic. Not all things that are human made are bad, but do your research. You may decide that you do not want some of these ingredients in your garage, home, yard, and local ecosystem. This is why Rick’s is proud to continue to carry our Organic Lawn and Garden fertilizers. Both of these are gentle fertilizers, with low nitrogen levels, and contain ingredients such as chicken manure, bone meal and blood meal.
Timing: Never fertilize before a severe rainstorm where run-off can take the majority of your fertilizer downstream. This is also cost prohibitive. If you plan on putting fertilizer down before predicted moisture, consider prior to a snowfall, where the melting snow can bring the fertilizer into the ground gently. Also read the instructions. Many fertilizers recommend a fertilizing schedule. Follow this, or see if you can stretch the schedule out further, to reduce the amount of fertilizer that you have to buy and apply throughout the year. Never fertilize more than what is recommended, this can stress the plant, and excess product will be absorbed into the waterways.
Pesticide Use
Pesticides include insecticides, herbicides, and fungicides. Similar to fertilizing, follow the same wisdom regarding quantity, quality and timing. We have said it before, but just to remind you: “While pesticides are convenient and sometimes necessary especially when mitigating invasive plant species, pesticides negatively impact pollinator numbers…. It is important to remember that while applying control products at night can reduce pesticide exposure to several pollinators/ beneficial species, this does not protect nocturnal pollinators such as moths and bats. When we use pesticides there is no current method that does not negatively affect pollinators or their second tier predators, who are further up the food chain (Excerpt from our March 2024 newsletter).” All of these pesticides reach water sources that are drinking water for pollinators and larger organisms: birds, fish, fox, deer, etc. Many of the chemicals used in popular pesticides, including glyphosate do not break down with water. This means the problem is washed downstream, but never away, and can exist in our waterways indefinitely. Manual removal of weeds is no fun- we all know this. When we choose conventional pesticides, we give up clean water. Limiting the amount of pesticides we use in our yards is one step to keeping our watershed less polluted.
General Maintenance
When you mow your lawn, consider mulching the cut grass instead of bagging it unless you use the cut grass in your compost. Mulched grass that has been chopped by the mower multiple times and is spread evenly over the lawn acts as a wonderful additive of organic material to the soil. This method improves water retention, and overall soil health, decreasing your need for fertilizer. If you mulch the cut grass, but leave large clumps of thatch, this can burn your grass and be swept away into a waterway. This process can act similarly to over fertilization, causing algae blooms downstream. Use the same logic with fall leaves. Mulch leaf litter and either use it on your lawn or in your garden, to add nutrition to the soil. Avoid abandoning leaves in gutters, and storm drains, as it increases excess nitrogen in the watershed. In the winter, make sure you are using a low saline and non-toxic ice melt as well. Water guardianship takes place in all four seasons!
Plant Selection
Finally, the fun stuff! Select plants and grasses for your landscape that are resilient to the Rocky Mountain circumstances. When we do this, we automatically reduce the need for mowing, fertilizing and the use of pesticides. Native plants especially, have been living here in the Colorado landscape much longer than any human lifespan. They have been taking care of themselves without any of our human care measures, such as fertilization, and will continue to do so into the future. I believe that by choosing to plant native plants in a landscape, you are actually simplifying your overall workload in the yard. You will fertilize less, you will use pesticides less, and regarding grass, you will mow less. That means more money in your pocket and more sitting on the back porch, sipping on a cold beverage. Cheers!
ECO-BRAN BRAN FOR GRASSHOPPERS DIRECTIONS
DIRECTIONS PULLED FROM PEACOCK INDUSTRIES BOOKLET ON ECO-BRAN
WE CLAIM NO OWNERSHIP OF GUIDE