Protecting Tomatoes Against Heat
Temperatures are rising, and plants are taking a beating, especially tomatoes. From blossom loss to poor growth, this South American fruit can’t always beat the heat. “Tomatoes grow best at uniformly moderate temperatures between 65 to 85 degrees Fahrenheit,” claims Colorado State University, “This is why a high altitude, semiarid climate like Colorado with wide daily temperature swings is not a favorable area for tomato growing (PlantTalk, 2025).” It’s important to identify heat stress compared to fungal issues. We’re going to go over some techniques for identifying heat stress and keeping tomatoes cool!
Heat Stress Signs
Are your blossoms falling off the tomato plant? Or has their growth suddenly halted? What about wilting? These are all signs of heat stress in tomatoes. Blossom loss is caused by high temperatures interfering with pollination. Dry winds don’t carry pollen well, so blossoms go unfertilized and die off. Halted growth is caused by cool night temperatures and scorching hot day temperatures, the contrast induces stress. And wilt is caused by numerous factors, not just heat. If the soil is dry, then it may be caused by accelerated evaporation due to heat. Fungal wilt disease is another issue caused by heat, due to the combination of a moist environment and then sudden heat. There are several varieties of fungal wilt, so we recommend checking out this article to fight them accordingly: Click here!
Fighting Heat
Time to beat the heat! Anything that retains moisture and shields plants from the sun will protect your tomatoes. We recommend a shade hail cloth, preferably one with a percentage like 30% light blockage. This filtered shade cloth will allow the tomatoes to get enough light while also creating a cool environment. Shade cloth shouldn’t be draped on the plant, it should be supported by PVC pipe or a tomato cage. Plus, it will also protect against hail when it hits!
Applying mulch will help retain moisture. Apply mulch in vegetable beds and containers. Make sure not to layer mulch right against the stem of the plant. Leaving space between mulch and plants helps prevent further fungal infections. Make sure the mulch isn’t dyed either. Dye isn’t safe for human consumption. Leaf mulch will also do the same thing! Leaf mulching involves shredding leaves that fall from trees to make your own mulch! It retains moisture like shredded wood mulch but also gives back precious nitrates, helping your tomatoes grow! To make leaf mulch you can buy a leaf mulcher or smash them with a weed whacker or mower. It’s obviously July, so leaves aren’t expected to fall until autumn but garden centers often have leaf mulch piles people drop off for others to take. We certainly do! Give us a call before driving home to make sure we have bagged.
Regardless if you choose to add mulch you may have to water more as the heat increases. We recommend following Colorado Springs Utilities for watering times. But when watering, water deep. Use a bubbler sprinkler or slow-release irrigation system and water in intervals. This is so the water penetrates the soil and soaks deeper, ensuring lower evaporation rates. This also helps strengthen roots and drought immunity in the plant!
Fighting heat isn’t easy, Colorado is a semi-arid high desert after all. Not all tomatoes will survive super hot summers, but these cool techniques will help preserve them! Plus, these techniques can be used on other plants too, from vegetables to annuals!
“Colorado State University.” PlantTalk Colorado. Accessed June 26, 2025. https://planttalk.colostate.edu/topics/vegetables/1835-tomato-questions-abound-heat/.

Planning For Trees
Gardening is for everyone, and that includes those who want a tree! How can this be? Not everyone has the space for these kinds of big plants. Not so fast-trees also include bonsai and indoor citrus too! Whether you want something decorative, fruiting, or just plain cool, we will help you pick and care for a tree that will thrive!
What To Look For: Location, Location, Location!
Trees are surprisingly delicate plants. Selecting the right plant, planting it at the optimal time, and choosing the ideal location is crucial for a tree to thrive. We’ll first go over site selection. Trees need space both above and below ground. Their canopies need to spread alongside their roots so they can establish themselves easily and live a long time. Keep in mind a tree’s full size before purchasing. If you’re lacking this space, a dwarf tree variety or even a shrub would be better.
Drainage also is important. Most soil in Colorado retains moisture poorly, however there can be areas with poor drainage in any environment. Picking a drought-tolerant tree would be best for soil that poorly retains moisture, the very best being a native tree. For a tree in a wet area pick one that enjoys damp soil, just don’t forget to water during the drier months!
Lastly, sunlight exposure is essential for trees (and generally all plants). Generally, trees need full sun but some don’t like bright hot light and prefer partial shade. Most trees we carry in our nursery will have little information packets attached to their branches about light requirements. If they don’t, our Ricksters are always happy to help!
What To Look For: Healthy Trees Please!
Now we get to the fun part: picking out the tree! Picking a healthy tree will benefit your wallet and the health of your garden or yard. An unhealthy or sickly tree can transmit disease and decay to other plants, so knowing what to look for while shopping is essential for everyone! Tree leaves shouldn’t be wilting, have discolored bark, odd spots, or oddly colored leaves. You shouldn’t buy a tree that has non-beneficial insects, like aphids or mealy bugs, on its leaves, branches, or bark. Trees should have evenly spaced branches and a central branch that acts as the main trunk. The Colorado State Forest Service suggests, “Tree foliage and branches should be distributed on the upper 2/3 of the tree.” Study the tree roots too. Are roots circling, appear pot bound or are suffocating the stem and trunk of the tree? These are all bad signs and this tree shouldn’t be purchased.
Why Natives?
Some trees will do better in Colorado than others. Native trees in particular are hardier and built for our drastic climate. Generally, they will also need less maintenance, like less watering, pruning, and insect control. Natives will thrive in Colorado hardiness zones, though there are always exceptions. A great place to check out native trees and shrubs is at Colorado State University Extension. Alongside pictures, each tab is filled with information about the plant’s preferred elevation, habitat, and more. Click the link to learn more: https://csfs.colostate.edu/colorado-trees/colorados-major-tree-species/
Planting
Trees have specificities when it comes to planting. When you choose to purchase a tree from our nursery, we’ll typically send you home with one of our tree-planting guides. It’s also available on our website, link located here for ease: https://www.ricksgarden.com/wp-content/uploads/2021/04/Ricks-Tree-Shrub-Planting-Guide.pdf .
We want to remind you to NOT FERTILIZE your tree for the first year! This can damage and even kill a tree. Trees are getting established in their new home and this is a stressful time. Applying fertilizer adds unnecessary stress in the first year.
Whether you choose a flowering crab apple or go the native route and pick a tree that easily establishes in our area, finding the right fit tree is what we should all strive for. A chosen tree should be picked to thrive in your yard’s microclimate. Once established, trees return the favor. Providing shade, habitats for animals and birds, cleaning the air and water, and limiting rain runoff are just a few of the reasons a tree can benefit the community. Likewise, trees increase property value and cut noise pollution! Trees are legacy gifts to the environment and to future generations. Whatever your reason is for choosing a tree we’re happy to help you do it right. Happy gardening!

Preventing Water Loss
We understand it’s not easy to garden this year-especially with how expensive watering can be. Trust us, it’s no easy feat to maintain watering our plants either. But we don’t think you should have to give up gardening entirely. Knowing and understanding water loss will help prevent it, saving you money and protecting the environment! Gardening is for everyone and water costs shouldn’t stop you.
Reduce Evaporation
Colorado is notoriously dry. Combined with a hot summer, it creates treacherous environments for gardens. “Thanks to capillary action throughout the soil, which draws water up from below,” says Rhonda Massingham Hart, author of “The Dirt Cheap Green Thumb,” “evaporation can deplete water from deep in the ground.” If you don’t want water to leave your soil, mulch over the top. Gorilla hair maintains water the best and as a perk clumps, so it won’t blow away either. Another good mulch is straw! And if you lay gravel on top, which is also an excellent mulch, it will keep the straw down for you. Gravel mulch however retains heat. In the dog days of summer, this can lead to trouble. If you’re interested in free mulch and willing to work up a sweat, check out the cities free mulch pile: Click here!
Likewise, consider putting down a drip system or soaker-style sprinkler head. Sprinklers that disperse through the air lose more water than these close-contact irrigation systems. If you don’t have the funds for an irrigation system consider purchasing or making olla pots! This technique hails from ancient Northern Africa & China and involves an unglazed terra cotta pot used for underground irrigation. Due to the porous nature of the unglazed terra cotta, the water leaches slowly into the soil. And because the olla put is partially buried or almost totally buried underground, water is less likely to evaporate. To make your own gather terra cotta pots (they cannot be glazed), plug the drainage holes, and place a lid over the top of it. To learn how to make your own olla pot, watch this short video: Click here!
You can also use plastic containers, like old milk jugs, to create olla pots. Wash out milk containers then puncture three holes on the bottom with a hammer and nail, knife, or other cutting tool. These holes shouldn’t be large. Bury the container up to the neck and remove the cap. Fill with water, screw the cap back on, and viola! Plastic olla pot! Keep an eye on when to refill your olla pot and tailor the size of the container to the plant. This too goes for terra cotta olla pots.
Amendments & Native Plants
You can add amendments to your soil to retain and even attract water. Ever heard of humus? Humus is essentially composted plant and animal matter, yet it’s different from typical compost. Our brand of humus we sell is made only with plant product and is one of thew few vegan style compost we provide. Dark in color and rich in nutrients, humus is also excellent at conserving water. Its presence within your soil lessens water percolation and keeps it “in reach” for plants. Likewise, it also slowly releases nitrogen, sulfur, and other essential amendments to plants over time. If you’d like to learn more about humus, read this article and scroll to pages 212-3: Click here!
On hot summer days, plants sweat like us. “One large shade tree can transpire several hundred gallons of water through its leaves,” remarks Rhonda Massignham Hart. While this tidbit of information seems contrary to the information above about reducing water evaporation, misting plants on especially hot days will likewise retain water. This shouldn’t be done every day however, reserve misting for only the hottest and driest of summer days. Native plants are less likely to transpire as non-native because they are adapted to Colorado’s semi-arid climate. If you’re tight on cash for water yet are looking to plant something new, always always ALWAYS choose native. Not only will these plants be saving you money but also you’ll also be helping the environment by returning native plants to the ecosystem! Don’t be surprised if your plants attract more beneficial bugs, birds, and even larger wildlife. Here at Rick’s we’re especially focused on trying to increase our native perennial selection for this reason. If you want certain qualities of native plants, here is a great way to select what you want before shopping at Ricks: Click here!
Conserving water doesn’t have to be scary or expensive. With these hacks, you’re sure to save on your water bill. Here at Rick’s, we’re excited to share more gardening tricks and tips. No one should ever have to give up gardening due to money or to the environment. Gardening is for everyone!

2025 Garden To-Do’s Recap 1#
Here are the gardening references we shared over the past month. We’re big fans of Colorado State University extension, so you’ll see us referencing them all the time. However, we also have some written articles just for you under our blog! There will be more gardening references for the year, so stay tuned!
Relative Houseplant Care/Rescuing House Plants:
Listen…shhhhh…if you listen closely, you can hear that neglected plant in the corner crying for help. You did not mean to cause harm. Whether you left for your holiday travels in a rush and failed to give your plants some extra TLC before you left, or you do not know the plant’s needs, the stress is equally killing you. You are at the point of not knowing what to do to make your plants happy again. No worries! We got you on our blog!
Starting Seeds Indoors:
We know it seems early, but the sooner you start your seeds the better. For tomato and pepper plants it’s recommended you start them outside once soil temperatures reach 50 degrees at night. This however doesn’t work well for Colorado’s short growing season. To get the most produce out of your vegetables we recommend starting seeds indoors now and in February! All you need is a seed-starting soil mix and a grow kit!
Seed Starting Troubles:
Have you been waiting for your seeds to pop up and still nothing? No matter what you do, your seedlings perish. There are multiple factors as to why your seeds may not be sprouting. Seed age, crusting soil, and temperature fluctuation are just a few. In the article below by CSU Extension, scientists review why your seeds may not thrive as they should. Fear not, solutions are provided to fix issues and to get those seeds growing! Happy gardening!
Winter Watering:
If air temperature is above 40 degrees it’s time to winter water! Read more about winter watering rules below!
https://www.csu.org/blog/winter-watering-tips
Do’s & Dont’s of Transplanting:
Want to get bang for your buck when starting transplants? Learn the dos and don’ts of growing transplants by copying and pasting the link below! And if you need containers we wanted to remind you we have a free drop off/pick up bin behind the store in our parking lot-perfect for starting seeds or other transplants (once they’re clean that is)!
Garden Planning:
Now’s a great time to start garden planning for spring! Remember to consider space when mapping your beds and companion plants! The links below will lead to more information about early garden planning and companion plants!
General Info:
Companion Plants:
General Onion Care:
Intimidated by growing and planting onions? How about storage, before and after planting and growing these flavorful bulbs? And what the heck does daylight have to do with all of it?
Among the hundreds of questions involving onions you may have, we’ve contacted the experts for their advice. Learn the essentials for onion care from Dixondale Farms!
Growing Potatoes at Home:
Want to try growing potatoes this season in your home garden? We have a link for you! We recommend reading Colorado State University article on the subject!
https://extension.colostate.edu/topic-areas/yard-garden/potatoes-in-the-home-garden-7-617
Spring Bulb Care:
Intimidated by growing spring bulbs? Don’t be with Colorado State Extensions help! Learn how to keep beautiful spring bulbs, corms, and roots alive by reading the article below or in our story/highlights. The article provides everything from choosing a perfect planting spot to planting depth for certain favorites Happy gardening!
https://extension.colostate.edu/topic-areas/yard-garden/spring-planted-bulbs-corms-and-roots-7-411
Rick’s Tree Planting Guide:
We know many of you are familiar with our Tree Planting Guide, so here it is again! This guide is perfect for those interested in buying a tree or about to plant a new one. We also sell mulch, root stimulators, and mycorrhizae for tree planting! Happy gardening!
https://www.ricksgarden.com/wp-content/uploads/2021/04/Ricks-Tree-Shrub-Planting-Guide.pdf

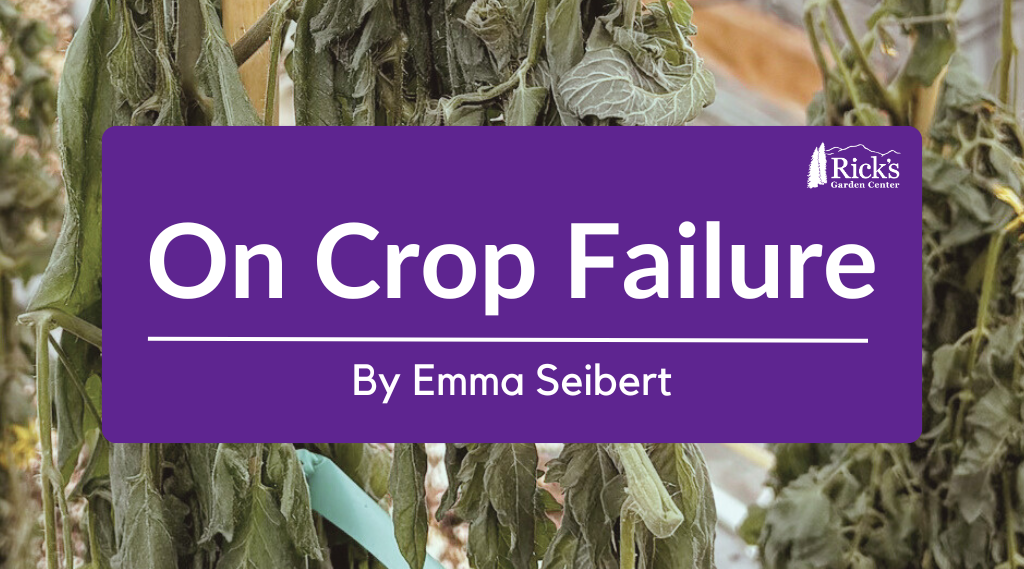
On Crop Failure
By Emma Seibert
A few nursery Ricksters had been growing tomatoes in our greenhouses this winter as an experiment. In hopes of helping gardeners sample certain varieties before they commit to growing, nursery crew member Emma was dedicated to growing tomatoes and selling them as produce over the winter. Accidents happen to the best of us, however, including garden centers. Though crop failure is tragic, it’s not a sign to stop growing. Rickster Emma will talk you through her recent experience with crop failure…
A regular part of my job, especially in the summertime, is helping customers troubleshoot the issues they are seeing with their vegetable gardens and flower beds. Sometimes customers come in and I am able to recommend different caregiving techniques that can help bring their plants back to full health. Other times, I have the unfortunate job of bearing the news that the plant in question is either beyond saving, or even more heart wrenching, that it is dead. And that is what I wanted to talk about today. Dead plants are a rather sensitive topic for most growing enthusiasts; whether you’re a farmer and the health of your crop determines your livelihood or you’re just beginning your houseplant collection, crop failure is painful.
On August 26th, 2024, I seeded 32 tomatoes to plant them in large farm troughs in one of our greenhouses, with the intention of sharing the organic, local greenhouse-grown fruit with you all during the cold winter months. We wanted to provide our community with locally grown, ‘out of season’ produce that was flavorful and that you all could feel good about purchasing, knowing exactly where it was grown.
On January 13th, 2025, the tomato plants were nearly touching the roof of the greenhouse. They were blossoming and nearly every plant was fruiting. The green globes that hung from the tender stems had a yellow hue, indicating that ripening was mere days away. The stripes on the Purple Bumblebee tomatoes were starting to darken and the folds in the skin on the Sub-Arctic Plenty were beginning to smooth out, firming up the skin and giving it a glossy appearance. The first harvest date was so close I could nearly taste the tang of the Sweetie cherry tomatoes.
Then that same evening, the heater in the greenhouse wouldn’t turn on, despite the thermostat readings dropping. For some reason the thermostat and the unit heater were not communicating, but we couldn’t figure out why. As I got in my car to go home that night, I tried to remain hopeful that something would kick on, that someone would be able to figure out what was wrong in the next 20 minutes before the store closed for the night; all while watching the temperature readings in my car drop below 32 degrees.
The morning of January 14th, I hustled to the greenhouse as quickly as I could. Before I could even open the door, I knew it was done. There was frost coating the inside of the greenhouse walls; it had gotten cold enough inside for the condensation from the previous day’s healthy plant transpiration to freeze, indicating to me that every tomato plant inside must be frozen too. I went inside anyway and saw what I already knew to be true; every beautiful plant was frozen in time. The leaves were slightly wilted but maintained their vibrant green color, iced over in the moment of their last breath. It turns out that the safety fuse in the greenhouse heater blew out the previous day, preventing the heater from turning on despite the thermostat telling it to do so. We were unable to replace it in time for that night’s low of 10 degrees. As the daytime temperatures rose, the cell walls thawed and tomato plants flopped in defeat, their fruit turning to mush in my hands.
I cried, really hard. For a long time. I am not telling you this story to make you sad or say woe is me and my little crop of tomatoes. I am telling you to try to be of comfort; crop failure happens and hurts at every stage. I am telling you because I want you to know that yes, crop failure is a fact of life in the horticulture world. And also, the pain associated with such loss is a fact of that life too. So if you come in to show me your plant that is struggling and I tell you that it is dead, know that I understand that pain too. And I will do my best to help you pivot your crop, like I did with mine.
After the sore task of digging up all of the spent tomato plants, I went back and seeded some other, more cold-tolerant crops. And soon, the greenhouse will be a miniature forest again, but this time of kale and spinach, lettuce, and Swiss chard. I am not perfect, and neither are you, and neither is anyone no matter the extent of their experience. We all have to pivot sometimes and just know that the pivot can be the seed for new success.
January 2025 Recap
Monday: Rick’s Highlights
On Mondays, we like to post about things happening around the store! There will be LOTS MORE in February!
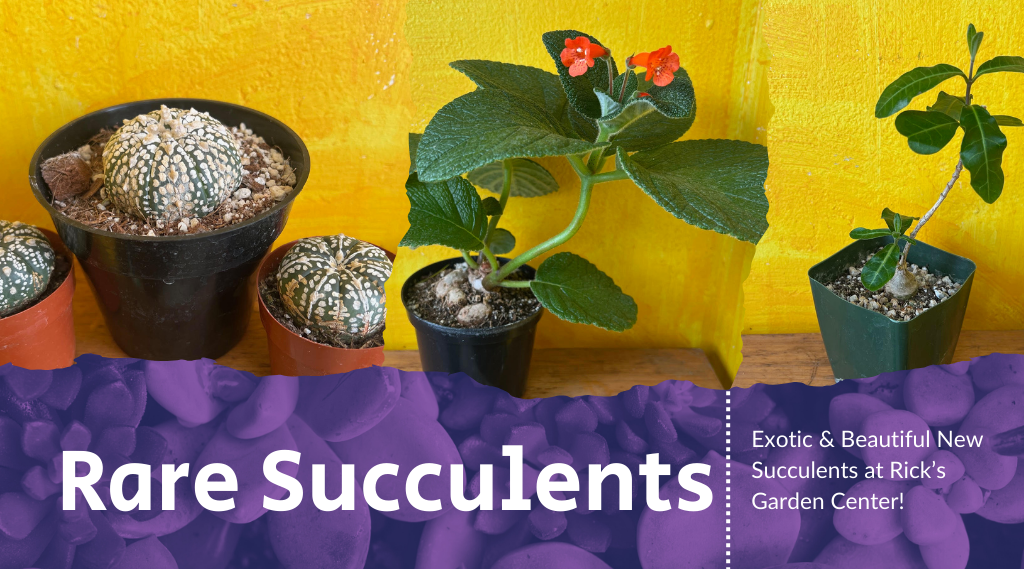
Astrophytum asterias Superkabuto
- Originate in Northern & Central Mexico!
- Sought out due to their beautiful white spotted patterns and semi-fuzzy texture.
- Occasionally even flowers! Flower color is white.
- Maximum size is about equal to a baseball!
Sinningia Hybrid
- Comes from Brazil!
- A perennial hybird of two different Sinningia, equates to a hardier plant!
- Similar to African Violets in terms of light needs.
- Misting soil required if plant goes dormant.
Raphionacme flanaganii
- Native range its from Kenya to E. South Africa.
- Produces vines that reach to 3′ long.
- Enjoys partial sun and shade.
- Occasionally blooms small fragrant flowers that green with a burgundy center.
Calibanus hookeri
- Native to North Central Mexico.
- One of only two species in genus, making this plant VERY RARE!
- Related to Ponytail Palms, somewhat pet safe.
ALL OF THESE PLANTS ARE CURRENTLY FOR SALE! We have a limited quantity, so hurry in before they’re gone!
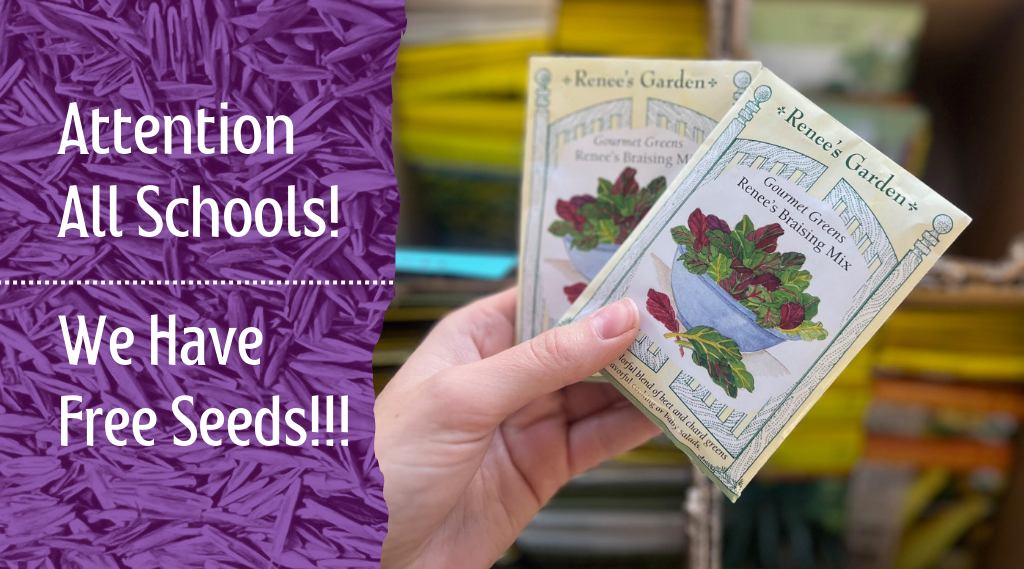
A select group of seeds are 2024 stock, so sales-wise they’re considered “expired.” However, that doesn’t mean they won’t sprout! We like to give our “expired” seeds away for free to places that need them, such as schools and other community centers. If you’re school is interested in seeds, please come into the store and show your school ID or community center ID at the front desk! Happy gardening!
We have both flower & vegetable 2024 seeds!
Tuesday: None
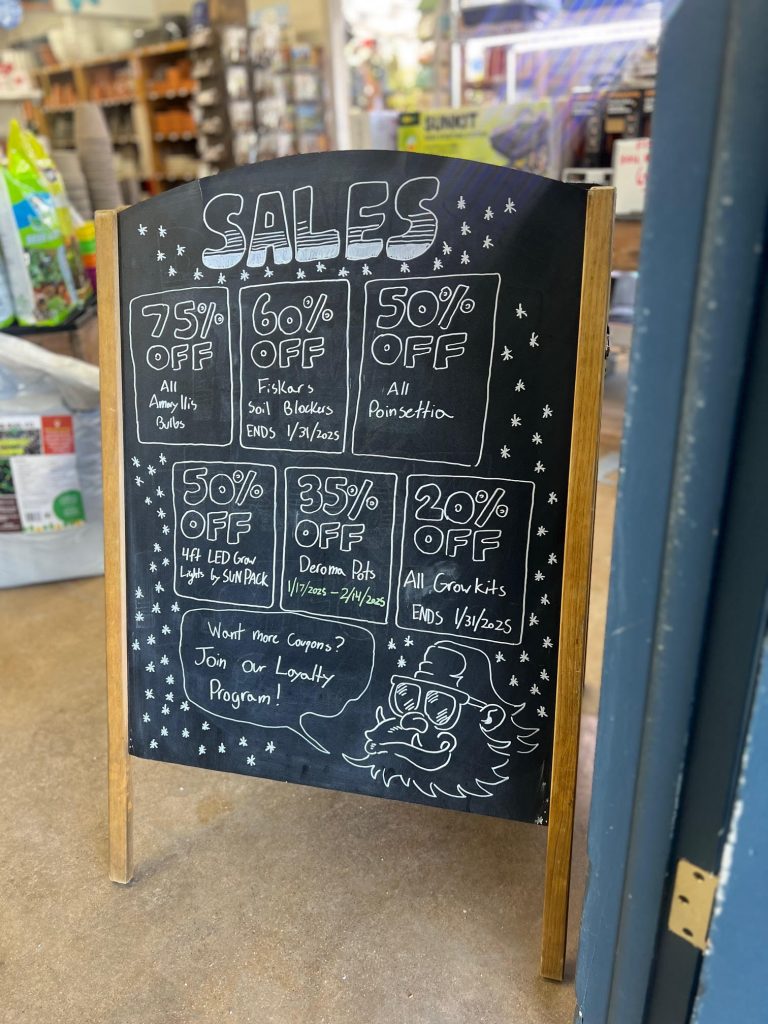
Wednesday: Sales
Thursday: Wild Card Days
Friday: Garden To-Do’s
Winter Houseplant Care: Listen…shhhhh…if you listen closely, you can hear that neglected plant in the corner crying for help. You did not mean to cause harm. Whether you left for your holiday travels in a rush and failed to give your plants some extra TLC before you left, or you do not know the plant’s needs, the stress is equally killing you. You are at the point of not knowing what to do to make your plants happy again. No worries! We got you on our blog! Click here to read!
Seed Starting Indoors: We know it seems early, but the sooner you start your seeds the better. For tomato and pepper plants it’s recommended you start them outside once soil temperatures reach 50 degrees at night. This however doesn’t work well for Colorado’s short growing season. To get the most produce out of your vegetables we recommend starting seeds indoors now and in February! All you need is a seed-starting soil mix and a grow kit! Click here to read!
Starting Seed Troubles?: Have you been waiting for your seeds to pop up and still nothing? No matter what you do, your seedlings perish. There are multiple factors as to why your seeds may not be sprouting. Seed age, crusting soil, and temperature fluctuation are just a few. In the article below by CSU Extension, scientists review why your seeds may not be thriving as they should. Fear not, solutions are provided to fix issues and to get those seeds growing! Happy gardening! Click here to read!
Saturday: Plant Factoids
Interesting gardening and plant facts! We include sources, so in case you want to learn more you can find that information!
“Proper light levels are important for the health of the rubber plant. They do best in medium to bright filtered light. Unfiltered, direct sunlight can damage leaves.”
-“1326 – Rubber Plant – PlantTalk Colorado.” Colostate.edu, 2025, planttalk.colostate.edu/topics/houseplants/1326-rubber-plant/. Accessed 18 Jan. 2025.
“Only feed or transplant a Norfolk pine (Araucaria) when they are actively growing (March through September). To supply nutrients any standard soluble fertilizer formulated for houseplants will do. Araucaria are slow growers and only need to be transplanted when they show signs of being root bound or have roots growing out the base of the container.”
-“1321 – Norfolk Island Pine – PlantTalk Colorado.” Colostate.edu, 2025, planttalk.colostate.edu/topics/houseplants/1321-norfolk-island-pine/. Accessed 25 Jan. 2025.
“Seedlings in soilless mixes need regular fertilization. Apply a water-soluble fertilizer at half-strength a week after seedlings germinate. Then fertilize every two weeks at full strength.”
-“1840 – Starting Vegetable Seeds Indoors – PlantTalk Colorado.” Colostate.edu, 2025, planttalk.colostate.edu/topics/vegetables/1840-starting-vegetable-seeds-indoors/?_gl=1. Accessed 1 Feb. 2025.
Sunday: Highlighted Products


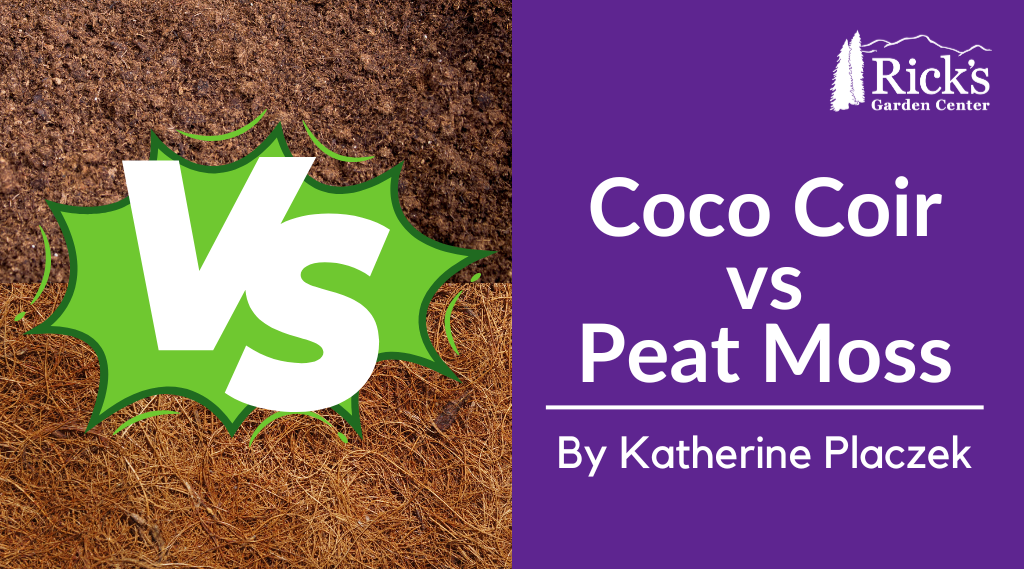
Coco Coir vs Peat Moss
By Katherine Placzek
Dear reader,
This article began initially with a straightforward trajectory. I was going to lay out why using peat moss in soil mixes is environmentally harmful and that we all should make the switch to using coco coir. But as I continued my research, I found it was not that simple and the subject required lots of continued digging to find accurate information. Instead, I am going to try to educate you on both substrates to the best of my ability.
Peat Moss:
Why is it used:
Peat moss has an incredible water retention capability- holding 20 times its weight in water. It also has a small but not insignificant amount of nutrients. You can pot a plant directly in peat moss and it will grow due to these nutrients. It is light and fluffy, used by many gardeners to lighten existing soils. It is highly acidic if not amended with lime, and shrubs like hydrangeas or blueberries can successfully be planted into peat. It also can be used as a pea/bean inoculant. It was not until the 1970s that peat became commonplace as a planting substrate for plant people.
How is it harvested/manufactured:
Peat bogs have centuries (possibly more) worth of plants and decomposing peat/sphagnum peat growing and compacting in a dynamic cycle and ecosystem. It is estimated that peat bogs contain more than 44% of all the Earth’s soil carbon and thus are considered a carbon sink (where carbon is stored and absorbed from the atmosphere). Harvesting practices vary in different bogs and countries. The majority of the peat sold in the United States is harvested in Canada. 95% of all peat in Canada is harvested in partnership with the Canadian Sphagnum Peat Moss Association (CSPMA). The CSPMA has strict regulations that they follow, and are involved in many ecological restorations, as well as scientific research behind peat bogs, and the living organisms that use the bogs as habitat. Many of their practices publicize that they attempt to reduce harm, prevent overharvesting, protect habitats, and replant as part of their aim toward sustainability. While this sounds good, in 2021, it was reported that peat harvesting released 2.1 megatonnes of carbon dioxide into the environment. That’s the equivalent emissions of the annual emissions of five gas-fired power plants. Critics also point out that rehabilitated peat bogs are unable to become a carbon-accumulating ecosystem (or a carbon sink) until roughly 20 years after harvesting. Harvesting in other countries is not regulated and they are likely not as concerned with any harm associated with their practices. All harvesting is mechanical due to utilizing fossil fuels. The UK has banned all peat sales for personal gardens beginning in 2024.
Factors to consider:
- Peat bogs house diverse and intricate habitats for all sorts of living organisms. Harvesting, regardless of practice, disrupts this environment.
- Peat bogs are considered carbon sinks- absorbing carbon from the atmosphere. Harvesting peat releases carbon into the atmosphere, causing concern that this practice contributes to climate change.
- Fossil fuels are used in the harvesting process and are used in the shipping of this product to garden centers and other plant/ home improvement stores.
Coco Coir:
Why is it used:
Coco Coir also has a high water retention rate, retaining 8-9 times its weight in water. It does not have any innate nutrients or pH implications, so it is a neutral starting point as a substrate. Coco coir is a waste product from all other food-grade products made from the meat/ milk of the coconut. Before the 1980s, millions of tons of coco coir were left to decompose in large piles, often taking close to 20 years to decompose. Now there is a market for this “waste product,” as a soil substrate.
How is it harvested/manufactured:
Many coconut plantations are based in the poorest countries, Sri Lanka, India, Vietnam, the Philippines, and more recently, in Central and South America and even Mexico. Coconut plantations are often monocultures that reduce natural biodiversity and cause displacement of living organisms. Coconut trees produce a lot of coconuts but do so at the cost of soil degradation. The coconut hull first is soaked in water (freshwater or saltwater) for a long time to break down the fibers on the hull. This process is called retting. The retting process generates water pollution. Among the major organic pollutants are pectin, fat, tannin, toxic polyphenols, and several types of bacteria including salmonella. While scientists are experimenting with treatment options, there does not seem to be a broad-scale accepted solution at this time. This wastewater is often returned to the local community’s water supply or the ocean. Then, either the coconut hulls can be highly processed through mechanical mastication, or beaten and broken down further by hand. This manual process creates a lot of dust, and workers are typically not provided any PPE (Personal Protective Equipment). Reports indicate an increase in respiratory illnesses in communities with coco coir processing. Many of the following processes, if mechanized, are achieved with fossil fuels. There are currently no regulations on the industry’s standards. I also found conflicting information on whether a second rinse with chemicals is necessary, so that is an additional set of pollution outputs to consider. In general, it’s harder to find reputable sources explicitly sharing information about coco coir. This makes me concerned about the transparency of the industry, as well as possible offenses that are intentionally hidden from the public’s knowledge.
Factors to consider:
- Many coconut plantations are monocultures, created by destroying native habitats for diverse organisms, thus causing soil degradation.
- Pollution of the environment due to wastewater from retting processes.
- The lack of regulations concerning this product allows for humanitarian abuses to occur, including health hazards for workers and the surrounding community.
- Fossil fuels are used in portions of the manufacturing process and in transporting this product to your local garden center.
I think continuing to use coco coir or peat moss warrants extra research. Dig into the companies that you are supporting. Do they have certifications, and third-party ratings that indicate that they care about their staff’s health and wellbeing? The environment and the community they impact? Their carbon footprint? Other points that you are passionate about?
All of this makes me consider, there have been gardeners and plants people before me who did not have access to these substrates. What did they use before? Compost. Manure. Leaves. Green manures/ cover crops. Aged forest products (humus). Straw. None of these probably have the water retention that peat moss or coco coir boast, but they all have higher nutrition, which means prior plants people did not have to fertilize in the same manner that we do when we utilize a peat or coco coir base. Many of these local inputs are also free. All of this is interesting and will lead to further research on my part.
The most honest conclusion that I can make is that, when we are removed from the product we are buying, we also become naïve of the ultimate cost and any negative impacts of the product. Perhaps, the point here is to grow plants that are acclimated to our growing habitat (for instance, native plants do not need peat or coco coir to thrive), or to build soil from what nature provides in our local vicinity. While this is easy to say, it is harder to do. I think this new knowledge is powerful, though. We can always experiment and try new things in hopes of finding replacements that have a lesser negative impact. Good luck with your own decisions ahead of you!
Soils that we carry that do not contain peat moss or coco coir:
Back to Earth-
- Composted Cotton Burrs (Acidified and Non-acidified)
EKO-
- Clay Buster
- Top Dressing
Happy Frog-
- Soil Conditioner
Rocky Mountain Soils-
- Top Soil
- Humus
- Compost Cow
- Tree and Shrub
Yard Care-
- Soil Pep
Note: We also carry a variety of only coco coir or only peat-based soils, if you decide you prefer one over the other.
Resources to utilize in your own research:
I think that Gardener Scott (A gardener in CO, who has an excellent library of YouTube videos on vegetable gardening) has a comprehensive video on the pros and cons of both of these substrates.
The link to the website that Gardener Scott references: https://www.gardenmyths.com/coir-ecofriendly-substitute-peat-moss/
Canada’s National Observer on the carbon footprint of peat harvesting: https://www.nationalobserver.com/2023/07/07/news/canadas-carbon-storing-peat-digs-climate-dilemma#:~:text=According%20to%20Environment%20Canada%2C%20about,of%20growth%20within%20those%20sites.
21 report on carbon sinks and greenhouse sources in Canada: https://publications.gc.ca/collections/collection_2023/eccc/En81-4-2021-1-eng.pdf
A Q&A with the Canadian Sphagnum Peat Moss Association (CSPMA):
The CSPMA’s website (includes the history of peat, how their manufacturers harvest peat, industry reports, and more) https://peatmoss.com/
Generalized information on how coco coir is made: https://www.madehow.com/Volume-6/Coir.html
Another source on how coir is made: https://coir.com/utility/how-to-make-coconut-coir-the-manufacturing-process/
A study linking coco coir to impaired respiratory function: https://www.thepharmajournal.com/archives/2023/vol12issue3/PartAR/12-3-455-522.pdf
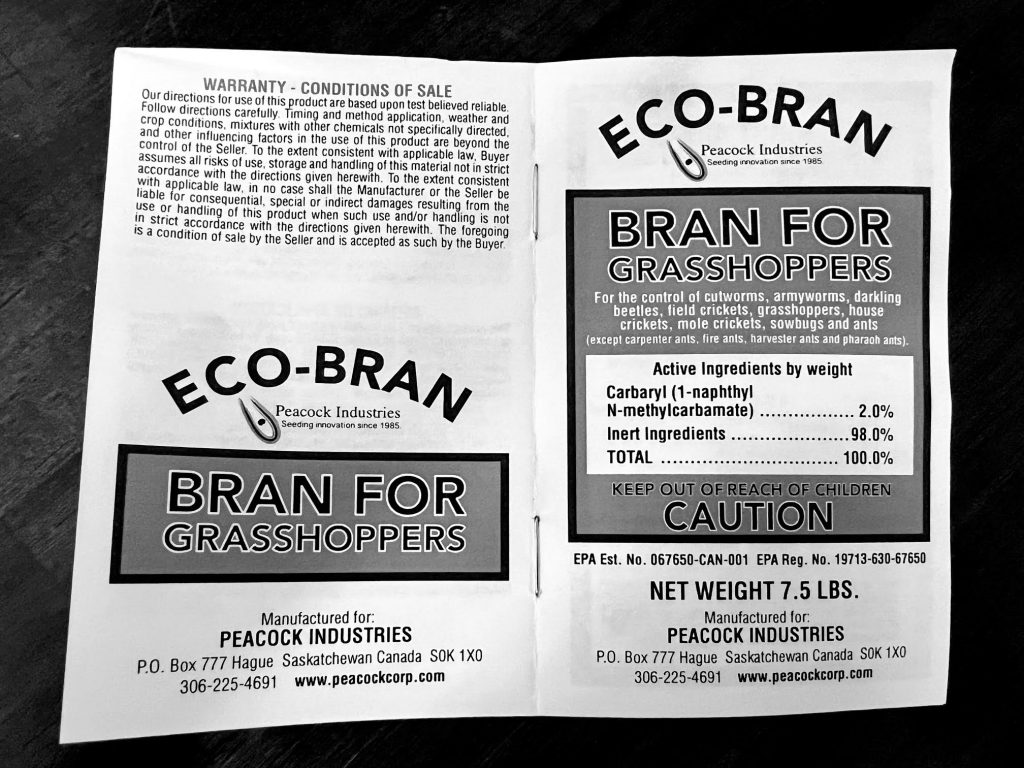
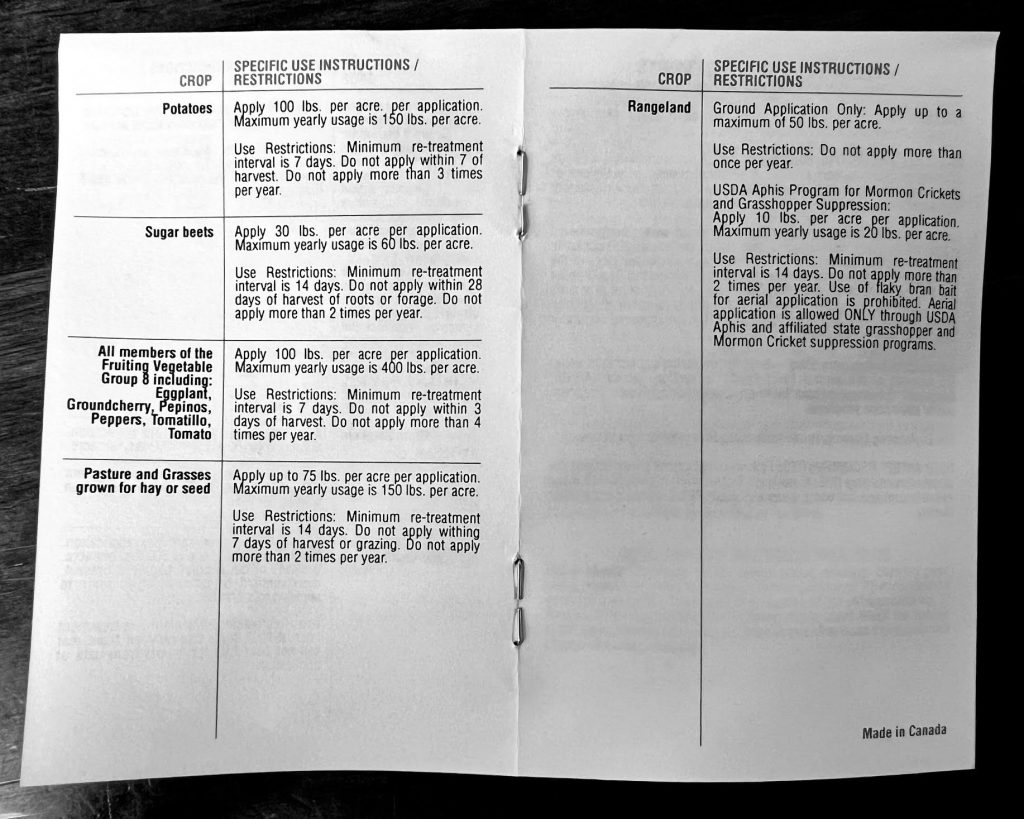
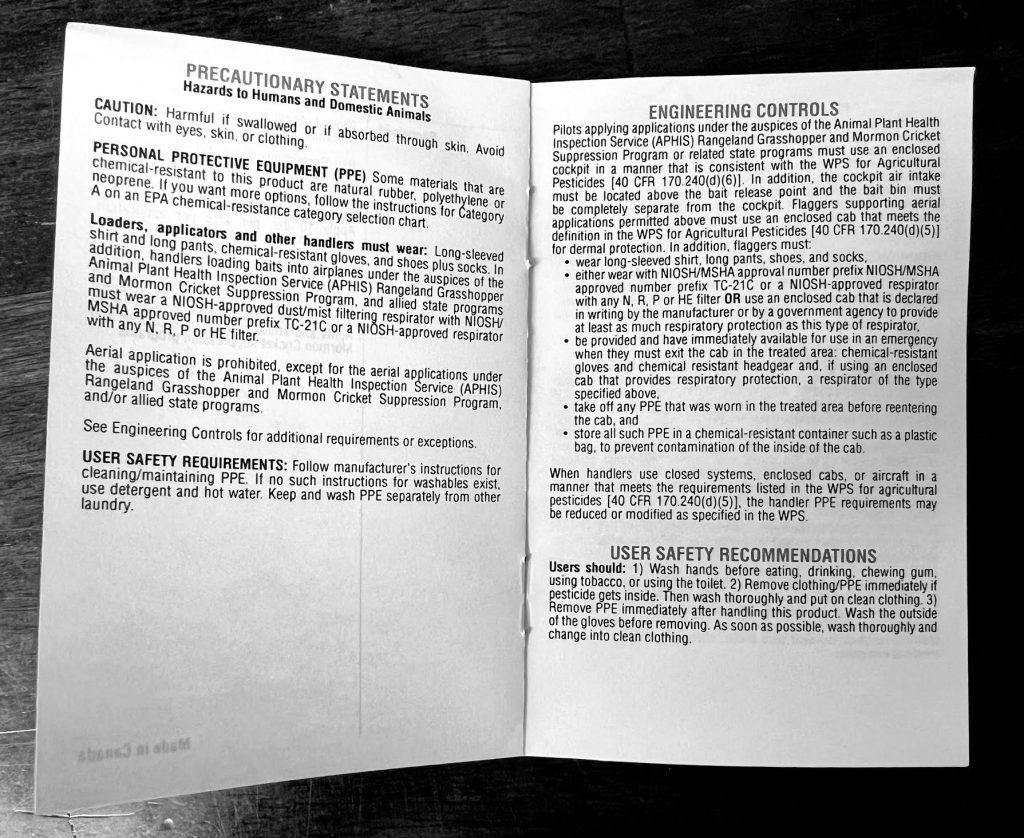
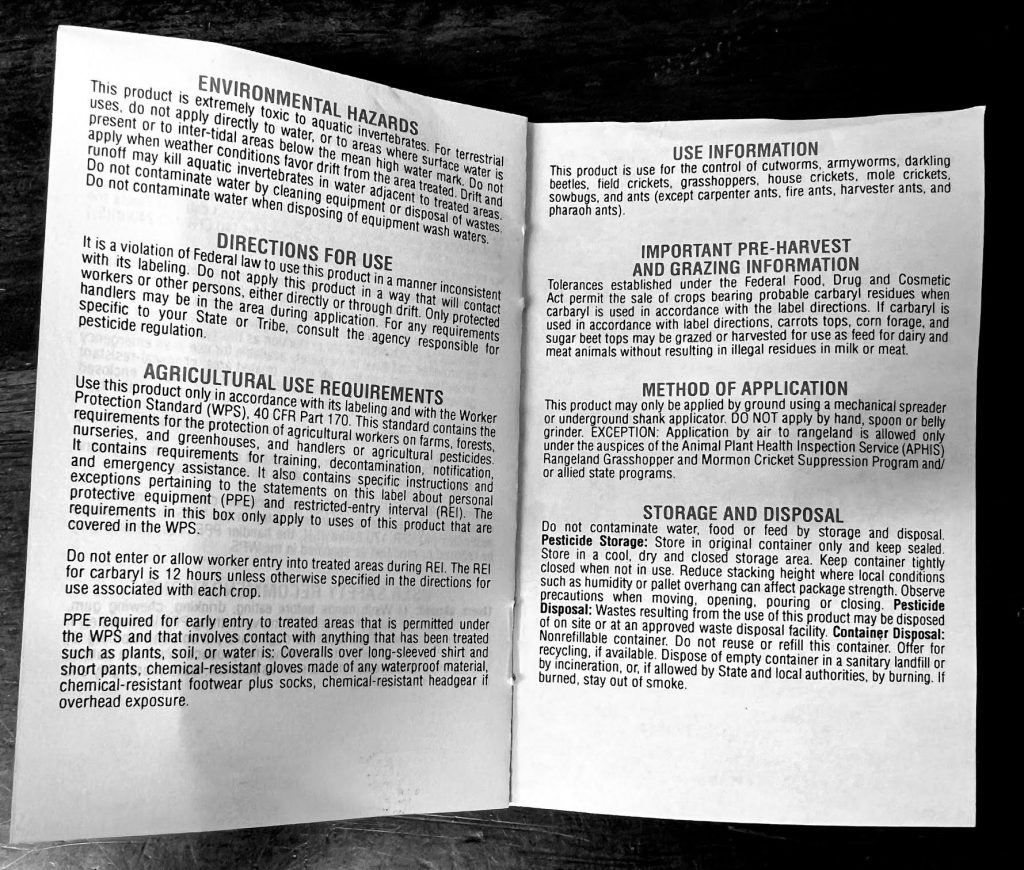
ECO-BRAN BRAN FOR GRASSHOPPERS DIRECTIONS
DIRECTIONS PULLED FROM PEACOCK INDUSTRIES BOOKLET ON ECO-BRAN
WE CLAIM NO OWNERSHIP OF GUIDE


Blossoms on Your Plate
Are you ready to elevate your gardening game to a whole new level of deliciousness? Well, we’re about to dive into the vibrant world of edible flowers that will not only make your garden pop but also your plate! Many of them are easy to grow, forgiving of rookie mistakes, and will reward you with an explosion of colors and flavors.
Nasturtiums (Tropaeolum majus): These deep burgundy to buttery yellow blooms have a peppery kick, perfect as a spicy twist to salads, tacos, and avocado toasts. Bonus: They’re easy to grow, thriving in poor soil and other neglect. These flowers are high in vitamin C. The entire plant is edible- so try out the lily pad-like leaves also! Deer resistant.
Calendula (Calendula officinalis): Often called “poor man’s saffron,” the golden petals of calendula add a subtle saffron flavor to rice dishes and soups. They’re sun lovers and can tough it out in the Rocky Mountain soil. This flower is also known for its skin-healing properties, consider making a toner with calendula flowers. Deer are typically not a fan of these flowers.
Pansies (Viola tricolor): These adorable flowers come in an array of colors and have a slightly sweet, grassy taste. Scatter them over desserts after dipping them in water and then sugar for a delicate but sweet touch. Or freeze them in ice cubes for fancy drinks. Pansies are cold-hardy and can withstand our unpredictable mountain weather. We had a pot of pansies survive the entire winter, even when temperatures dipped below 20 degrees!
Lavender (Lavandula angustifolia): Known for its calming aroma, lavender adds a delicate floral flavor to desserts, teas, and even cocktails. It thrives in well-drained soil, making it a great match for rocky gardens. We have several varieties that will survive year-round in our nursery area. Look for varieties such as Munstead, Hidot Blue, and Phenomenal. Due to the fragrance of these flowers, deer typically leave them alone.
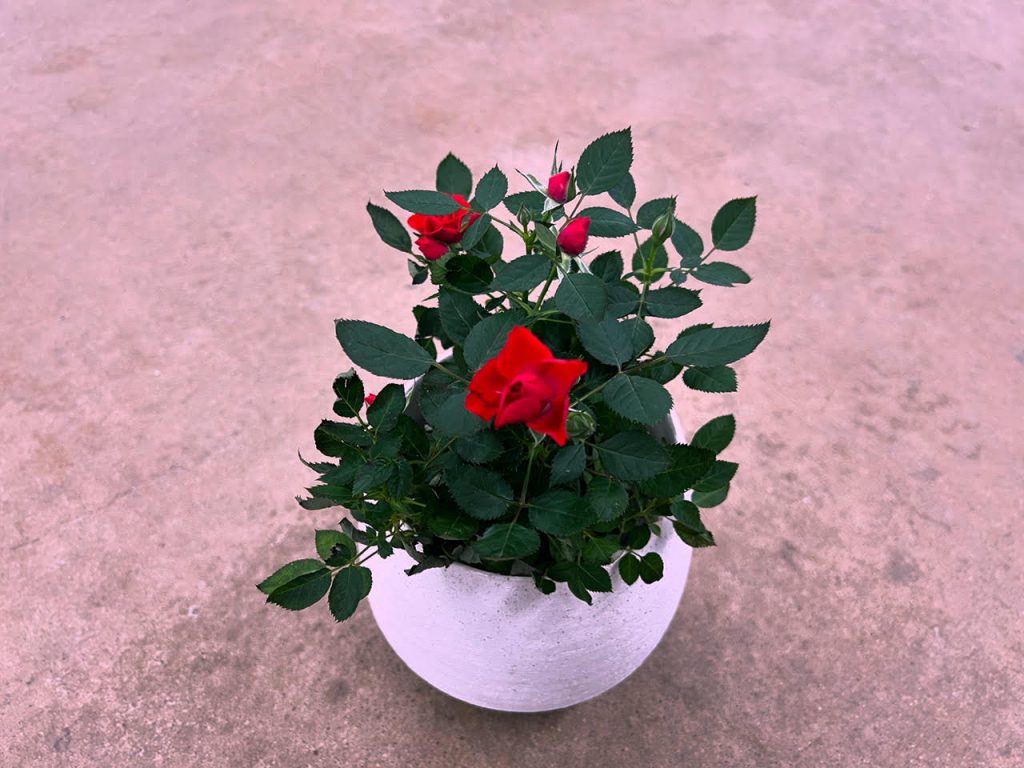
Rose (Rosa spp.): Beyond being a symbol of romance, roses can be used in various culinary creations. Make tea with their dried petals, infuse honey with their fragrance, or toss the petals into desserts. The rose hips that are produced in the fall are also edible and high in vitamin C. You can make tea from the rosehips as well. We have several varieties of roses, some more bred for their blooms, others are cultivated to be hardy for our mountainous climate.
Borage (Borago officinalis): With its brilliant blue flowers, borage adds a refreshing cucumber taste to salads, drinks, and desserts. The best part? Borage is a self-seeding annual, making it a low-maintenance addition to your garden. The pollinators will also feast on these blooms! Deer typically avoid this plant.
Chamomile (Matricaria chamomilla): Beyond being a bedtime tea, chamomile flowers can be used in salads or infused into syrups that go well in cocktails, over ice cream, or on pancakes. These sun-loving plants will thrive in our bright sun. Deer tend to avoid this plant due to its fragrance.
Dianthus (Dianthus spp.): Also known as pinks, or sometimes recognized as carnations, these flowers have a mild clove-like flavor. Add them to fruit salads, and desserts, or dry them and add them to various spice blends (za’atar, is a great example). Dianthus are hardy perennials, returning year after year. They are also deer-resistant.
Hibiscus (Hibiscus rosa-sinensis): Hibiscus flowers make a delightful and tropical addition to beverages, jams, and desserts. We carry gorgeous hardy hibiscus that will winter as a perennial shrub. Hibiscus also has high levels of vitamin C and is an excellent herb for overall health.
Daylilies (Hemerocallis spp.): Despite their fleeting beauty, daylilies are edible and offer a slightly sweet flavor. Stuff the blossoms with a soft cheese, or add them to stir-fries. Do your research on whether you have a daylily, before digging into a meal. Not all species of lilies are edible. These hardy perennials are a reliable choice in our climate.
Elderflower (Sambucus nigra): Fragrant elderflowers can be used to make refreshing beverages like elderflower cordial or add a subtle floral note to desserts. Elderflowers come from elderberry bushes, so you will also be able to eat elderberries if the birds don’t beat you to it! These shrubs are well-suited for the mountain environment, making them a great choice for your garden.
So, whether you’re a seasoned horticulturist or a budding green thumb, dive into the world of edible flowers and turn your garden into a culinary masterpiece. After all, why just stop and smell the roses when you can toss them in a dish too? Happy gardening and bon appétit!

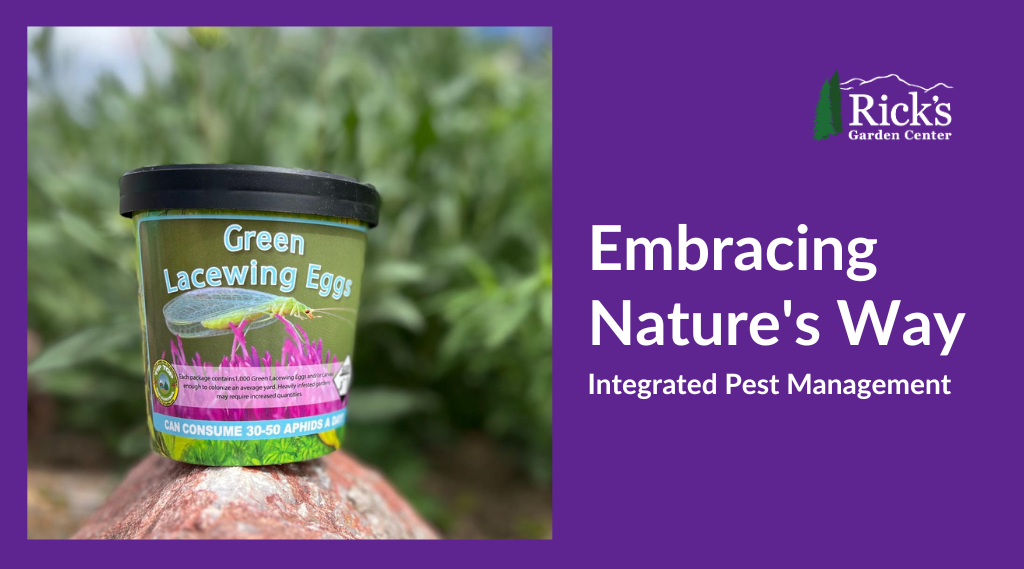
Embracing Nature’s Way: Integrated Pest Management
Integrated Pest Management is like the Gandalf of gardening – a wise, all-encompassing strategy that balances the forces of nature to keep your greenery flourishing. At its core, IPM is a holistic approach that combines biological, cultural, and physical/ mechanical control methods to manage pests and diseases. Instead of reaching for a pesticide or other control products, we tap into the power of Mother Nature herself to maintain a thriving and balanced ecosystem.
Some of our IPM practices include:
- Biological: Releasing ladybugs or other beneficial insects inside our greenhouses, or hoop houses to feast on those insects that are a bother; aphids, scale, mealy bugs, leafhoppers, etc. We also let spiders do their good work eating larger insects, like grasshoppers.
- Cultural: Reducing watering if fungal or pest problems crop up.
- Mechanical: Manually removing bugs from plants by hand or with water (aphids, mealy bugs, scale, potato bugs, etc)
While we lean into biological, cultural, or mechanical solutions, the last part of IPM is responsibly utilizing chemical products to rid of pests. This means we use more natural controls, such as Neem oil or Spinosad Soap, before other products. It is also important for us to factor in when pollinators or other beneficial insects may be around. So we try to spray when these individuals are not active. We also follow recommended application methods to avoid pollution of our environment or incur undue costs.
Why does Rick’s Garden Center Choose IPM Over Pesticides?
Environmental Harmony:
- Pesticides can disrupt your garden’s delicate ecosystem – effective, but with unintended consequences. IPM, on the other hand, dances with nature rather than against it. By embracing natural predators, beneficial insects, and environmentally friendly practices, we create a harmonious balance that keeps the pests at bay without harming the environment. By mostly avoiding synthetic chemicals, we reduce the environmental impact and create a garden that’s both beautiful and a haven for beneficial insects and wildlife.
Economic Sense:
- Let’s face it – pesticides can burn a hole in our pockets. IPM, however, is cost-effective in the long run. By relying on natural solutions, we reduce the need for constant reapplication of expensive chemicals, improving our bottom line.
Happy and Healthy Plants:
- Picture this: a garden where plants are not only surviving but thriving. That’s the magic of IPM. By addressing the root causes of pest problems and fostering a healthy soil environment, we ensure that your green companions are resilient and ready to face whatever life throws their way.
Community Connection:
- We believe in building a community that shares our love for the earth. By choosing IPM, we invite our customers to join us in creating a garden that is a testament to the power of working hand in hand with nature.
At Rick’s Garden Center, IPM isn’t just a gardening strategy – it’s a philosophy. It is about embracing the rhythms of nature and inviting others to join us toward a more sustainable future. So, next time you visit, know that you are not just buying plants; you are becoming a part of our eco-minded family.