Growing Onions 101
Our onion, leek, and shallot sets have just arrived, which means it’s soon time to plant them! These flavorful plants are a clear favorite for cooking around the world and are surprisingly easier to grow than most expect. But there’s a first time for everything we understand, so with the recent arrival of these bulb producers, we thought we’d write an easy guide to allium care! So, don’t sweat about day length, fertilization, fungal disease, and soil types; we’ve got you covered!
Onion Day Length Guide Explanation
Figuring out and finding an onion that fits your area’s “day length” standards is initially intimidating. “Day length, that is, the duration of daylight hours within 24 hours, is influenced by the Earth’s tilt. Thus, various amounts of light reach different parts of the Earth throughout the year. Likewise, latitude influences what onions you can and can’t grow. Places with higher latitude (the closer you get to the poles), your day length is extended in summer” (Jameson). This is flipped for places closer to the equator in winter. Certain onions won’t survive beyond the equator, while others won’t survive near the equator, as onions are extremely light-dependent. Now, to keep it simple, our store typically only carries onion varieties suitable for Colorado, which typically has Intermediate-day summer growing periods. You can likewise grow Long-day onions further North in our state. To find out what day-length range your state is, click the link here: Click me!
Planting Time
“Plant onion sets from April to early May (for zone 4) or four to six weeks before your last frost date. If your soil isn’t workable, onion sets can be stored for roughly three weeks in a cool, dark, and well-ventilated space” (Dixondale). DO NOT put them in water.
Perfect Soil
One perk about onions is that they grow well in a variety of soil types! “So long as your soil has excellent drainage, to avoid rot, you can grow onions in sandy or clay-dense soil” (CSU). Just make sure to amend said soils with organic material to generate better aeration (especially for clay soils). We recommend organic materials, such as Cotton bur compost or humus, to help. The onions wouldn’t shy away from nutrient-dense soil! “To amend soil for onion beds, you’ll apply 1 1/2” of green compost or humus over the desired beds, and work said material 8” deep into the soil” (CSU). Likewise, the spot onions will be planted in MUST HAVE good sun (exemplified in the day-length paragraph).
Fertilizing
Start strong with fertilizing your onions by testing your soil. You’ll want a nutrient-rich soil with a balanced NPK ratio with no excess. “Onions require a good dosage of nitrogen; however, too much leads to early maturing and produces poor bulbs. While liquid fertilizers are fine for onions, slow-release solid fertilizers are better, especially if they’re organic. You’ll side-dress onions to fertilize them by scratching in the slow-release fertilizer above ground six inches away from the onion plants. You will want to do this after roots establish and only once or twice per growing season” (UM).
Watering
“Onion roots are shallow and thus sensitive to changes in moisture. Make sure to water frequently, never allowing their soil to dry out. If you allow them to dry during the bulbing stage, bulbs will be small and leathery” (CSU). Our 2025-2026 winter has been dry, and our summer will be too (most likely), so make sure to water your onion sets from now until harvest. An inch of water a week should be perfect, but keep a close eye on them regardless. “Cease watering entirely by August, or when the tops of the plant lie over on the ground. The food made in the leaves will supply the onion with nutrients from this point on” (CSU).
Fungal Issues & Insects
Sadly, it’s not all champagne and caviar with growing onions. “One infamous insect that loves onions are thrips” (CSU). These tiny flying lice-like bugs feed by puncturing leaves and sucking out the sap. They especially love onions, so non-systemic insecticides are essential for keeping them away and exterminating them. Onions also suffer from various fungal issues and diseases, from purple blotch to mildew. Always stick to organic fungicides when protecting onions and never systemics, otherwise you won’t be able to enjoy your crops! If you’re interested in learning more about onion diseases and fungal issues, check out a few articles featured below:
Disease & Fungus: Click me!
Insect Control: Click me!
Soil-Borne Diseases: Click me!
Weeds
Onions are susceptible to weed choking. “Get onion beds free from weeds with organic preemergents (such as corn meal), raking them into the top inch of the soil” (Dixondale). Preemergents will halt weed seed germination for six weeks, but established weeds will remain. Do not use any other herbicide and weed by hand with a hoe, dandelion popper, etc.
That’s just the basics when it comes to growing onions, shallots, and leeks from sets. For further questions, we highly recommend you check out the sources below or the others featured within this article. Feel free to visit the store for help from our staff or email Colorado State Extension Q&A for questions. Don’t let the onions frighten you, happy gardening!
Jameson, Molly. “Understanding Short-Day vs. Long-Day Onions | Panhandle Agriculture.” Ufl.edu, 2024, https://nwdistrict.ifas.ufl.edu/phag/2024/07/26/understanding-short-day-vs-long-day-onions/
“1808 – Growing Onions from Seed – PlantTalk Colorado.” Colostate.edu, 2025, https://planttalk.colostate.edu/topics/vegetables/1808-growing-onions-seed/
“Growing Onions in Home Gardens.” Extension.umn.edu,https://extension.umn.edu/vegetables/growing-onions
“Onion Planting Guide – Dixondale Farms.” Dixondale Farms, 16 Apr. 2020, https://dixondalefarms.com/onion-planting-guide/?srsltid=AfmBOopg3208TqFNnzA7QA7bRfa1G1ElBS05UPDSmU2tczB506uMrrrB
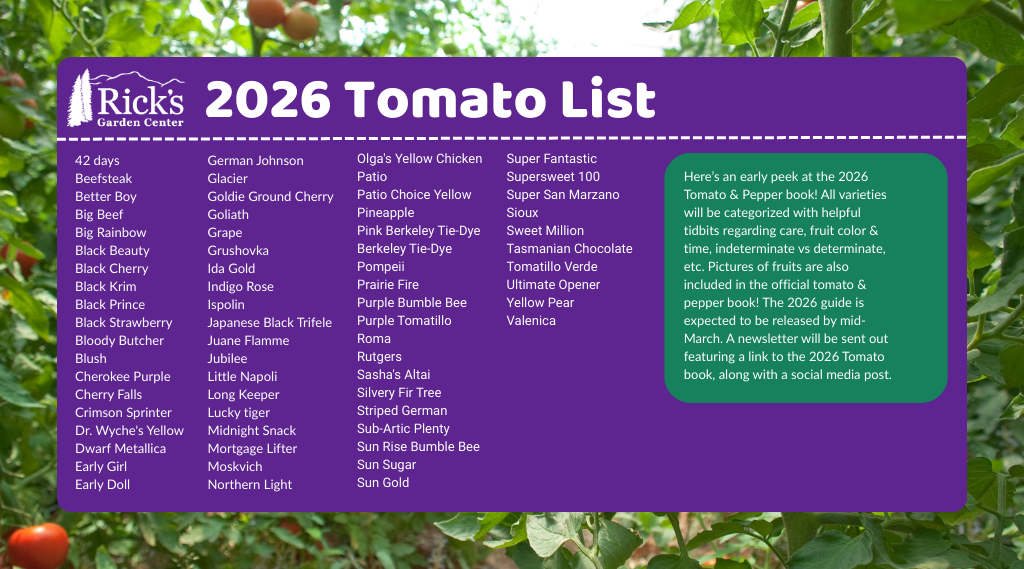
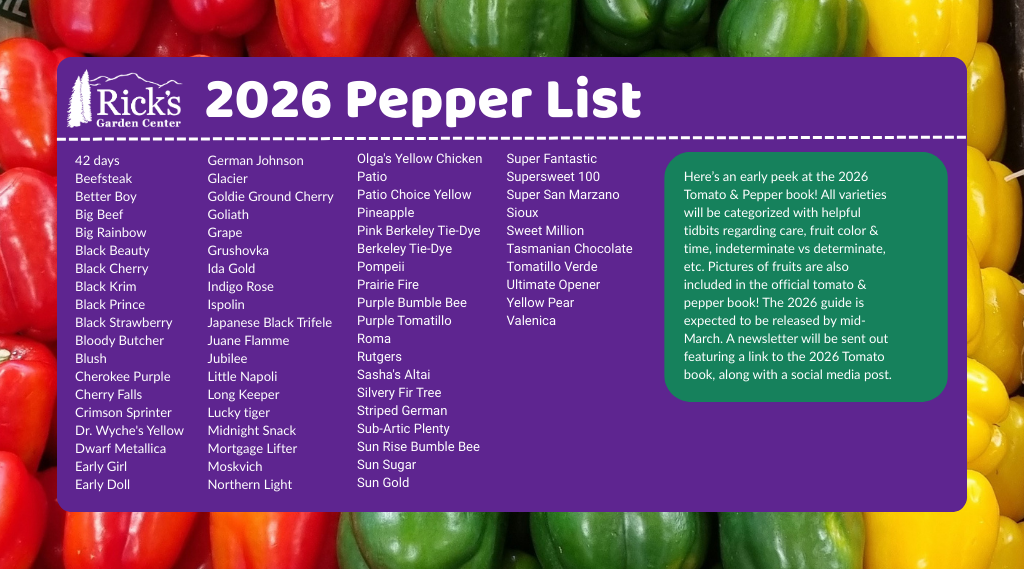
2026 Tomato & Pepper List
Colorado Seed Starting 101: Advice From Rick’s Grow Team
If you want lots of fruits and veggies come summer, the best gardening advice we can offer you is to start early and indoors. Colorado’s growing season is too short for many garden favorites. Eggplants, peppers and tomatoes do not have enough time exclusively outdoors to produce a bountiful harvest. That being said, we’d like to share some of our own techniques for extending the season. Starting seeds inside is the best way to get this jumpstart on the season. And I can thank our spectacular Grow Team, particularly Emma & Jenn, for the helpful advice! If you are a seasoned gardener, or this is your first season growing a garden, enjoy some of our best tips for being successful at seed starting.
Days To Maturity & Pre-Planting
As previously mentioned, Colorado’s growing season is short. When I visited Missouri one time, I was amazed that communities had tomatoes ready to harvest by June, and all of them were grown outside, from seed! Colorado gardeners can have full bushels of tomatoes come June also; we just have to start early and indoors. The best way to plan for this is to research days to maturity for each plant and start according to these specifications. Depending on when the plants reach maturity, you should sow seeds indoors an additional 4 to 6 weeks before the last frost date. For example, peppers need about 85 days to reach maturity. With a bit of math, 85 days turns into 12 weeks. Maturity refers to the number of days it takes the plant to produce fruit. Add four to six weeks on top of that for germination, then research your area’s last frost date through a trusted weather channel. Colorado Springs is typically on May 8th or even Mothers Day. Just to be safe, we’ll use Mother’s Day as a guide for our planning going forward. Subtracting roughly 14 weeks from May 10th means the optimal planting date is January 18th. A little late, but that doesn’t mean you can’t plant peppers; they’ll just fruit a little later! You can find maturity information on the back of seed packets. We’ll also provide a link below this paragraph to one of our favorite references, Colorado State Extension, and their incredible Colorado Vegetable Guide. Click here to read!
Drainage, Drainage, Drainage!
A major seed killer is overwatering, which is easy to do. However, raw seeds need to remain moist until cracking appears, which creates a conundrum in terms of watering. Both Jenn and Emma recommend a combination of fine-draining growing medium and special watering techniques to avoid this. In terms of growing medium, our Grow Team actually starts seeds in vermiculite. It has to be coarse for the best aeration, but if you water less, fine-grade is alright. Seedlings will stay in vermiculite for two weeks, then will be transplanted into a special seed soil or Foxfarm’s Happy Frog soil. Why do we not keep seeds in vermiculite permanently until they can go into larger pots? Vermiculite isn’t great at storing nutrients for seedlings, which obviously isn’t a benefit if you want to grow delicious, healthy, and strong vegetable plants (or any plant). And in terms of watering, we use misters, not watering cans or a hose. Keep the medium moist but not soggy. It’s the Goldilock’s ideal for the seeds!
Warm Bottoms, Cool Tops
A trick to creating a perfect environment for seeds, Emma told me, is to keep the following phrase in mind: warm bottom, cool tops. She and her grow team raise a majority of our vegetable starts in one of our many greenhouses, including a major crop of our tomato varieties. In the greenhouse, we have enough space to use heating mats, and regulate temperature with a greenhouse heater. We also understand many readers aren’t as lucky when it comes to such growing conditions. If you live in an apartment, a small home, or are on a budget, where do you even start, much less keep in mind the mantra “warm bottoms, cool tops?” Let’s translate the quote and make alterations. Seeds should have a warm and inviting substrate to thrive in, preferably one heated by a heating mat. Hence, the “warm bottoms” of the first half of the mantra. Whether growing in a greenhouse or at home, we always recommend a heating mat. It emulates summer growing temperatures that vegetables, like peppers, need. We carry various heat mats, some with timers and others without, that would work perfectly for a smaller grow setting. These mats should be set between 80 to 70 degrees Fahrenheit.
What about the meaning of “cool top?” In our greenhouse, there’s the heater, but even now, the environment is still considered “cool” compared to summer temperatures. The contrast between soil and air tells the seed which direction to grow, establish roots in the warm earth, whilst the stalk should reach to the cool air above ground. The air cannot be too frigid, however (hence the greenhouse heater), or else the sprout will have stunted growth or die. In a home operation, we recommend growing seeds in a warm spot with full sun, using a plastic greenhouse cover only when the sun moves away to keep in the heat. The space you plan to grow seeds in, shouldn’t go below 68 degrees Fahrenheit.
Light On The Subject
This is essential for growing seeds at home, Jenn mentions, “as much light as possible is essential for starting seeds.” And we’re not talking about keeping seeds by windows. We’re talking grow lights, which sounds like overkill to many, but if you want to avoid leggy plants they’re a must. Have you ever grown seeds at home and noticed that as they mature, they become long, stringy, and weak? This is what we mean by leggy. These plants are desperate for light, but without enough, they cease to function since photosynthesis depends on sunlight. Jenn recommends keeping the grow light as close as possible, and eventually “upgrading” seed domes (which is where the grow light can rest upon). This is the best way to avoid leggy seedlings.
Quick but helpful tips (we hope) to Colorado seed starting! We know gardening can be expensive, and some of these supplies will be, but in the end, nothing beats the pride of using your own plant starts for the summer. Plus, your wallet will thank you in the long run, too! Happy gardening!
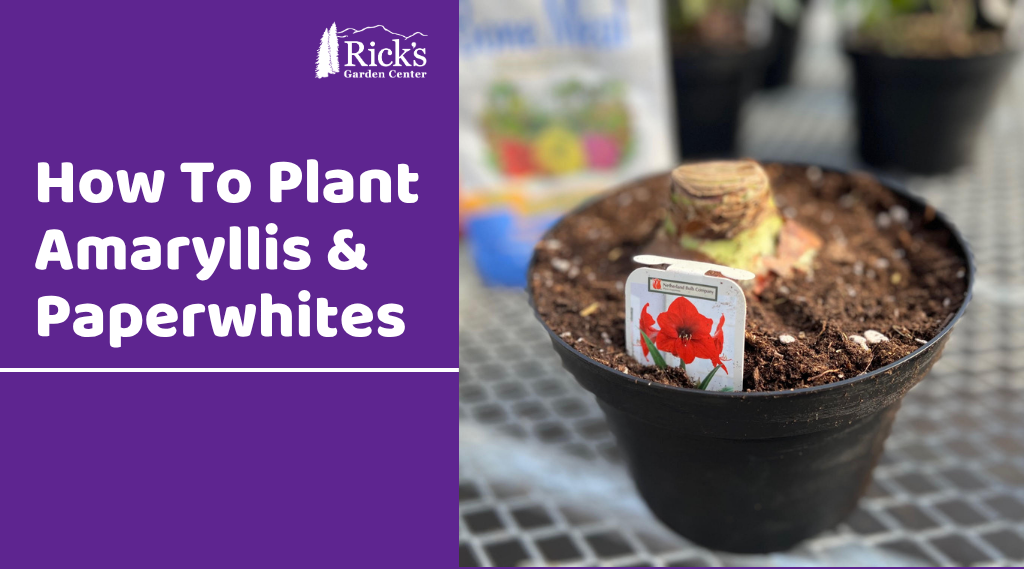
How To Plant Amaryllis & Paperwhites
Our holiday bulbs are here! Make way for Amaryllis & Paperwhites! Because these plants need to be planted about eight to ten weeks in advance, to flower around Christmas, we thought we’d provide this care guide now. Caring for and planting these bulbs is surprisingly easy!
How To Plant Holiday Bulbs
Ingredients:
-Bulbs, one Amaryllis or ten to eight Paperwhites.
-Well-draining soil (we’re using Fertilome Ultimate Potting Soil).
-8 Inch Container.
-Bulb fertilizer (we’re using both blood meal and bone meal).
Step-By-Step Guide
1.) Let’s start with the substrate. To prevent rot, pick soil with excellent drainage for these bulbs. We prefer Fertilome Ultimate Potting Soil, but Fox Farm’s Happy Frog works too. Gardners occasionally plant Amaryllis in a succulent mix, replicating their natural arid environment. Be cautious with this approach because it requires more watering due to extremely well draining soil.
2.) Once your soil is selected, fill about two-thirds of the container of your choice. Here, for both paperwhites and amaryllis, we’re using an 8 inch nursery injection pot. But you can use any kind of container. Having a hole for drainage is essential, and bulbs need some wiggle room.
3.) We advise fertilizing bulbs with a slow-release organic fertilizer. Whilst bulb-specific fertilizer, like Espoma Bulb-Tone, is ideal due to phosphorus levels, a flower fertilizer likewise works. Here, we choose to use blood meal and bone meal, high sources of nitrogen and phosphorus. We’ll eyeball the amounts because with them organic and a slow-release fertilizer burn isn’t a high concern.
4.) Plant your bulbs! Make sure roots are pointing down to the bottom of the pot, tip pointing to the sky. In fact, about one-third of the top of the plant should be above the soil. Amaryllis should have an inch and a half of space around the bulb and enough depth to properly root out. Paperwhites can be planted close together, but bulbs shouldn’t be touching. Think of how an egg carton is arranged! They should also have good depth for their roots to grow.
5.) Now, give the bulbs a light water. This helps pack them in. Rot is the primary cause of death for bulbs, so maintaining a good watering schedule is essential for their survival. We recommend watering every other day in a dry environment, less so in a humid environment. Lower watering to once every four days once green sprouts appear.
2025 Garden To-Do’s Recap 1#
Here are the gardening references we shared over the past month. We’re big fans of Colorado State University extension, so you’ll see us referencing them all the time. However, we also have some written articles just for you under our blog! There will be more gardening references for the year, so stay tuned!
Relative Houseplant Care/Rescuing House Plants:
Listen…shhhhh…if you listen closely, you can hear that neglected plant in the corner crying for help. You did not mean to cause harm. Whether you left for your holiday travels in a rush and failed to give your plants some extra TLC before you left, or you do not know the plant’s needs, the stress is equally killing you. You are at the point of not knowing what to do to make your plants happy again. No worries! We got you on our blog!
Starting Seeds Indoors:
We know it seems early, but the sooner you start your seeds the better. For tomato and pepper plants it’s recommended you start them outside once soil temperatures reach 50 degrees at night. This however doesn’t work well for Colorado’s short growing season. To get the most produce out of your vegetables we recommend starting seeds indoors now and in February! All you need is a seed-starting soil mix and a grow kit!
Seed Starting Troubles:
Have you been waiting for your seeds to pop up and still nothing? No matter what you do, your seedlings perish. There are multiple factors as to why your seeds may not be sprouting. Seed age, crusting soil, and temperature fluctuation are just a few. In the article below by CSU Extension, scientists review why your seeds may not thrive as they should. Fear not, solutions are provided to fix issues and to get those seeds growing! Happy gardening!
Winter Watering:
If air temperature is above 40 degrees it’s time to winter water! Read more about winter watering rules below!
https://www.csu.org/blog/winter-watering-tips
Do’s & Dont’s of Transplanting:
Want to get bang for your buck when starting transplants? Learn the dos and don’ts of growing transplants by copying and pasting the link below! And if you need containers we wanted to remind you we have a free drop off/pick up bin behind the store in our parking lot-perfect for starting seeds or other transplants (once they’re clean that is)!
Garden Planning:
Now’s a great time to start garden planning for spring! Remember to consider space when mapping your beds and companion plants! The links below will lead to more information about early garden planning and companion plants!
General Info:
Companion Plants:
General Onion Care:
Intimidated by growing and planting onions? How about storage, before and after planting and growing these flavorful bulbs? And what the heck does daylight have to do with all of it?
Among the hundreds of questions involving onions you may have, we’ve contacted the experts for their advice. Learn the essentials for onion care from Dixondale Farms!
Growing Potatoes at Home:
Want to try growing potatoes this season in your home garden? We have a link for you! We recommend reading Colorado State University article on the subject!
https://extension.colostate.edu/topic-areas/yard-garden/potatoes-in-the-home-garden-7-617
Spring Bulb Care:
Intimidated by growing spring bulbs? Don’t be with Colorado State Extensions help! Learn how to keep beautiful spring bulbs, corms, and roots alive by reading the article below or in our story/highlights. The article provides everything from choosing a perfect planting spot to planting depth for certain favorites Happy gardening!
https://extension.colostate.edu/topic-areas/yard-garden/spring-planted-bulbs-corms-and-roots-7-411
Rick’s Tree Planting Guide:
We know many of you are familiar with our Tree Planting Guide, so here it is again! This guide is perfect for those interested in buying a tree or about to plant a new one. We also sell mulch, root stimulators, and mycorrhizae for tree planting! Happy gardening!
https://www.ricksgarden.com/wp-content/uploads/2021/04/Ricks-Tree-Shrub-Planting-Guide.pdf

Getting Home & Garden Ready For Sale
Despite mortgage interest rates continuing to climb in the past several months, in this military base-saturated city, we continue to have a thriving real estate market. If you are prepping a house for sale, know that it does not have to be scary! Historically most house sales occur in the spring, so the later winter months are the perfect time to begin thinking about how to improve your curb appeal and get a “to-do” list fleshed out in time for your spring sale. Sprucing up your yard is especially important.
The first thing you should do is take your blinders off. You probably have lived at your house for some time. Pretend you are pulling up to the house for the first time or walk by your house like you are new to the neighborhood. Take notes. Like an artist, you will come back to this step multiple times, building a masterpiece!
- Do you have a couple of ways your eye can “travel” through the landscape? If not, how can you add interest in multiple areas of your yard?
- What are the immediate eye sores? Clean those up or remove them immediately.
- What is the highlight of your home and yard? How can you further accent it?
- What trees or shrubs need to be trimmed?
- Are there holes in the landscape? Can a tree, shrub, ornamental grasses, several perennials, or a boulder fill in the gaps?
The second thing that is helpful to do right now is a general yard cleanup. Even if your yard is ho-hum, an easy way to elevate the place is to do some general yard maintenance.
- Clean pathways/ sidewalks by sweeping dirt/ debris or pulling weeds
- Rake leaves off your lawn. Leaves can be mulched into your lawn also, by running a lawn mower over them.
- Remove any weeds. Pulling is preferred especially now, when they are most likely dead. Feel free to put a natural pre-emergent down, like corn gluten. This will prevent weed seeds from germinating in the spring.
- Pruning should be done in the spring, but take note of which trees or shrubs should be addressed before your sale.
- Consider if outdoor statement containers should be purchased, so you can plant vibrant flowers ahead of putting your home on the market.
- Add a fresh layer of mulch or gravel to refresh any landscaping areas. Do not forget to put a weed pre-emergent down under the mulch and on top of the new mulch, to discourage weed growth. There is nothing more aggravating than completing a clean landscaping job to have weeds pop up in the spring. You can also consider laying down weed barrier fabric under the mulch.
- It should also be mentioned that you should remove any yard art that is specific to your “aesthetic.” You want potential buyers to imagine their own lives when doing a home walkthrough. Pack the garden gnomes away for when you move into your new place!
Next, you will want to address outdoor lighting. If you plan on selling in the spring, you will be hitting the market before it is light in the evenings. You will want to ensure that you make your house feel welcoming as people come to showings after getting off of work.
- Highlight your entrance. This is the most important area to highlight. If you are concerned about light pollution, make sure the light casts downward, instead of out or upward. If you are further interested in reducing light pollution at your home, check out this resource on what light fixtures are best: Click here!
- Other areas to consider lighting include pathways, the address number on your house, and any architecture or plants you want to illuminate.
Finally, consider your plant life. You will not do any planting until spring, but this is a wonderful time to find plants that will fit your needs. In the first step, you identified if your eye traveled through the house/garden lay out, if there were any highlights, and if there were holes in the landscape. As you choose plants to fit these roles, consider the following:
- How much water does it require? Will you be able to ensure it gets the water it needs until you sell? Will potential buyers be turned off by the amount of water that you use? Consider more xeric or water-wise options, if this is the case.
- How much maintenance will it require? For example, many younger buyers are no longer interested in lawns, due to the regular, watering, fertilization, aeration, and mowing that a lawn requires.
- If you have deer or rabbits in the neighborhood, consider choosing species that are resistant to their munching, so all of your plants look good for your closing!
- Resources that are helpful when selecting native plants or water-wise plants are detailed below:
- Plant Select is a brand of plants that we sell. They have an excellent variety of plants and detailed descriptions of each plant. They specialize in plants that are, “…unique, smart, and sustainable plants inspired by the Rocky Mountain region.” Check them out here: Click here!
- High Country Gardens is another gem of information. They “…offer a diverse and ever-expanding selection of plants for the unique challenges of Western gardens.” Use their perennial filter to drill down to find those difficult-to-find plants that are deer-resistant, in partial shade, water-wise, and good for your zone. Check them out here: Click here!
- Finally, a local resource. Please check out the water-wise demonstration gardens that the Colorado Springs Utilities have. They have two different locations listed below. All of the plants are labeled, which is helpful when you find a plant you have fallen in love with! It is helpful to go visit through the four seasons, so you see how foliage and plants change throughout the year. Check them out here: Click here!
There you have it! Good luck with getting your property ready for sale!

Tool Care Guide
Fall is here! This is a bittersweet moment for me. Harvest has hit its finale, and I am beginning to accumulate a stack of books that will keep me growing while my garden begins to take a snooze. Before I cozy up on the couch, and have a cup of tea- I always take care of my end-of-season garden tool maintenance. Garden tools should have regular TLC, especially after use, but in reality, this may not happen. I will detail daily care at the end of this article for your convenience.
End-of-Season Garden Tool Maintenance:
Deep Clean and Oil Pruners:
This is imperative to reduce disease and rust on your snippers, prolonging their use.
- Pruners should be taken apart and deep cleaned at least once each season.
- Unscrew any nuts/ bolts that hold the pruners together.
- Wash all parts separately in soapy water.
- Soak all parts in vinegar, then rinse with water.
- Rub with steel wool to remove any rust, then rinse and dry.
- Soak in diluted bleach water to sanitize, then rinse and dry.
- Buff with linseed oil and reassemble.
Sharpening:
Both pruners and Hori knives, as well as long-handled tools (hoes and shovels), need to be sharpened every season. Keeping pruners sharp helps produce clean cuts on plants, reducing the entry of any disease. Other tools benefit from a sharpening, making your life much easier. Digging a hole to plant with a dull shovel is no fun!
- Anything you are going to sharpen should be cleaned first. Long-handled tools may not need the vinegar/ bleach/ oil treatment unless there are concerns about rust.
- Push the sharpening file in the same direction across the blade and follow the original blade angle. Do not rub the file or stone back and forth, this does not sharpen but dulls the blade further.
- Smooth these newly filed edges with a sharpening stone.
- We recommend wearing eye protection and gloves when sharpening to protect against metal slivers.
Care for Wood Handles:
With long-handled tools, it is important to take care of wood handles. Utilize durable tape (think athletic tape or other heavy-duty tape) for minor cracks. Anything that is more compromised should be replaced immediately to prevent injury.
- Wipe down the handles with a damp cloth.
- Inspect for cracks or any weak spots between the handle and the tool head. Address with durable tape or replace the wooden handle if damaged.
- If needed, lightly sand the handle to smooth splinters, and rub linseed oil to condition.
Daily Garden Tool Care (when you have time!):
Generalized care:
- Rinse any digging tools, then use a wire brush or something similar to get rid of any stuck dirt or debris.
- Scrub snippers down with a brush and soapy water.
- If any tools were used with diseased plants or infected soil, make sure you disinfect them before any other use. Soak the infected tools in a diluted solution of 2 cups of bleach mixed with 1 gallon of water. Then rinse in plain water, and follow with a generous wipe of rubbing alcohol.
- Before storing tools, rub them dry with a rag.
- To help prevent rust on digging tools, mix a bucket of sand with plant-based oil, like linseed oil (avoid any petroleum oils, as this reduces plant vitality). The sand should be damp with oil, but not wet. Plunge any blades, tines, or teeth into the sand a few times for a quick clean, or do this following regular maintenance once the tools have been wiped dry.
- Store your tools in a dry and well-ventilated place. Small hand tools can be stored directly in a dry bucket of sand or gravel, and larger tools should be hung so as not to dull their blades in a mad scramble.
Removing Sap:
- Wipe blades with a rag dipped in mineral spirits or turpentine.
- Submerge and clean the blades in soapy water. Rinse and then wipe with linseed oil.
Preventing and Removing Rust:
- Soak any tools showing signs of rust in a 50/50 mixture of vinegar and water overnight.
- Scrub the affected areas with steel wool.
- First, wash in soapy water, and then rinse.
- Rub dry and then buff with linseed or a mineral oil.
All tool maintenance requires is a little elbow grease and time. Sometimes we neglect our tools throughout the season, but I can tell you the reward of pulling out a clean, sharp, and shiny tool in the spring never ceases to make me smile. Happy fall, everyone!

Protecting Our Watershed While Gardening & Landscaping
By Katherine Placzek
Every item that we use in our green spaces– fertilizers, pesticides, sprays, powders and granules, etc. all make their way into the water, after it rains or when we water our plants. This means a myriad of compounds, organic and synthetic, are making their way in our or someone’s drinking water. Yes, most of our drinking water is filtered, but this also impacts lakes, streams, aquifers, wells, and other sources of water that can be a habitat for other living organisms, big and small. While this may feel overwhelming initially, we have the power to make little meaningful changes in the way we manage our landscapes.
Lawn and Garden Fertilization
Three things make a difference here. Quantity, quality and timing:
Quantity: When you use fertilizer, always use the instructed amount of fertilizer or a diluted/ lesser amount. This ensures that your plants can take up the applied fertilizer and that excess is not making its way into our waterways. Excess fertilization can stress plants and negatively impact water quality. Over fertilizer use through agriculture, golf course maintenance, and community landscaping have contributed to dead zones in waterways. A dead zone is where all aquatic life ceases to exist. First, expansive algae blooms occur that crowd out sunlight, which choke oxygen out of the environment, causing inhabitable levels for any life, plant or animal. While some dead zones do occur naturally, the second largest one in the world is in the Gulf of Mexico, where many of North America’s waterways meet. This dead zone is widely attributed to human causes.
Quality: When choosing a fertilizer, it is advisable to read the ingredients, similar to reading food labels. If you cannot recognize an ingredient, know it is likely synthetic. Not all things that are human made are bad, but do your research. You may decide that you do not want some of these ingredients in your garage, home, yard, and local ecosystem. This is why Rick’s is proud to continue to carry our Organic Lawn and Garden fertilizers. Both of these are gentle fertilizers, with low nitrogen levels, and contain ingredients such as chicken manure, bone meal and blood meal.
Timing: Never fertilize before a severe rainstorm where run-off can take the majority of your fertilizer downstream. This is also cost prohibitive. If you plan on putting fertilizer down before predicted moisture, consider prior to a snowfall, where the melting snow can bring the fertilizer into the ground gently. Also read the instructions. Many fertilizers recommend a fertilizing schedule. Follow this, or see if you can stretch the schedule out further, to reduce the amount of fertilizer that you have to buy and apply throughout the year. Never fertilize more than what is recommended, this can stress the plant, and excess product will be absorbed into the waterways.
Pesticide Use
Pesticides include insecticides, herbicides, and fungicides. Similar to fertilizing, follow the same wisdom regarding quantity, quality and timing. We have said it before, but just to remind you: “While pesticides are convenient and sometimes necessary especially when mitigating invasive plant species, pesticides negatively impact pollinator numbers…. It is important to remember that while applying control products at night can reduce pesticide exposure to several pollinators/ beneficial species, this does not protect nocturnal pollinators such as moths and bats. When we use pesticides there is no current method that does not negatively affect pollinators or their second tier predators, who are further up the food chain (Excerpt from our March 2024 newsletter).” All of these pesticides reach water sources that are drinking water for pollinators and larger organisms: birds, fish, fox, deer, etc. Many of the chemicals used in popular pesticides, including glyphosate do not break down with water. This means the problem is washed downstream, but never away, and can exist in our waterways indefinitely. Manual removal of weeds is no fun- we all know this. When we choose conventional pesticides, we give up clean water. Limiting the amount of pesticides we use in our yards is one step to keeping our watershed less polluted.
General Maintenance
When you mow your lawn, consider mulching the cut grass instead of bagging it unless you use the cut grass in your compost. Mulched grass that has been chopped by the mower multiple times and is spread evenly over the lawn acts as a wonderful additive of organic material to the soil. This method improves water retention, and overall soil health, decreasing your need for fertilizer. If you mulch the cut grass, but leave large clumps of thatch, this can burn your grass and be swept away into a waterway. This process can act similarly to over fertilization, causing algae blooms downstream. Use the same logic with fall leaves. Mulch leaf litter and either use it on your lawn or in your garden, to add nutrition to the soil. Avoid abandoning leaves in gutters, and storm drains, as it increases excess nitrogen in the watershed. In the winter, make sure you are using a low saline and non-toxic ice melt as well. Water guardianship takes place in all four seasons!
Plant Selection
Finally, the fun stuff! Select plants and grasses for your landscape that are resilient to the Rocky Mountain circumstances. When we do this, we automatically reduce the need for mowing, fertilizing and the use of pesticides. Native plants especially, have been living here in the Colorado landscape much longer than any human lifespan. They have been taking care of themselves without any of our human care measures, such as fertilization, and will continue to do so into the future. I believe that by choosing to plant native plants in a landscape, you are actually simplifying your overall workload in the yard. You will fertilize less, you will use pesticides less, and regarding grass, you will mow less. That means more money in your pocket and more sitting on the back porch, sipping on a cold beverage. Cheers!
Blossoms on Your Plate
Are you ready to elevate your gardening game to a whole new level of deliciousness? Well, we’re about to dive into the vibrant world of edible flowers that will not only make your garden pop but also your plate! Many of them are easy to grow, forgiving of rookie mistakes, and will reward you with an explosion of colors and flavors.
Nasturtiums (Tropaeolum majus): These deep burgundy to buttery yellow blooms have a peppery kick, perfect as a spicy twist to salads, tacos, and avocado toasts. Bonus: They’re easy to grow, thriving in poor soil and other neglect. These flowers are high in vitamin C. The entire plant is edible- so try out the lily pad-like leaves also! Deer resistant.
Calendula (Calendula officinalis): Often called “poor man’s saffron,” the golden petals of calendula add a subtle saffron flavor to rice dishes and soups. They’re sun lovers and can tough it out in the Rocky Mountain soil. This flower is also known for its skin-healing properties, consider making a toner with calendula flowers. Deer are typically not a fan of these flowers.
Pansies (Viola tricolor): These adorable flowers come in an array of colors and have a slightly sweet, grassy taste. Scatter them over desserts after dipping them in water and then sugar for a delicate but sweet touch. Or freeze them in ice cubes for fancy drinks. Pansies are cold-hardy and can withstand our unpredictable mountain weather. We had a pot of pansies survive the entire winter, even when temperatures dipped below 20 degrees!
Lavender (Lavandula angustifolia): Known for its calming aroma, lavender adds a delicate floral flavor to desserts, teas, and even cocktails. It thrives in well-drained soil, making it a great match for rocky gardens. We have several varieties that will survive year-round in our nursery area. Look for varieties such as Munstead, Hidot Blue, and Phenomenal. Due to the fragrance of these flowers, deer typically leave them alone.
Rose (Rosa spp.): Beyond being a symbol of romance, roses can be used in various culinary creations. Make tea with their dried petals, infuse honey with their fragrance, or toss the petals into desserts. The rose hips that are produced in the fall are also edible and high in vitamin C. You can make tea from the rosehips as well. We have several varieties of roses, some more bred for their blooms, others are cultivated to be hardy for our mountainous climate.
Borage (Borago officinalis): With its brilliant blue flowers, borage adds a refreshing cucumber taste to salads, drinks, and desserts. The best part? Borage is a self-seeding annual, making it a low-maintenance addition to your garden. The pollinators will also feast on these blooms! Deer typically avoid this plant.
Chamomile (Matricaria chamomilla): Beyond being a bedtime tea, chamomile flowers can be used in salads or infused into syrups that go well in cocktails, over ice cream, or on pancakes. These sun-loving plants will thrive in our bright sun. Deer tend to avoid this plant due to its fragrance.
Dianthus (Dianthus spp.): Also known as pinks, or sometimes recognized as carnations, these flowers have a mild clove-like flavor. Add them to fruit salads, and desserts, or dry them and add them to various spice blends (za’atar, is a great example). Dianthus are hardy perennials, returning year after year. They are also deer-resistant.
Hibiscus (Hibiscus rosa-sinensis): Hibiscus flowers make a delightful and tropical addition to beverages, jams, and desserts. We carry gorgeous hardy hibiscus that will winter as a perennial shrub. Hibiscus also has high levels of vitamin C and is an excellent herb for overall health.
Daylilies (Hemerocallis spp.): Despite their fleeting beauty, daylilies are edible and offer a slightly sweet flavor. Stuff the blossoms with a soft cheese, or add them to stir-fries. Do your research on whether you have a daylily, before digging into a meal. Not all species of lilies are edible. These hardy perennials are a reliable choice in our climate.
Elderflower (Sambucus nigra): Fragrant elderflowers can be used to make refreshing beverages like elderflower cordial or add a subtle floral note to desserts. Elderflowers come from elderberry bushes, so you will also be able to eat elderberries if the birds don’t beat you to it! These shrubs are well-suited for the mountain environment, making them a great choice for your garden.
So, whether you’re a seasoned horticulturist or a budding green thumb, dive into the world of edible flowers and turn your garden into a culinary masterpiece. After all, why just stop and smell the roses when you can toss them in a dish too? Happy gardening and bon appétit!