
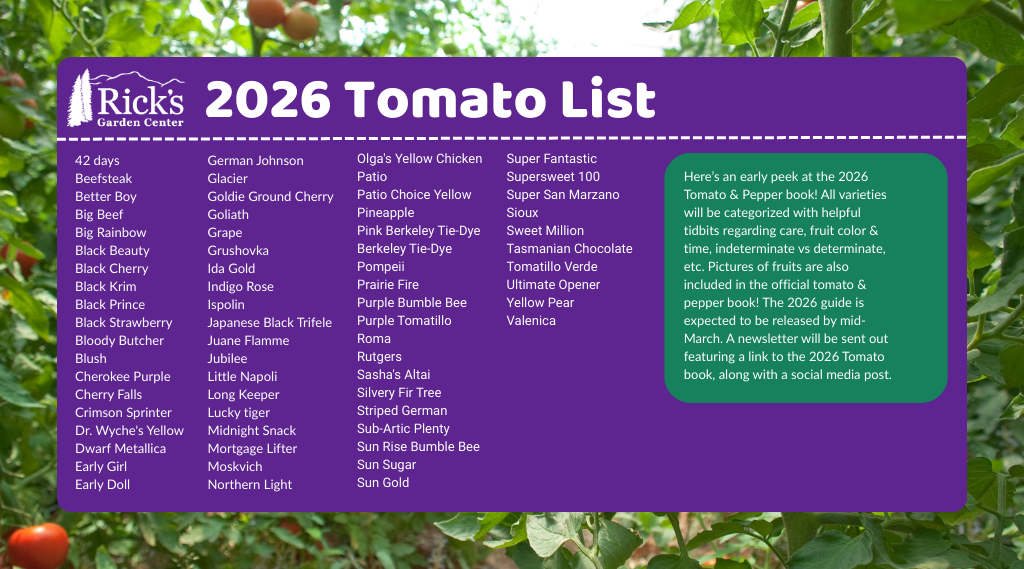
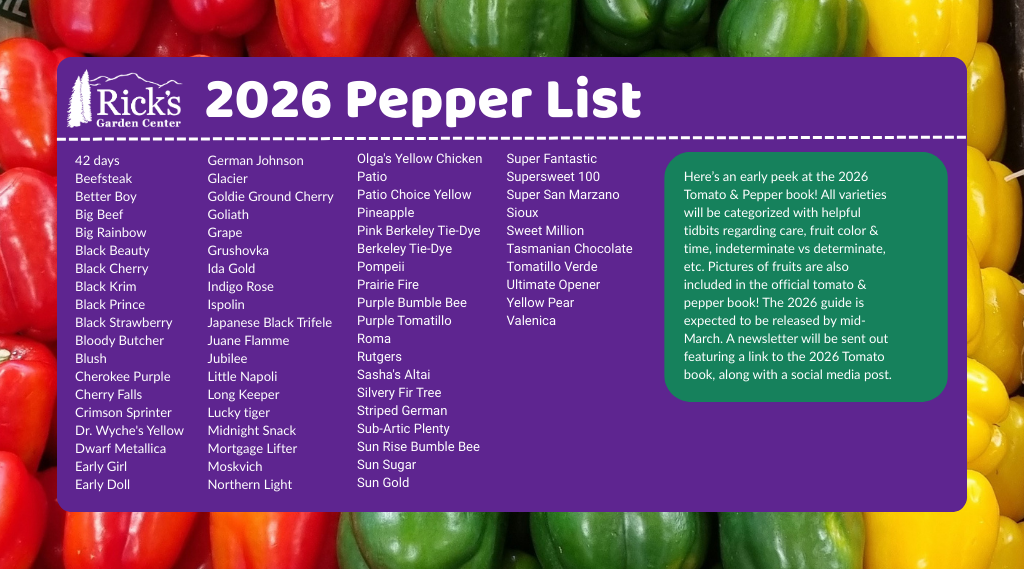
2026 Tomato & Pepper List
AI & The Garden: A Hard NO
If you’re a gardener, you should be aware that relying on AI can be dangerous. Running the AI data centers are detrimental to the environment, consuming 10 times the normal electricity compared to other search engines (UNEP, 2024). And what’s the point if it’s inaccurate? We’ve had numerous issues with AI spouting nonsense to all our wonderful customers and we don’t want your gardens, landscaping projects, or interior decorating ruined because of it. In this article, we’ll go over how to spot AI and what to use instead.
AI is transforming the plant industry at an exponential rate and not for the best. Sure, you can get information about plants, gardening techniques, and more using Chat GBT or a AI-run plant app but how accurate is this information? AI pulls its data from various sources across the internet, from downloaded books to “even those funny Reddit threads” (Climate Vault, Dec 2024). We’re sure you can recognize a red flag here: AI pulls information from ANY data online. AI can be trained to select data from certain sites but it can’t differentiate between reliable and unreliable sources. This leads to false information being shared on plant apps, the Google search settings, and even AI-generated images as fact. We can’t tell you how frequently misinformed customers come in because of AI. We have a good rule of thumb to keep in mind when it comes to AI identification: if it’s too good to be true, that’s because it probably is.
Too Good To Be True
Have you been recommended home remedies to care for sick plants? Or have you been shown images of plants that seem unreal, like deep blue leaves or neon magenta flowers that glow? These are all examples of AI displaying “too good to be true” facts and images. Gardeners in the know are aware there’s no such thing as a fully blue colored plant, that’s impossible because plants absorb light from blue and red light waves and reflect the green wavelength. Some plants appear blueish or even purple yet are never the color displayed by AI, exemplified below. Another sign (and poor recommendation) of AI is through plant apps’ advice. As we mentioned before AI absorbs and relays information from collected data all over the internet, including from memes (online jokes), unprofessional advice from Reddit and other websites, and non-scientific sources. AI in plant apps thus recommends that knowledge be treated as fact when it comes to identifying or recommending products to treat sick plants. Customers come in all the time with spotted leaves on houseplants and outdoor plants and through a plant apps “advice” been recommended inappropriate care, like supplying fertilizer when it’s a fungal issue. The fertilizer might help the plant bounce back but doesn’t eliminate a fungus, only a fungicide will do that. AI will also recommend homeopathic “remedies” for plants based on this collected data, like using honey to stimulate root growth on cuttings or using dish soap to treat for insect eggs. Sounds too good to be true right? You are correct, these claims are advertised as cheap but aren’t rooted in science and are often pulled from untrustworthy data. Honey has been shown to have limited effect, but very minimally, and rotting often occurs before root take a hold. And using dish soap on plants will kill your plants before killing insect eggs. Seasoned gardeners and plant people would be suspicious of these recommendations but those new to the lifestyle may be caught unaware and taken advantage of.
How to Spot AI Via Images
AI learns and thus it becomes increasingly difficult to differentiate real photos and AI-generated photos. Realistic but not perfect, thankfully there are still techniques to spot AI in photos:
Strange Details: Focus on the details of a photo you question. Are plant leaves melding together? Or do flowers seem way too bright? Almost glowing? No matter how small the detail something will be wrong with its appearance, indicating AI-usage. Data is collected and generated into a new image yet AI isn’t tuned enough to make it appear natural. Another great detail to look at is if a blossom appears identical to another in the picture, AI is essentially just copying and repeating the same feature in one photo.
Too Perfect: Aesthetics are important when it comes to internet images. Things must be perfect and AI tends to make things too perfect. AI-generated photos tend to lack realistic details, forgetting about the tiny hair like roots of a potted plant or a certain leaf pattern, instead giving an airbrushed appearance to the photo. Or the background environment might be incorrect for the plant featured in a photo, like tomatoes being displayed in a cold setting. Too perfectly aesthetic are red flags and their source, information, or appearance should not be trusted.
These are only techniques to handle photos, however. Rely on the professionals, like academics and scientists, for plant knowledge.
How to Spot AI: Discovering the Source
There’s a final trick up our sleeves for discovering what images or data snippets are AI-generated or not and it involves a little extra work. Are you familiar with the reverse image search?
Google Image Search: Have you ever downloaded a plant picture and are suspicious of its authenticity? Introducing the Google Image search. Simply open up a tab in Google, click the little camera in the search bar, upload that mysterious picture and you should be able to trace its origin. If the image comes from an academic source, a college, a published research magazine, or an established agricultural company chances are the plant displayed in the said photo is the real deal. If the image is tracing back to a single source and it’s on a shady website or a single page on Amazon chances are not only did you stumble upon an AI-generated image but it’s being used in a scam. Distrust the photo immediately and continue to rely on the professionals.
The Professionals: Who to trust
The best sources for plant advice ALWAYS come from professionals: academics, scholars, and scientists. Academic websites, university & college websites, scientist-run online journals and blogs, and more are all excellent places to source plant information and research. Science is evidence-based, meaning scientists study topics through experimentation. To think about the reliability of science is to think about the reliability of the car. “Most of us trust our cars, ” says Naomi Oreskes, a professor of the history of science at Harvard, “The modern automobile is the product of the collected work and wisdom and experience of every man and woman who has ever worked on a car. And the reliability of the technology is the result of that accumulated effort (Oreskes, 2017).” Real people analyzing trusted research, not just general data, is why science and thus academia should always be trusted and referenced. AI has no peers to check it and keep it real, though in time that may change. But in the meantime stick with the professionals.
We Ricksters use Colorado State University Extension as our main source for information. There are hundreds of free articles on whatever subject you could imagine. And there’s even a Q&A panel where you speak with real researchers, not an AI-driven help bot! To check them out, click these links:
Colorado State University Extension Page: CLICK HERE!
Colorado State University Extension Q&A: CLICK HERE!
Another great source of FREE information is the library! A librarian may not be a gardener but they’re trained in the art of finding trustworthy sources and good material. Use them or the library’s search features to hunt down trustworthy authors and information.
From college websites to libraries, there are numerous trustworthy sources for your plants. And even though AI is learning every day and becoming better, no one can do it like the pros. Plus, AI is bad for the environment, and using it is not cool. It uses thrice as much power as normal search engine, uses rare earth materials, and produces crazy amounts of electronic waste. Happy gardening and happy researching!
Sources:
“Industry News from 3BL Media: The Impact of AI on Carbon Emissions.” My Green Lab, December 4, 2024.
“AI Has an Environmental Problem. Here’s What the World Can Do about That.” UNEP. Accessed July 7, 2025.
Oreskes, Naomi, “Why Should We Believe In Science,” TED Radio Hour, February 24th 2017, 13 Minutes.

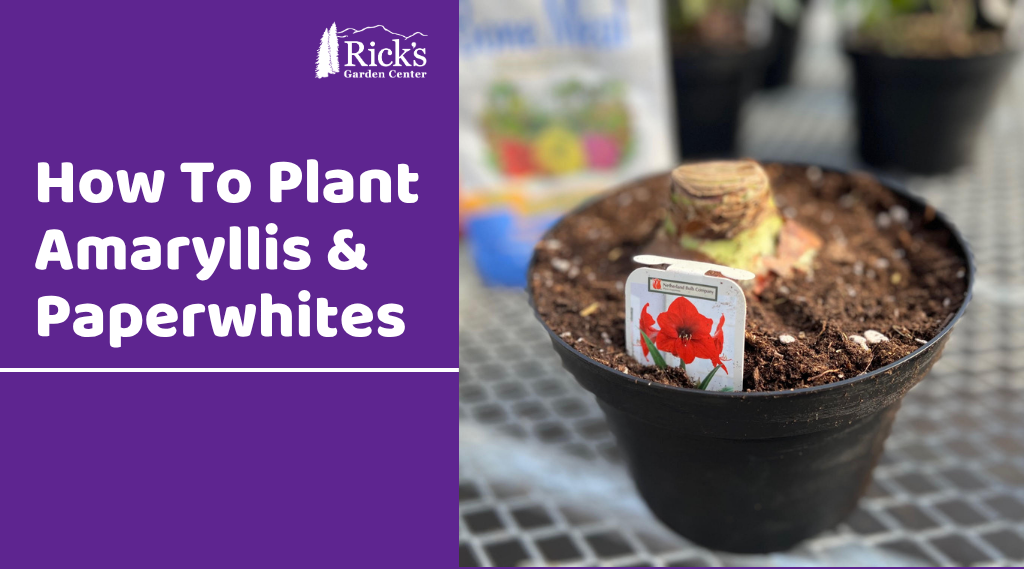
How To Plant Amaryllis & Paperwhites
Our holiday bulbs are here! Make way for Amaryllis & Paperwhites! Because these plants need to be planted about eight to ten weeks in advance, to flower around Christmas, we thought we’d provide this care guide now. Caring for and planting these bulbs is surprisingly easy!
How To Plant Holiday Bulbs
Ingredients:
-Bulbs, one Amaryllis or ten to eight Paperwhites.
-Well-draining soil (we’re using Fertilome Ultimate Potting Soil).
-8 Inch Container.
-Bulb fertilizer (we’re using both blood meal and bone meal).
Step-By-Step Guide
1.) Let’s start with the substrate. To prevent rot, pick soil with excellent drainage for these bulbs. We prefer Fertilome Ultimate Potting Soil, but Fox Farm’s Happy Frog works too. Gardners occasionally plant Amaryllis in a succulent mix, replicating their natural arid environment. Be cautious with this approach because it requires more watering due to extremely well draining soil.
2.) Once your soil is selected, fill about two-thirds of the container of your choice. Here, for both paperwhites and amaryllis, we’re using an 8 inch nursery injection pot. But you can use any kind of container. Having a hole for drainage is essential, and bulbs need some wiggle room.
3.) We advise fertilizing bulbs with a slow-release organic fertilizer. Whilst bulb-specific fertilizer, like Espoma Bulb-Tone, is ideal due to phosphorus levels, a flower fertilizer likewise works. Here, we choose to use blood meal and bone meal, high sources of nitrogen and phosphorus. We’ll eyeball the amounts because with them organic and a slow-release fertilizer burn isn’t a high concern.
4.) Plant your bulbs! Make sure roots are pointing down to the bottom of the pot, tip pointing to the sky. In fact, about one-third of the top of the plant should be above the soil. Amaryllis should have an inch and a half of space around the bulb and enough depth to properly root out. Paperwhites can be planted close together, but bulbs shouldn’t be touching. Think of how an egg carton is arranged! They should also have good depth for their roots to grow.
5.) Now, give the bulbs a light water. This helps pack them in. Rot is the primary cause of death for bulbs, so maintaining a good watering schedule is essential for their survival. We recommend watering every other day in a dry environment, less so in a humid environment. Lower watering to once every four days once green sprouts appear.
2025 Fall Donations: Giving Back to the Local Community
By Katherine Placzek
November is the month where humans best emulate nature-we participate in the magic of giving without the expectation of receiving in return. I hope you all find abundance in your lives, and pass it along to others in small and big ways.
This fall, Rick’s Garden Center donated over $22,000 worth of trees and shrubs to local organizations that benefit the Colorado Springs community. Read on as we highlight their missions. Maybe you can find a way to support their mission or be inspired to find another non-profit group you can volunteer at, or share your monetary gifts. Rick’s vision has always been to help beautify El Paso County and beyond with plants. What is yours?
Mountain Song Community School
An elementary and middle school (grades K through 8), Mountain Song Community School, is a public school that is also a member of the Alliance for Public Waldorf Education. The Waldorf model nurtures the body, mind, and heart of each student. Mountain Song’s curriculum also includes the Agricultural Arts- something Rick’s Garden Center can get behind! Our donation helped further build the berry and native plant portions of their gardens. You can check them out here: Click here!
Flying Pig Farm
Flying Pig Farm is an educational farm located in Manitou Springs. They “… nourish our community and the land we steward by hosting school and community groups and events, facilitating workshops, supporting community gardens, consulting and collaborating with partners, cooking and sharing food, promoting creative expression, holding seasonal festivals, and advocating for healthy relationships with people and the planet.” What a cool mission! They consistently create exciting new community events and educate the local population of all ages about agriculture and self-sustaining techniques. Our donation helped build a “fledgling hedgerow” to offer further privacy and a noise barrier on the farm property. Please check out their programming here: Click here!
TESSA of Colorado Springs
TESSA offers immediate safety for victims of abuse. They have safehouses for women, children, and other victims. They empower and support these individuals while helping them build a safer future. They have several sister programs and are an important part of our community in Colorado Springs. We were able to help re-landscape a portion of their office outdoor space to feel welcoming, but still safe. TESSA provides space for victims to know they are worthy of goodness. This donation will allow them to know they are worthy of beautiful things. Support them in their brave mission: Click here!
Rock Ledge Ranch (in Partnership with the CSU Extension Office)
The Rock Ledge Ranch is a historic ranch, and park at the cusp of the Garden of the Gods Park. They have educational programming while maintaining historic grounds. The CSU Extension is working with them to rehabilitate soil and build a historically authentic greenhouse that will further their educational offerings. We were able to donate native trees/shrubs as well as berry bushes that will help make their grounds feel appropriate to the time, while continuing to support the vision of soil restoration. To support their continued efforts in raising money for the greenhouse construction and to attend their programs, head here: Click here!
Colorado Springs City Horticulture Department and Forestry Department
Our city runs on the funds from the local sales tax. When consumers slow buying, or there is a dip in tourism, like we saw this summer, that revenue becomes strained for our local city departments. Some departments are beginning to see budget cuts or hiring freezes. We were able to help both the Colorado Springs City Horticultural Department and Forestry Department. They both obtained trees/shrubs for beautifying our city and community spaces. Berry bushes and grapevines will be planted in community gardens, and shrubs and trees will find homes in parks, medians, and other public recreation spaces. Check out the City of Colorado Springs website here: Click here!

Planning For Trees
Gardening is for everyone, and that includes those who want a tree! How can this be? Not everyone has the space for these kinds of big plants. Not so fast-trees also include bonsai and indoor citrus too! Whether you want something decorative, fruiting, or just plain cool, we will help you pick and care for a tree that will thrive!
What To Look For: Location, Location, Location!
Trees are surprisingly delicate plants. Selecting the right plant, planting it at the optimal time, and choosing the ideal location is crucial for a tree to thrive. We’ll first go over site selection. Trees need space both above and below ground. Their canopies need to spread alongside their roots so they can establish themselves easily and live a long time. Keep in mind a tree’s full size before purchasing. If you’re lacking this space, a dwarf tree variety or even a shrub would be better.
Drainage also is important. Most soil in Colorado retains moisture poorly, however there can be areas with poor drainage in any environment. Picking a drought-tolerant tree would be best for soil that poorly retains moisture, the very best being a native tree. For a tree in a wet area pick one that enjoys damp soil, just don’t forget to water during the drier months!
Lastly, sunlight exposure is essential for trees (and generally all plants). Generally, trees need full sun but some don’t like bright hot light and prefer partial shade. Most trees we carry in our nursery will have little information packets attached to their branches about light requirements. If they don’t, our Ricksters are always happy to help!
What To Look For: Healthy Trees Please!
Now we get to the fun part: picking out the tree! Picking a healthy tree will benefit your wallet and the health of your garden or yard. An unhealthy or sickly tree can transmit disease and decay to other plants, so knowing what to look for while shopping is essential for everyone! Tree leaves shouldn’t be wilting, have discolored bark, odd spots, or oddly colored leaves. You shouldn’t buy a tree that has non-beneficial insects, like aphids or mealy bugs, on its leaves, branches, or bark. Trees should have evenly spaced branches and a central branch that acts as the main trunk. The Colorado State Forest Service suggests, “Tree foliage and branches should be distributed on the upper 2/3 of the tree.” Study the tree roots too. Are roots circling, appear pot bound or are suffocating the stem and trunk of the tree? These are all bad signs and this tree shouldn’t be purchased.
Why Natives?
Some trees will do better in Colorado than others. Native trees in particular are hardier and built for our drastic climate. Generally, they will also need less maintenance, like less watering, pruning, and insect control. Natives will thrive in Colorado hardiness zones, though there are always exceptions. A great place to check out native trees and shrubs is at Colorado State University Extension. Alongside pictures, each tab is filled with information about the plant’s preferred elevation, habitat, and more. Click the link to learn more: https://csfs.colostate.edu/colorado-trees/colorados-major-tree-species/
Planting
Trees have specificities when it comes to planting. When you choose to purchase a tree from our nursery, we’ll typically send you home with one of our tree-planting guides. It’s also available on our website, link located here for ease: https://www.ricksgarden.com/wp-content/uploads/2021/04/Ricks-Tree-Shrub-Planting-Guide.pdf .
We want to remind you to NOT FERTILIZE your tree for the first year! This can damage and even kill a tree. Trees are getting established in their new home and this is a stressful time. Applying fertilizer adds unnecessary stress in the first year.
Whether you choose a flowering crab apple or go the native route and pick a tree that easily establishes in our area, finding the right fit tree is what we should all strive for. A chosen tree should be picked to thrive in your yard’s microclimate. Once established, trees return the favor. Providing shade, habitats for animals and birds, cleaning the air and water, and limiting rain runoff are just a few of the reasons a tree can benefit the community. Likewise, trees increase property value and cut noise pollution! Trees are legacy gifts to the environment and to future generations. Whatever your reason is for choosing a tree we’re happy to help you do it right. Happy gardening!

Encouraging Kid’s Green Thumbs
There is a saying that “green thumbs are not born, they’re grown.” And here at Rick’s we heartily agree! Green thumbs come in all shapes and sizes, and even ages. Today we want to encourage younger green thumbs- kiddos! Kids are naturally attracted to dirt, worms, flowers, bugs, watering cans, seeds, berries and even veggies that are unique. It really is quite easy to get them hooked on becoming gardeners. Some may balk at including kiddos in the garden. What if they mess things up? I counter, adults also mess things up in the garden- often without trying. Let the kids learn, experiment, play and succeed in the garden. If you are a parent, teacher, guardian, devoted auntie, grandparent, or other care giver, these tips will get you started on introducing kids to the wide world of science and beauty of plants.
Gardening is an adventure into math, science and art. Math is used when discussing how far and deep seeds are planted, as well as in the conversation of, “If we have three eaters in our home, how many zucchini plants do we need to plant?” There is no right answer for this conundrum, because you typically end up with too many zucchini in general. But having that conversation with a child allows them to think of the production of one zucchini plant, how to extrapolate how many ways they and other eaters can eat zucchini, and to problem solve with what to do with any extras. Maybe the neighbor next door would like some?
Science takes a look at the immediate needs of a plant; nutrients, water and sunlight. But as a kiddo becomes more advanced in their gardening skills, you can begin talking about seed production, pollination, photosynthesis, soil biology, mushrooms, diseases, pests and the list goes on! Perhaps most importantly, it may be wise to share why gardening is so important to embark on in this time and age. This can cover creating habitats and safe zones for pollinators, building food sovereignty and security while avoiding supply chain disturbances, farming for the purpose of carbon sequestration, etc. And the variations on this theme grow infinitely from there.
Of course art goes hand in hand with gardening. Design and edibleness are dependent on aesthetic values. A child will love choosing pansies (some look like tiger stripes!), colorful zinnias, snapdragons, and other annual flowers for their container garden. Consider taking them through the perennials section for in season cut bouquets, including daisies, black-eyed Susans, Penstemons, and Yarrow. They may want to try purple carrots, purple tomatillos, purple beans or peas, or eggplants if the kiddo’s favorite color is, you guessed it- purple! Challenge them to create colorful dishes with the veggies you all grow. “Can you create an all orange meal? All green? Red? Can you have every color of the rainbow represented on your plate?” Growing vegetables for their colors is not only fun, it is healthy! Produce that have unique colors often are chock full of vitamins, antioxidants and other nutrients that we may neglect to get through our Standard American Diet (SAD).
Other ways to encourage the gardener in every child:
- Pick out seeds together to grow by inviting them to take a look at a seed catalog or a seed company’s website. If you are looking for wild and very colorful seeds, Baker Creek Seeds is a great start!
- Grow sprouts or microgreens if you are lacking space, but want a child to see the life of a plant from seed to germination to the plate. See our other blog this month for details on how to grow microgreens!
- Grow things that create awe and wonder like:
- Sunflowers
- Beans
- Pumpkins
- Small cherry tomato varieties (Spoon is a great variety, because it is abundant and kiddos love the “baby” tomatoes)
- Raspberries and blackberries
- Plant a tree, and talk through how trees are important for creating habitat, providing oxygen, cooling of the climate and are a generous resource for paper, fruit, and wood.
- Plant fall or spring bulbs for children who may need an example of delayed gratification. Plant the popular daffodils in the fall and watch them bloom in the spring. Or plant gladiolas now and watch them pop up late summer.
- Build an observation habitat: Plant flowers and other plants that will attract hummingbirds or other pollinators that the children love (butterflies, bumble bees, etc). Place a bench beside the habitat and have children tell you what they see, hear, smell, feel, etc. This prompts quiet patience and the building blocks for scientific inquiry.
- Begin a worm or compost bin. Collect kitchen scraps, shred old school work, or bills and throw in a generous community of worms. Children will be amazed to watch these items turn into worm castings, or worm poo, and how it can be used in the garden or with house plants.
A kiddo who eats their first carrot or snap pea from the garden will never forget that moment. While gardening is magical as a child, being an adult and witnessing the magic is priceless. Green thumbs can grow at any age and stage, but it is a true gift to give the love for gardening to a child. They have the rest of their lives to grow with it!
Rick’s Garden Center believes in the power of people and plants. All of our blogs and content are written and edited by real humans with their own unique creative perspectives. Any use of our publications to ‘train’ generative artificial intelligence (AI) technologies to generative text is expressly prohibited. Any typos or errors are our own
On Crop Failure
By Emma Seibert
A few nursery Ricksters had been growing tomatoes in our greenhouses this winter as an experiment. In hopes of helping gardeners sample certain varieties before they commit to growing, nursery crew member Emma was dedicated to growing tomatoes and selling them as produce over the winter. Accidents happen to the best of us, however, including garden centers. Though crop failure is tragic, it’s not a sign to stop growing. Rickster Emma will talk you through her recent experience with crop failure…
A regular part of my job, especially in the summertime, is helping customers troubleshoot the issues they are seeing with their vegetable gardens and flower beds. Sometimes customers come in and I am able to recommend different caregiving techniques that can help bring their plants back to full health. Other times, I have the unfortunate job of bearing the news that the plant in question is either beyond saving, or even more heart wrenching, that it is dead. And that is what I wanted to talk about today. Dead plants are a rather sensitive topic for most growing enthusiasts; whether you’re a farmer and the health of your crop determines your livelihood or you’re just beginning your houseplant collection, crop failure is painful.
On August 26th, 2024, I seeded 32 tomatoes to plant them in large farm troughs in one of our greenhouses, with the intention of sharing the organic, local greenhouse-grown fruit with you all during the cold winter months. We wanted to provide our community with locally grown, ‘out of season’ produce that was flavorful and that you all could feel good about purchasing, knowing exactly where it was grown.
On January 13th, 2025, the tomato plants were nearly touching the roof of the greenhouse. They were blossoming and nearly every plant was fruiting. The green globes that hung from the tender stems had a yellow hue, indicating that ripening was mere days away. The stripes on the Purple Bumblebee tomatoes were starting to darken and the folds in the skin on the Sub-Arctic Plenty were beginning to smooth out, firming up the skin and giving it a glossy appearance. The first harvest date was so close I could nearly taste the tang of the Sweetie cherry tomatoes.
Then that same evening, the heater in the greenhouse wouldn’t turn on, despite the thermostat readings dropping. For some reason the thermostat and the unit heater were not communicating, but we couldn’t figure out why. As I got in my car to go home that night, I tried to remain hopeful that something would kick on, that someone would be able to figure out what was wrong in the next 20 minutes before the store closed for the night; all while watching the temperature readings in my car drop below 32 degrees.
The morning of January 14th, I hustled to the greenhouse as quickly as I could. Before I could even open the door, I knew it was done. There was frost coating the inside of the greenhouse walls; it had gotten cold enough inside for the condensation from the previous day’s healthy plant transpiration to freeze, indicating to me that every tomato plant inside must be frozen too. I went inside anyway and saw what I already knew to be true; every beautiful plant was frozen in time. The leaves were slightly wilted but maintained their vibrant green color, iced over in the moment of their last breath. It turns out that the safety fuse in the greenhouse heater blew out the previous day, preventing the heater from turning on despite the thermostat telling it to do so. We were unable to replace it in time for that night’s low of 10 degrees. As the daytime temperatures rose, the cell walls thawed and tomato plants flopped in defeat, their fruit turning to mush in my hands.
I cried, really hard. For a long time. I am not telling you this story to make you sad or say woe is me and my little crop of tomatoes. I am telling you to try to be of comfort; crop failure happens and hurts at every stage. I am telling you because I want you to know that yes, crop failure is a fact of life in the horticulture world. And also, the pain associated with such loss is a fact of that life too. So if you come in to show me your plant that is struggling and I tell you that it is dead, know that I understand that pain too. And I will do my best to help you pivot your crop, like I did with mine.
After the sore task of digging up all of the spent tomato plants, I went back and seeded some other, more cold-tolerant crops. And soon, the greenhouse will be a miniature forest again, but this time of kale and spinach, lettuce, and Swiss chard. I am not perfect, and neither are you, and neither is anyone no matter the extent of their experience. We all have to pivot sometimes and just know that the pivot can be the seed for new success.

Norfolk Pine
Ah- the Norfolk Pine! The perfect gift for someone who has just moved into their first home around the holidays. The Norfolk Island Pine is also an elegant house plant to welcome into a home for year-round interest!
Also known as Araucaria heterophylla, this plant is not a pine at all. Beautiful and graceful, the Norfolk Pine was originally found on Norfolk Island in the South Pacific, adjacent to Australia. This island is the only natural and known occurrence of the plant. This conifer evergreen tree keeps a symmetrical and compact habit. Due to its branches that present a spiraled and stepped appearance, the tree has a tidy and pyramidal canopy. The needles are fine and almost fern-like, adding a delicate touch. It is so easy to fall in love with this tropical tree! Below you will find care tips for this unique plant.
Moisture:
Norfolk Island Pine’s native habitat is tropical and very humid (50-60%). Our climate is difficult for them, so supply additional humidity through daily misting, a humidifier on a timer, or a humidity tray (set your plant on a tray of water with pebbles). The Norfolk Pine does not like their roots to be waterlogged so make sure you are not over-watering, only watering when the top inch of soil is relatively dry.
Light:
Colorado has very bright light. The Norfolk Pine prefers bright indirect light. Place a Norfolk Pine by a window that receives a good amount of light, but shift the plant away from any direct light, since they are susceptible to sunburn. Many people find that a west or east-facing window is the perfect spot!
Temperature:
Araucaria heterophylla needs a temperature range between 60°F and 70°F. Do not place this tree by a window that transfers cool air inside or a heat vent that could cause scorching or excess drying out of the plant, and its needles. Even slight fluctuations in temperatures can cause stress, so make sure to keep your Norfolk Pine under careful watch. The first sign of stress is needle drop or loss of lower limbs. These lost limbs will not grow back.
Soil:
This beautiful tree would enjoy a well-draining potting mix. The key is moisture retention without becoming waterlogged. Consider a blend of peat moss or finished homemade compost, perlite, and sand. We often also recommend fine-grade orchid bark instead of perlite, since this mimics its native soil.
Fertilizing:
Since Norfolk Island Pines are very susceptible to burning by other means, it should be expected that it’s sensitive to nutrient burn as well. To combat this risk, it is recommended to only fertilize during the growing season (spring and summer, here), and with a diluted half-strength water-soluble fertilizer formulated specifically for house plants. The cadence of fertilizer application is roughly once a month.
Other notables:
The Araucaria heterophylla is sensitive to changes in its environment. Swings in temperature, changes in light intensity, and even moving the plant to different rooms can elicit needle drops. Another thing to note is that this plant is difficult to transplant. We typically recommend delaying transplanting into a larger pot for as long as possible. It is also preferred to up-pot during the growing season. With other houseplants, we usually recommend transplanting into a pot 2 inches larger than the existing pot. For Norfolk Pines, we recommend a pot up to 4 inches larger than its original sized pot. This allows you to reduce the number of up-pots the tree will experience in its lifetime.
While it is hard to keep tropical species like the Norfolk Pine happy in Colorado’s climate, it is well worth it. This tree is festive in the winter months, and a beautiful companion the rest of the year!