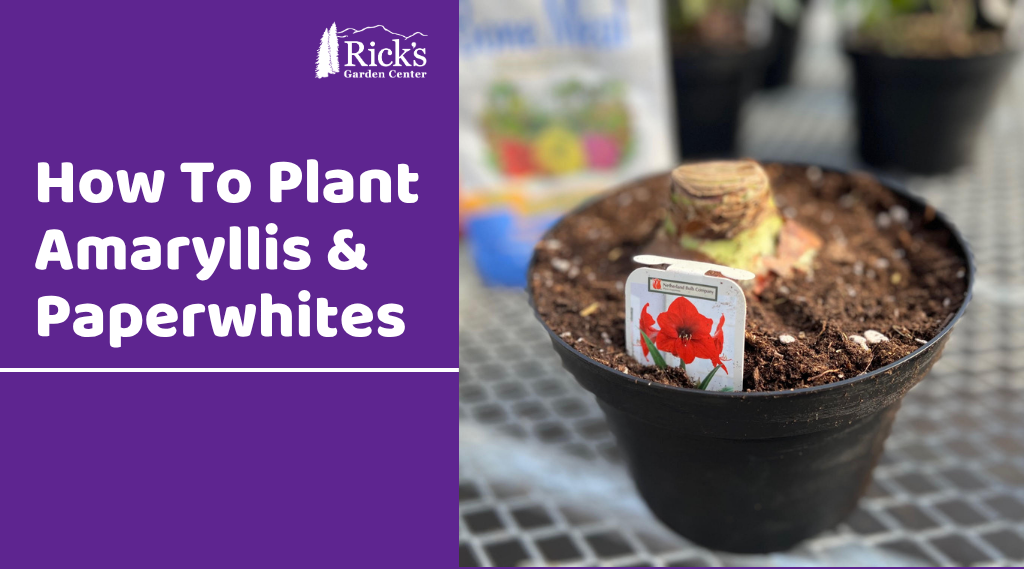
How To Plant Amaryllis & Paperwhites
Our holiday bulbs are here! Make way for Amaryllis & Paperwhites! Because these plants need to be planted about eight to ten weeks in advance, to flower around Christmas, we thought we’d provide this care guide now. Caring for and planting these bulbs is surprisingly easy!
How To Plant Holiday Bulbs
Ingredients:
-Bulbs, one Amaryllis or ten to eight Paperwhites.
-Well-draining soil (we’re using Fertilome Ultimate Potting Soil).
-8 Inch Container.
-Bulb fertilizer (we’re using both blood meal and bone meal).
Step-By-Step Guide
1.) Let’s start with the substrate. To prevent rot, pick soil with excellent drainage for these bulbs. We prefer Fertilome Ultimate Potting Soil, but Fox Farm’s Happy Frog works too. Gardners occasionally plant Amaryllis in a succulent mix, replicating their natural arid environment. Be cautious with this approach because it requires more watering due to extremely well draining soil.
2.) Once your soil is selected, fill about two-thirds of the container of your choice. Here, for both paperwhites and amaryllis, we’re using an 8 inch nursery injection pot. But you can use any kind of container. Having a hole for drainage is essential, and bulbs need some wiggle room.
3.) We advise fertilizing bulbs with a slow-release organic fertilizer. Whilst bulb-specific fertilizer, like Espoma Bulb-Tone, is ideal due to phosphorus levels, a flower fertilizer likewise works. Here, we choose to use blood meal and bone meal, high sources of nitrogen and phosphorus. We’ll eyeball the amounts because with them organic and a slow-release fertilizer burn isn’t a high concern.
4.) Plant your bulbs! Make sure roots are pointing down to the bottom of the pot, tip pointing to the sky. In fact, about one-third of the top of the plant should be above the soil. Amaryllis should have an inch and a half of space around the bulb and enough depth to properly root out. Paperwhites can be planted close together, but bulbs shouldn’t be touching. Think of how an egg carton is arranged! They should also have good depth for their roots to grow.
5.) Now, give the bulbs a light water. This helps pack them in. Rot is the primary cause of death for bulbs, so maintaining a good watering schedule is essential for their survival. We recommend watering every other day in a dry environment, less so in a humid environment. Lower watering to once every four days once green sprouts appear.
2025 Garden To-Do’s Recap 1#
Here are the gardening references we shared over the past month. We’re big fans of Colorado State University extension, so you’ll see us referencing them all the time. However, we also have some written articles just for you under our blog! There will be more gardening references for the year, so stay tuned!
Relative Houseplant Care/Rescuing House Plants:
Listen…shhhhh…if you listen closely, you can hear that neglected plant in the corner crying for help. You did not mean to cause harm. Whether you left for your holiday travels in a rush and failed to give your plants some extra TLC before you left, or you do not know the plant’s needs, the stress is equally killing you. You are at the point of not knowing what to do to make your plants happy again. No worries! We got you on our blog!
Starting Seeds Indoors:
We know it seems early, but the sooner you start your seeds the better. For tomato and pepper plants it’s recommended you start them outside once soil temperatures reach 50 degrees at night. This however doesn’t work well for Colorado’s short growing season. To get the most produce out of your vegetables we recommend starting seeds indoors now and in February! All you need is a seed-starting soil mix and a grow kit!
Seed Starting Troubles:
Have you been waiting for your seeds to pop up and still nothing? No matter what you do, your seedlings perish. There are multiple factors as to why your seeds may not be sprouting. Seed age, crusting soil, and temperature fluctuation are just a few. In the article below by CSU Extension, scientists review why your seeds may not thrive as they should. Fear not, solutions are provided to fix issues and to get those seeds growing! Happy gardening!
Winter Watering:
If air temperature is above 40 degrees it’s time to winter water! Read more about winter watering rules below!
https://www.csu.org/blog/winter-watering-tips
Do’s & Dont’s of Transplanting:
Want to get bang for your buck when starting transplants? Learn the dos and don’ts of growing transplants by copying and pasting the link below! And if you need containers we wanted to remind you we have a free drop off/pick up bin behind the store in our parking lot-perfect for starting seeds or other transplants (once they’re clean that is)!
Garden Planning:
Now’s a great time to start garden planning for spring! Remember to consider space when mapping your beds and companion plants! The links below will lead to more information about early garden planning and companion plants!
General Info:
Companion Plants:
General Onion Care:
Intimidated by growing and planting onions? How about storage, before and after planting and growing these flavorful bulbs? And what the heck does daylight have to do with all of it?
Among the hundreds of questions involving onions you may have, we’ve contacted the experts for their advice. Learn the essentials for onion care from Dixondale Farms!
Growing Potatoes at Home:
Want to try growing potatoes this season in your home garden? We have a link for you! We recommend reading Colorado State University article on the subject!
https://extension.colostate.edu/topic-areas/yard-garden/potatoes-in-the-home-garden-7-617
Spring Bulb Care:
Intimidated by growing spring bulbs? Don’t be with Colorado State Extensions help! Learn how to keep beautiful spring bulbs, corms, and roots alive by reading the article below or in our story/highlights. The article provides everything from choosing a perfect planting spot to planting depth for certain favorites Happy gardening!
https://extension.colostate.edu/topic-areas/yard-garden/spring-planted-bulbs-corms-and-roots-7-411
Rick’s Tree Planting Guide:
We know many of you are familiar with our Tree Planting Guide, so here it is again! This guide is perfect for those interested in buying a tree or about to plant a new one. We also sell mulch, root stimulators, and mycorrhizae for tree planting! Happy gardening!
https://www.ricksgarden.com/wp-content/uploads/2021/04/Ricks-Tree-Shrub-Planting-Guide.pdf

January 2025 Recap
Monday: Rick’s Highlights
On Mondays, we like to post about things happening around the store! There will be LOTS MORE in February!
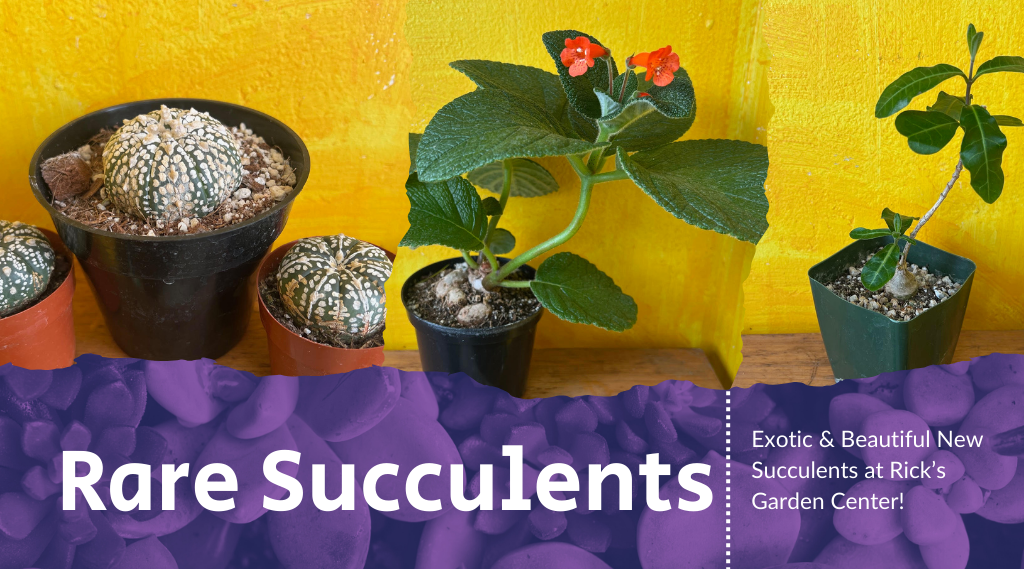
Astrophytum asterias Superkabuto
- Originate in Northern & Central Mexico!
- Sought out due to their beautiful white spotted patterns and semi-fuzzy texture.
- Occasionally even flowers! Flower color is white.
- Maximum size is about equal to a baseball!
Sinningia Hybrid
- Comes from Brazil!
- A perennial hybird of two different Sinningia, equates to a hardier plant!
- Similar to African Violets in terms of light needs.
- Misting soil required if plant goes dormant.
Raphionacme flanaganii
- Native range its from Kenya to E. South Africa.
- Produces vines that reach to 3′ long.
- Enjoys partial sun and shade.
- Occasionally blooms small fragrant flowers that green with a burgundy center.
Calibanus hookeri
- Native to North Central Mexico.
- One of only two species in genus, making this plant VERY RARE!
- Related to Ponytail Palms, somewhat pet safe.
ALL OF THESE PLANTS ARE CURRENTLY FOR SALE! We have a limited quantity, so hurry in before they’re gone!
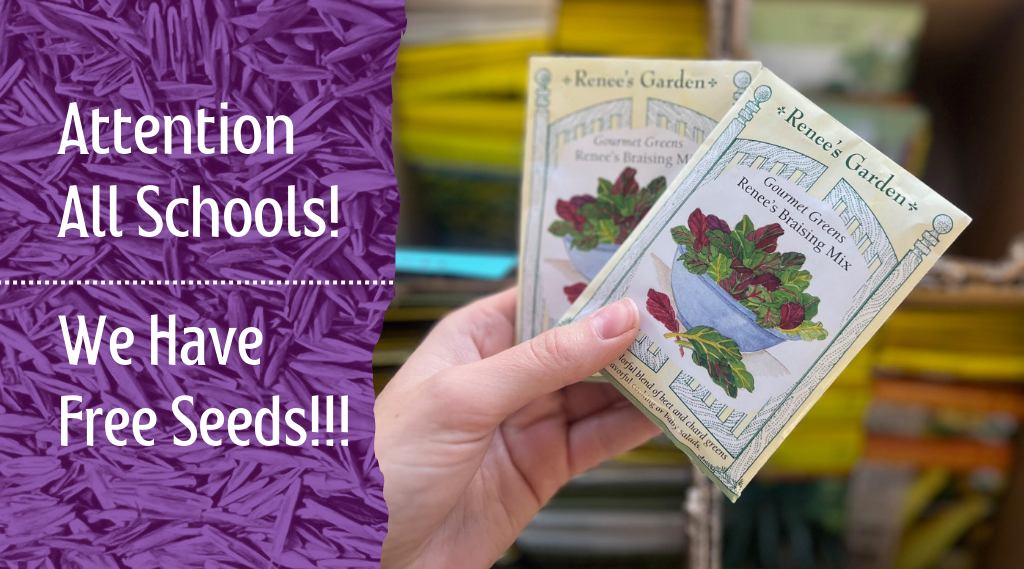
A select group of seeds are 2024 stock, so sales-wise they’re considered “expired.” However, that doesn’t mean they won’t sprout! We like to give our “expired” seeds away for free to places that need them, such as schools and other community centers. If you’re school is interested in seeds, please come into the store and show your school ID or community center ID at the front desk! Happy gardening!
We have both flower & vegetable 2024 seeds!
Tuesday: None
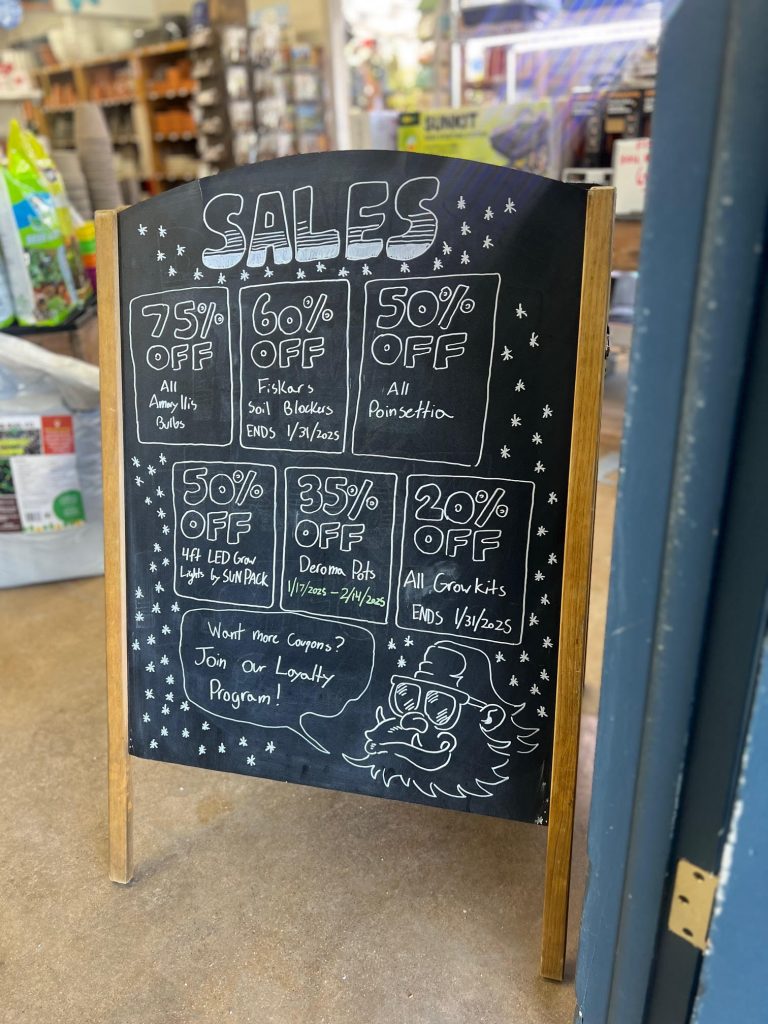
Wednesday: Sales
Thursday: Wild Card Days
Friday: Garden To-Do’s
Winter Houseplant Care: Listen…shhhhh…if you listen closely, you can hear that neglected plant in the corner crying for help. You did not mean to cause harm. Whether you left for your holiday travels in a rush and failed to give your plants some extra TLC before you left, or you do not know the plant’s needs, the stress is equally killing you. You are at the point of not knowing what to do to make your plants happy again. No worries! We got you on our blog! Click here to read!
Seed Starting Indoors: We know it seems early, but the sooner you start your seeds the better. For tomato and pepper plants it’s recommended you start them outside once soil temperatures reach 50 degrees at night. This however doesn’t work well for Colorado’s short growing season. To get the most produce out of your vegetables we recommend starting seeds indoors now and in February! All you need is a seed-starting soil mix and a grow kit! Click here to read!
Starting Seed Troubles?: Have you been waiting for your seeds to pop up and still nothing? No matter what you do, your seedlings perish. There are multiple factors as to why your seeds may not be sprouting. Seed age, crusting soil, and temperature fluctuation are just a few. In the article below by CSU Extension, scientists review why your seeds may not be thriving as they should. Fear not, solutions are provided to fix issues and to get those seeds growing! Happy gardening! Click here to read!
Saturday: Plant Factoids
Interesting gardening and plant facts! We include sources, so in case you want to learn more you can find that information!
“Proper light levels are important for the health of the rubber plant. They do best in medium to bright filtered light. Unfiltered, direct sunlight can damage leaves.”
-“1326 – Rubber Plant – PlantTalk Colorado.” Colostate.edu, 2025, planttalk.colostate.edu/topics/houseplants/1326-rubber-plant/. Accessed 18 Jan. 2025.
“Only feed or transplant a Norfolk pine (Araucaria) when they are actively growing (March through September). To supply nutrients any standard soluble fertilizer formulated for houseplants will do. Araucaria are slow growers and only need to be transplanted when they show signs of being root bound or have roots growing out the base of the container.”
-“1321 – Norfolk Island Pine – PlantTalk Colorado.” Colostate.edu, 2025, planttalk.colostate.edu/topics/houseplants/1321-norfolk-island-pine/. Accessed 25 Jan. 2025.
“Seedlings in soilless mixes need regular fertilization. Apply a water-soluble fertilizer at half-strength a week after seedlings germinate. Then fertilize every two weeks at full strength.”
-“1840 – Starting Vegetable Seeds Indoors – PlantTalk Colorado.” Colostate.edu, 2025, planttalk.colostate.edu/topics/vegetables/1840-starting-vegetable-seeds-indoors/?_gl=1. Accessed 1 Feb. 2025.
Sunday: Highlighted Products


Norfolk Pine
Ah- the Norfolk Pine! The perfect gift for someone who has just moved into their first home around the holidays. The Norfolk Island Pine is also an elegant house plant to welcome into a home for year-round interest!
Also known as Araucaria heterophylla, this plant is not a pine at all. Beautiful and graceful, the Norfolk Pine was originally found on Norfolk Island in the South Pacific, adjacent to Australia. This island is the only natural and known occurrence of the plant. This conifer evergreen tree keeps a symmetrical and compact habit. Due to its branches that present a spiraled and stepped appearance, the tree has a tidy and pyramidal canopy. The needles are fine and almost fern-like, adding a delicate touch. It is so easy to fall in love with this tropical tree! Below you will find care tips for this unique plant.
Moisture:
Norfolk Island Pine’s native habitat is tropical and very humid (50-60%). Our climate is difficult for them, so supply additional humidity through daily misting, a humidifier on a timer, or a humidity tray (set your plant on a tray of water with pebbles). The Norfolk Pine does not like their roots to be waterlogged so make sure you are not over-watering, only watering when the top inch of soil is relatively dry.
Light:
Colorado has very bright light. The Norfolk Pine prefers bright indirect light. Place a Norfolk Pine by a window that receives a good amount of light, but shift the plant away from any direct light, since they are susceptible to sunburn. Many people find that a west or east-facing window is the perfect spot!
Temperature:
Araucaria heterophylla needs a temperature range between 60°F and 70°F. Do not place this tree by a window that transfers cool air inside or a heat vent that could cause scorching or excess drying out of the plant, and its needles. Even slight fluctuations in temperatures can cause stress, so make sure to keep your Norfolk Pine under careful watch. The first sign of stress is needle drop or loss of lower limbs. These lost limbs will not grow back.
Soil:
This beautiful tree would enjoy a well-draining potting mix. The key is moisture retention without becoming waterlogged. Consider a blend of peat moss or finished homemade compost, perlite, and sand. We often also recommend fine-grade orchid bark instead of perlite, since this mimics its native soil.
Fertilizing:
Since Norfolk Island Pines are very susceptible to burning by other means, it should be expected that it’s sensitive to nutrient burn as well. To combat this risk, it is recommended to only fertilize during the growing season (spring and summer, here), and with a diluted half-strength water-soluble fertilizer formulated specifically for house plants. The cadence of fertilizer application is roughly once a month.
Other notables:
The Araucaria heterophylla is sensitive to changes in its environment. Swings in temperature, changes in light intensity, and even moving the plant to different rooms can elicit needle drops. Another thing to note is that this plant is difficult to transplant. We typically recommend delaying transplanting into a larger pot for as long as possible. It is also preferred to up-pot during the growing season. With other houseplants, we usually recommend transplanting into a pot 2 inches larger than the existing pot. For Norfolk Pines, we recommend a pot up to 4 inches larger than its original sized pot. This allows you to reduce the number of up-pots the tree will experience in its lifetime.
While it is hard to keep tropical species like the Norfolk Pine happy in Colorado’s climate, it is well worth it. This tree is festive in the winter months, and a beautiful companion the rest of the year!

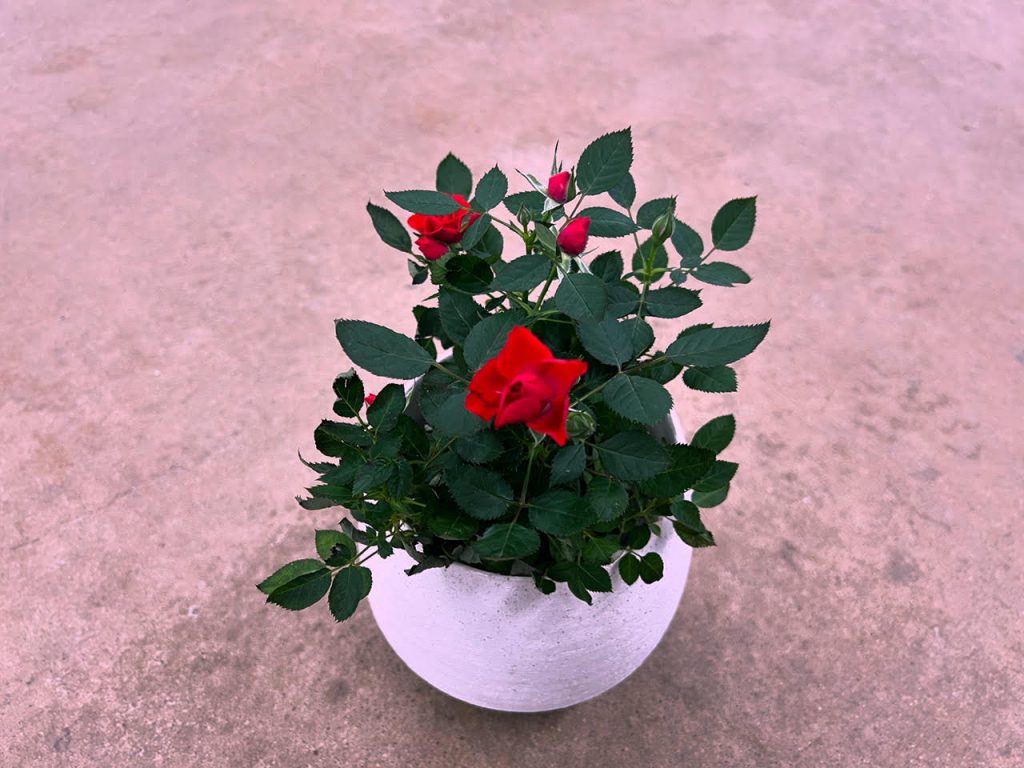
Rescuing Houseplants
Listen…shhhhh…if you listen closely, you can hear that neglected plant in the corner crying for help. You did not mean to cause harm. Whether you left for your holiday travels in a rush and failed to give your plants some extra TLC before you left, or you do not know the plant’s needs, the stress is equally killing you. You are at the point of not knowing what to do to make your plants happy again. No worries! We got you.
First:
Get nerdy. Pretend you are a scientist. Observe the plant. See what its symptoms include. What is it trying to tell you? Do research by using reference guides. We recommend The Plant Rescuer: The Book Your Houseplants Want You to Read by Sarah Gerrard-Jones (available at the Pikes Peak Library District). This book has helpful decision trees that will help you decipher your plant’s calls for help. Also, feel free to search the web on general care for your species of plant. Cross-check with multiple sources, so you are getting good and correct information on what your plant needs. Academic sources and search engines, like Google Scholar, are excellent places to find accurate knowledge. And plant communities on Reddit surprisingly are always insightful. Feel free to bring photos to us, and we can help diagnose what is occurring!
Second:
Based on the initial sleuthing you did through observation, reference books, internet searching, and inquiry, come back to the plant. Address the habitat first. Habitat includes light, moisture, heat, and humidity. Is your cactus in a dark corner? Is your Norfolk pine crisping up because it is in direct sun? How about moisture? Does your plant look like it is dehydrated, and needs a drink? Or conversely, has it seen too much water and would love to dry out its feet? Is your plant feeling a chill because it’s by a cold window? Or is it dropping dry leaves because it is in proximity of a heater vent? Some plants do not want to be drenched with water, but like the daily mist of a shower, a spritz of a spray bottle, etc. Are you giving those plants the humidity they need? If you have adjusted the habitat of the plant to fit its individual needs, and still do not see improvement in 7-14 days, move on to the next tier of help.
Third:
This next tier of inquiry is about pests, plants that are rootbound, and fertilization. Typically plants that were left for themselves for a couple of days and look sad will not need help from this stage of help. Plants that have fended for themselves for weeks while you were working on that big project, or you have mistakenly overwatered several times, or are just ready to go to a larger home are typically when you will see any of these concerns.
Pests come in all shapes and sizes. The most common pests you will encounter are house gnats, white flies, aphids, thrips, mealybugs, and scale. Another pest that occasionally shows up is various fungi. Some of these concerns are easy to get rid of, and some are extremely difficult. While this article does not have the space for the breadth of how to address each of these species, you should consult your resources (like The Plant Rescuer, or give us a call!).
Rootbound plants may present as under-watered but are typically not happy even after you have watered them. Check for roots poking out of the bottom of a drainage hole, or pull the side of the soil away from the pot to see if roots have encircled the base of the pot. If the plant is rootbound, up the pot to a container 2 inches wider than the current size.
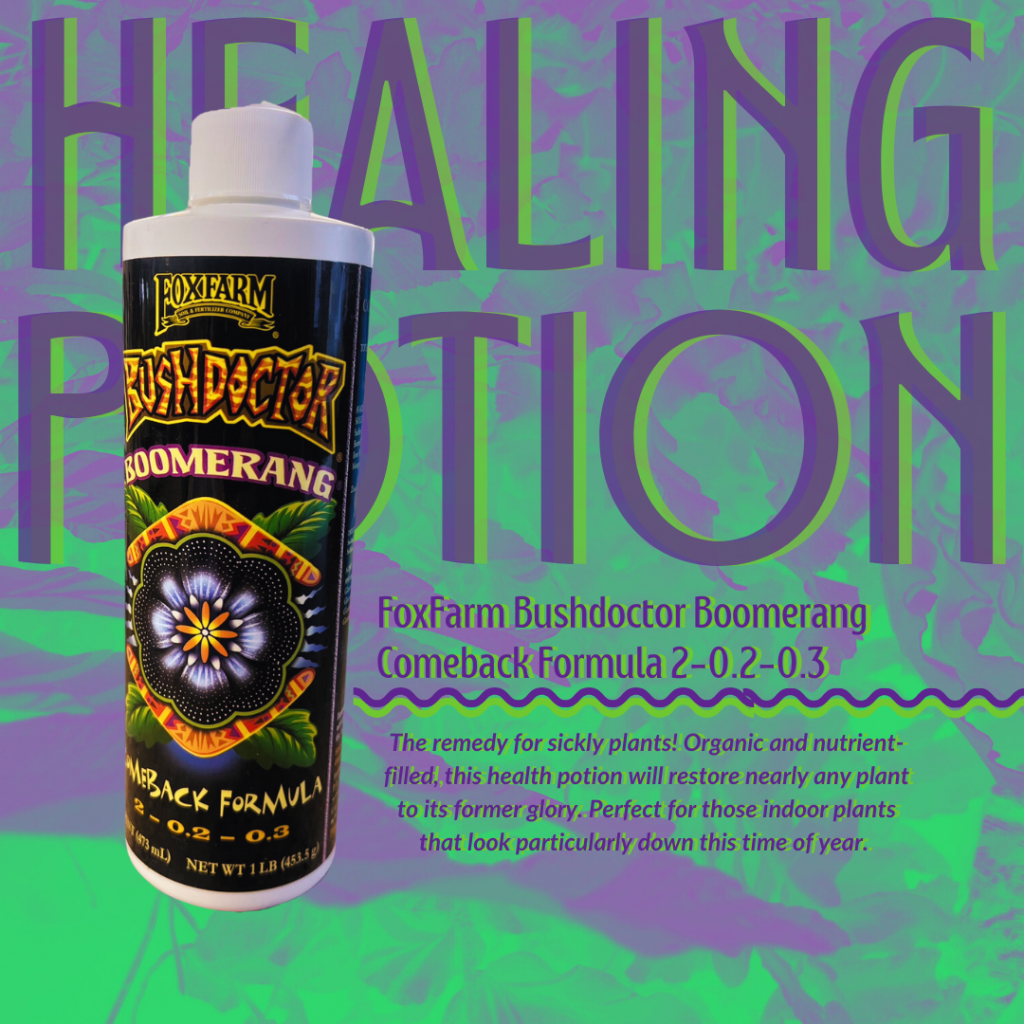
Finally, nutrients may be what your plant is asking for. A nutrient deficiency can present as yellowing leaves, absence of blooms (as an example, begonias typically need fertilization to bloom), slowed growth, or languishing properties. Find a fertilizer that will suit your plant (cacti and succulents do not need a whole lot of fertilizer, so do not go straight for the all-purpose 20-20-20.) If you are not sure that your plant needs fertilizing, start with a diluted or lesser amount than advised on the container. You can always make a situation worse.
If at any point you lose a plant along the way, know it happens to the best of us. Take heart, there are other plants out there, and this is not an indication of your skill level as a plant person. Part of the journey is losing plants occasionally, sad as it is. Say last rites, find a peaceful resting spot for the plant (the compost is a nice spot), and fill the empty corner with a new plant friend. If it is too soon for that, take the time you need. We will be here when you are ready. Peace, Love & Plants.
Holiday Houseplant Care
So many of us travel around the holidays- sometimes traveling the whole stint of Christmas through the week of New Year’s. This stretch can be long for plants (and you- depending on who you are visiting and how long the trip is), without their regular TLC from you. Our easy-to-follow tips to ensure your plants look amazing after your holiday hiatus.
Moisture
All plants have different moisture needs. Some will need closer attention, and regular watering, even while you are gone. If this is the case for some of your plants, you can implement a self-watering system such as a plant watering globe, plant nanny, or drip irrigation system. A drip irrigation solution is as simple as filling a container of water, and then using a strip of yarn or other water-wicking material immersed in the water to have it “transport” water to the plant in need.
If you prefer, feel free to lean into your community. Ask a neighbor to water while you are gone. Ensure you show them exactly how you water, and how often, so they do not over or under water. Winter air in Colorado is dry. Some of your houseplants will benefit from added humidity. A humidifier on a timer or a DIY humidity tray are great solutions for when you travel. A humidity tray can be as simple as a ceramic drip tray filled with pebbles or clay balls/LECA. Fill the tray with water, and place your potted plant on top of this set-up. Anything that evaporates will immediately be absorbed by the plant.
Mulch
We typically think of mulching as a technique to utilize outdoors, but this technique can also be used indoors! Mulching can help retain moisture during short periods. Use fine-grade orchid bark as a top dress for houseplants that need extra care. Once you have mulched, regularly check that these plants are not retaining too much moisture.
Light
Winter can be a challenge for some houseplants, especially tropical houseplants native to the region around the equator. The equator experiences more consistent sun exposure year-round. You probably have noticed the increased darkness during the winter months in our region. Thus, some of your houseplants may be craving more light right now. Move any plants that need more light to a sunny window, or beneath a grow light on a timer. With temperatures dipping in the winter months, make sure you are aware that the window you place your plant by is transmitting those cold temperatures indoors. No house plant likes a cold draft!
Temperature
As alluded to in the above paragraph, temperature is key to a plant’s happiness! Winter brings new variables for plants. Cooler temperatures translated through windows can cause frost, so move plants that may be susceptible. We also have heaters running in the winter. If you have a plant directly over a vent or radiator, you may see leaf drop or “burnt” leaves. Move any plants that could be affected. Some of these signs will show up only after you have spent time away, so it is helpful to address these risks ahead of time.
Maintenance
While some of us may leave house plant maintenance at the bottom of our to-do list, it is important to address it before you leave for an extended time. Many problems that are riding under the surface can rear their head if left unchecked. This includes any existing pest concerns. Preventative measures can include wiping houseplants down with diluted neem oil and a rag. Neem works as a leaf shine, micro-nutrient, and pest repellant. Other maintenance may include trimming any dead or languishing leaves and stems, so pests cannot get a foothold while you are gone. Trimming in this fashion, also allows plants to conserve energy and focus on being healthy, instead of trying to recuperate in your absence.
Fertilizing
Fertilizing houseplants in the winter is frowned upon since winter is a season of “hibernation” and not growth for houseplants. Winter can be a stressful period for some species due to cold, drier conditions, and reduced light. Fertilizing can present additional stress. Do not fertilize ahead of your travels, where you are not able to observe any drastic changes or your plants’ calls for help!
Now, what if you were unable to follow these recommendations, and you return to a home of sad-looking plants? We will be covering houseplant-rescuing tips next month!
Rick’s Deep Freeze Guide
In preparation for our first deep freeze coming this Sunday, Rick’s Garden Center would like to remind our fabulous customers to take some steps beforehand to help your plant friends and tools out.
- Water in outdoor trees, shrubs and perennials and cover root balls with mulch. Do not mulch up to the trunk. Moist soil conducts earth heat better than dry soil. The mulch will help keep in the heat and protect the sensitive root ball.
- Rose bushes, mulch up to the graft union at the base of the rose trunk. You can use a rose collar or just pile up mulch up to and above the graft union. The graft union will look like a bulging area on the main trunk just above the soil line.
- Bring in any tropical plants, cacti or succulents that are not at least a zone 5 inside.
- Check and move any plants that are blown on by heat vents. This will dry out the foliage in no time!
- Outdoor trees, shrubs and perennials planted in pots should be insulated with burlap bags or mulch and placed against a south or west wall of your home. Avoid watering these before the freeze.
- Water in newly established lawns and grass.
- Go ahead and plant those mums you bought in the ground.. They may come back next year!
- Disconnect and drain all hoses and drips lines from spigots
- Cover newly planted bulbs with leaf, needle or straw mulch.
- Blow out that sprinkler system!
- After the freeze, you do not have to pull up all of the dead material, so that pollinators and other insects have a place to overwinter.

Houseplant Pest Guide
Stop the Problem Before it Starts
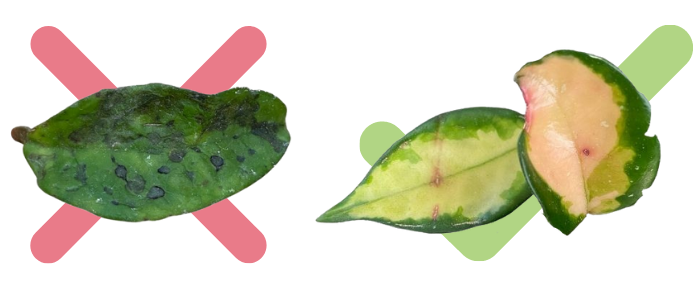
Always check a plant over for pests before you purchase.
Look at the plant’s overall health, checking for correct leaf texture and consistent coloring. There will almost always be small imperfections from shipping or normal wear and tear, but there should not be dark spotting or discoloration across the entire plant.
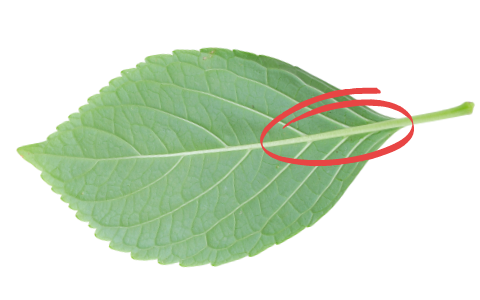
Look very closely at the leaves, particularly underneath near the area where the stem meets the leaf. If you see any small white or brown/black dots, show it to a nursery employee. They will be able to confirm if the dots are actually pests or simply dust/dirt.
Dig your finger through the dirt at the base of the plant. Look for anything moving around or flying out of the pot. Any pests that you find in the dirt will generally be much easier to get rid of, so if you see something, just be aware that you will need to treat the plant when you get home.
Always quarantine your plants when you get home. Even if you checked them over at the nursery, there is a chance that some pests snuck under the radar. The safest practice is to keep your new plants in a separate room from any other plants for about a week. Recheck your new plants every day and treat as necessary. All pests spread easily between plants, so you are protecting yourself (and your plants) from a larger problem if you quarantine any new purchases.
Identifying the Culprit
Identifying pests in your houseplants can sometimes be difficult. Many of them are so tiny you cannot see them with your bare eyes, others are more obvious. The following descriptions can help you identify which pests are “bugging” your houseplants.
Fungus Gnats
Effect on the Plant
Fungus gnats do not often cause enough damage to a plant to be noticeable. However, the larvae does feed on the roots of plants, so if an infestation is bad enough, they can kill your plants.
Appearance
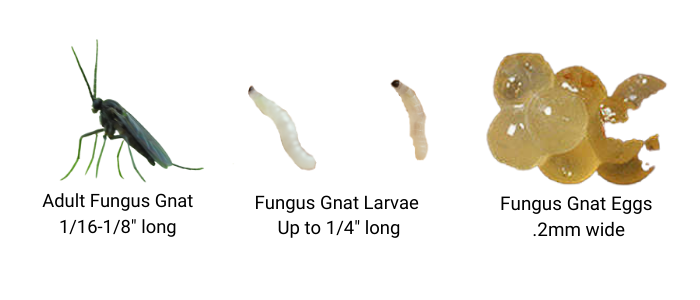
Adult fungus gnats look a lot like the common fruit fly, but with a longer abdomen that comes to a point at the back. They range from light brown to black in color.
Fungus gnat larvae range from yellow to white with dark brown tips on one end.
Fungus gnat eggs are small, round, semi-opaque and white in color. They are usually found stuck together in a bunch.
Solutions
Fungus gnats are attracted to consistently damp soil – so the first solution is to let your soil dry out as much as possible before watering again. This will make your soil less tempting for them to lay their eggs in.
You can also set out yellow sticky traps to catch and kill the adults. This will help with keeping the population down.
If you have a worse infestation, the most aggressive way to get rid of fungus gnats is with Mosquito Bits. Mix 5-6 tablespoons of Mosquito Bits with a gallon of water and let them sit for at least 24 hours. Then use this tea to water your plants. It will make the soil inhabitable for the adults and will kill any larvae or eggs that are already present in the soil. You may also layer the Mosquito Bits over the soil (ensuring to cover the entire surface) and then water as usual; however, this method can cause white mold to grow on the surface of your soil. The mold is harmless to you and your plants, but it can be unsightly. You will want to treat with Mosquito Bits for at least 4 weeks (depending on the frequency of watering) to break the life cycle.
Always follow the directions for your safety and the safety of your family, pets and plants.
Usually a combination of all three methods is the best way to completely get rid of fungus gnats. Once you have eradicated the original infestation, you can continue to water with Mosquito Bit tea once every other month to stop them from reappearing.
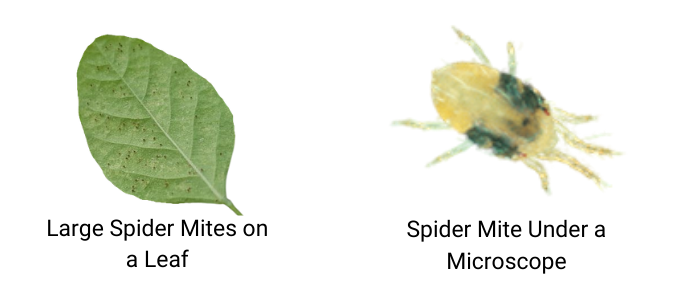
Spider Mites
Effect on the Plant
Spider mites also feed on the liquid stored inside plant leaves, so they leave behind very small white or yellow circles from their feeding on the leaves. The damage left by spider mites is often not noticeable until it is extensive – the on the plant will look speckled with a lighter coloration, and will often be limp. Spider mites also leave behind a small web made of very fine strands. hat can be seen between the leaves and stems of your plant.

Appearance
Adult spider mites are often too small to see with the naked eye. They look like tiny flecks of dirt and range in color from brown and red to white. They will move around if you watch for long enough. They usually gather on the underside of the leaves, nearer to the stem.
Solutions
Spider mites are attracted to dry and arid areas, so they are fairly common in Colorado houseplants. To stop an infestation from starting, you can spray or wipe your plants with diluted neem oil once every few weeks. Only spray in the early morning or in the evening to avoid burning your leaves. Check the leaves (especially the undersides) and stems regularly so you can catch them early if they decide to move in.
To treat an already started infestation, you want to:
First, quarantine any plants that show signs of spider mites.
Next, spray your plants’ leaves with water using a sink, hose, or shower to remove most of the spider mites and their webs. During this process, be careful to not drench the soil – keep the stream aimed at only the foliage to avoid drowning your plant. If your plant has delicate foliage that will not stand up to being sprayed, you can gently dip the plant in water (only the leaves and stems, not the pot) and gently swirl to remove the spider mites.
Then, either spray or gently wipe diluted neem oil on to all of the leaves and stems of the plant. Apply the neem oil either early in the morning or late in the evening to avoid burning the leaves in any intense daytime light. Continue this treatment every 4 days, until all signs of spider mites have been gone for at least 3 weeks.
If the infestation persists, you can switch to a spinosad treatment. You can find these products at your local garden store. It is recommended that you use these products outside only unless the bottle is specifically marked for indoor use.
Always follow the directions for your safety and the safety of your family, pets and plants.
Once the infestation is gone (you have seen no signs of spider mites for at least 3 weeks), you can cut off any leaves that show spider mite damage so your plant has more energy for new, healthy growth.
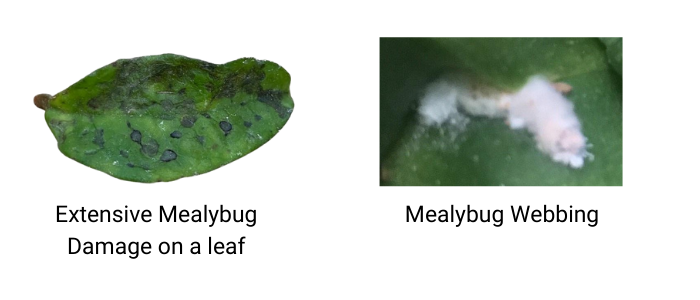
Mealybugs
Effect on the Plant
Mealybugs also feed on the sugary sap within the leaves – they typically leave behind dark round circles on the leaves. Once the damage is extensive enough, the leaf will wilt and fall off. Mealybugs also leave behind a very fine white webbing that is often woven in tight spheres, making them look like small, plush, white balls.
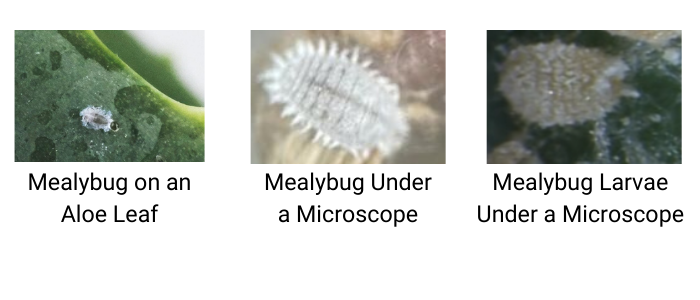
Appearance
Adult mealybugs most often look like small white circles to the naked eye, however they can get large enough to see the definition in their many legs without a microscope. The larvae are very small and usually opaque yellow, and they are too small to be seen with the naked eye.
Solutions
Mealy bugs are attracted to soft plant matter, so they are usually found on plants that have been overwatered (causing the leaves to go soft). They are also attracted to high nitrogen levels, so over fertilizing your plants can attract them as well. Be sure to only water when your plant needs it, and have a well draining potting mix. Treating your plants and soil with diluted neem oil will also keep mealybugs away.
To treat an already started infestation, you want to:
First, inspect all of your plants carefully and quarantine any that show signs of mealybugs.
Next, you should remove all of the mealybugs you can see by using a Q-tip dipped in 3% rubbing alcohol. Throw away the removed mealybugs somewhere outside of your house.
Then, treat all affected plants with diluted neem oil every 4-7 days (depending on the severity of the infestation) for around 6 weeks.
Once the infestation is gone, remove all leaves that show signs of mealybug damage.
Always follow the directions for your safety and the safety of your family, pets and plants.
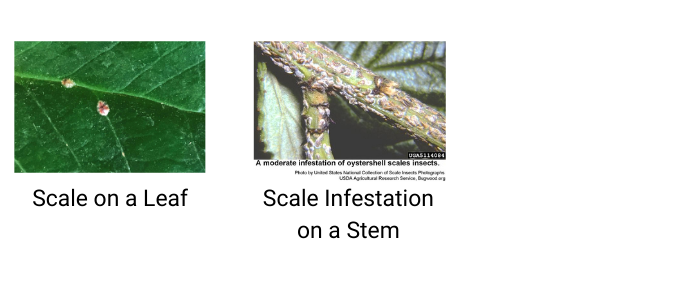
Scale Insects
Effect on the Plant
Scale insects feed on the sap found in the leaves and stems of houseplants, so they will leave small yellow or brown spots behind. They also excrete a sticky sap, that attracts ants.

Appearance
Adult scale looks very similar to the damage it leaves behind. They are small, circular and flat. It is common to confuse a scale bug with a the normal damage you would see on a healthy leaf or stem. You can try scraping the brown area off with your fingernail, and if it comes off easily and does not leave behind an open wound on the plant, it is likely scale. The adults are usually between 1/8″ to 1/4″ in size.
Solutions
Scale insects are very easy to mistake as a part of the plant, so it is important to inspect your houseplants often. Look for the sticky sap they leave behind or any increase in ants present around your plants.
To treat an already started infestation, you want to:
First, inspect all of your plants carefully and quarantine any that show signs of scale.
Next, you should remove all of the scale you can see by using your fingernail or a pair of tweezers. Try not to damage the surface of the plant too much during the removal process. Throw away the removed scale somewhere outside of your house.
Next, treat all affected plants with diluted neem oil every 4-7 days (depending on the severity of the infestation) for around 6 weeks.
Once the infestation is gone, remove all leaves that show signs of scale damage.
Always follow the directions for your safety and the safety of your family, pets and plants.
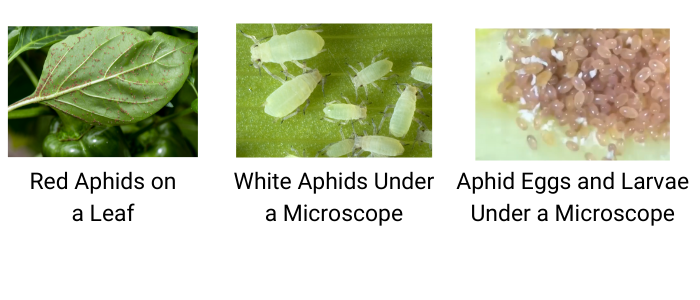
Aphids
Effect on the Plant
Aphids suck the sap of your plants and leave behind a sticky substance called honeydew. Sometimes the first sign of an infestation is an uptick in ants present on your plants because they are attracted to the honeydew. Aphids will often leave small holes behind in the leaves they have fed on.

Appearance
Adult aphids are some of the easiest pests to spot – but they are still quite small. Adults vary in color from dark brown and red to white or bright green. They can be seen without a microscope.
Aphid eggs are tiny, oblong and usually a light green or white color. They can be seen stuck on the underside of leaves, but are sometimes housed in a light gray casing that resembles dust or dirt.
Solutions
Aphids can come into the house through open windows or in contaminated soil and plants. To keep aphids from reaching your houseplants, be sure to thoroughly inspect any new houseplants or potting soil for signs of insect activity.
To treat an already started infestation, you want to:
First, inspect all of your plants carefully and quarantine any that show signs of aphids.
Next, spray your plants’ leaves with water using a sink, hose or shower to remove most of the aphids. During this process, be careful to not drench the soil. Keep the stream aimed at only the foliage to avoid drowning your plant. If your plant has delicate foliage that will not stand up to being sprayed, you can gently dip the plant in water (only the leaves and stems, not the pot) and gently swirl to remove the aphids.
Then prune all of the affected foliage.
From here, there are a few effective options to stop the aphids from coming back.
Predatory insects – you can release ladybugs or green lacewings to control aphid populations. This is usually a more popular choice for those growing in outdoor greenhouses, but some do not mind having ladybugs in their house. Keep in mind, these predatory insects will die off once the aphids are gone.
You can also kill aphids with neem oil. Spray or wipe your plants thoroughly (tops and bottoms of the leaves and stems) with diluted neem oil every 4-7 days, depending on the severity of the infestation. You should treat until the aphids have been gone for about a month.
Always follow the directions for your safety and the safety of your family, pets and plants.
Fern Care Guide

Light
Most fern varieties naturally grow on the floor of thick, forested areas so they prefer a bright but indirect light. Given the delicate nature of their leaves, they can easily burn if put in direct sunlight.
Temperature
Ferns should be kept in a temperate environment – they prefer daytime temps between 65-75 degrees, and can have nighttime temps no more than 10 degrees lower (55-65). If the temperature is often above 75 degrees, they will be okay but may require more frequent watering. If temperatures fall below 50 degrees, they risk being cold-shocked which is rarely survivable.
Humidity
This is the trickiest aspect of keeping a fern in Colorado. They require a humid environment in order to keep their foliage from crisping up and falling off. A fern should be kept in humidity levels that are consistently above 60%. There are a few ways to accomplish this:
- Keep your fern in a closed terrarium – This is the easiest way to ensure your fern has optimal temperature and humidity levels.
- Give your fern a humidity tray to sit on – By filling a saucer with washed gravel and a very small amount of water and then setting your potted fern on top, you can create a temporarily humid environment immediately around your fern. When using this method, ensure that the soil is not touching the water through your pot’s drainage hole. The water will have to be refilled about every other day.
- Give your fern a humidifier – A humidifier is a great choice for people who have many plants that prefer a more humid environment than Colorado has to offer. There is a great variety to choose from – small, single-plant serving models, to ones that can raise the humidity of a large room.
Watering
Ferns prefer to stay in moist soil. It is important to maintain a good medium between letting the soil dry out and keeping it wet. The best way to tell if your fern needs to be watered is by sticking your finger into the top layer – if the top 1 1/2 inches are dry, then you should water. As with most houseplants, it is much safer to err on the side of underwatering than overwatering.
Fertilizer
Ferns are very light feeders, so they do not need to be fertilized often. For the best results, feed your fern a balanced houseplant fertilizer once every month starting mid-spring through the summer. It is best to not feed your fern during the fall and winter, as they are most sensitive to over-feeding at this time.
Tillandsia (Air Plant) Care
Tillandsia species are wonderful indoor houseplants that add a fun and exciting flare to your décor.
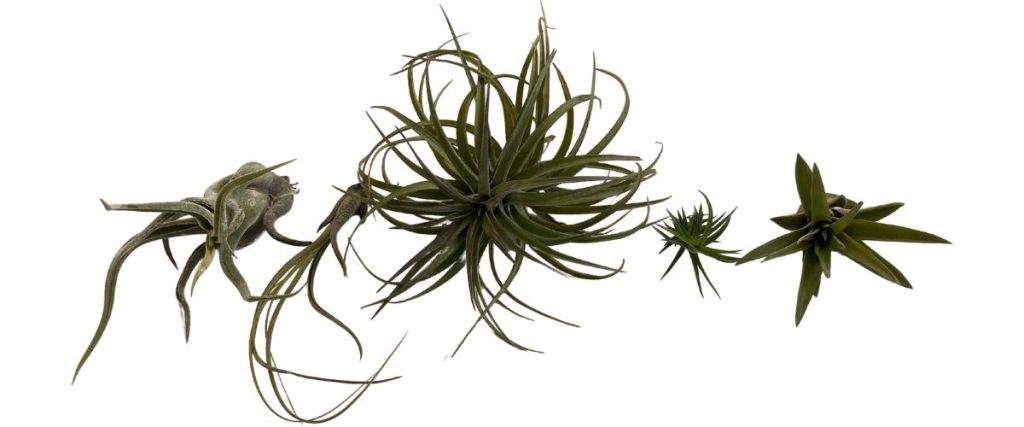
What are tillandsias?
Tillandsias, commonly known as air plants, are part of the bromeliad family. In addition, they are one of many examples of epiphytes, meaning that they grow on other plants and structures. However, epiphytes are not parasitic and do not take moisture or nutrients from their host. Instead, epiphytes use their leaves (instead of their roots) to absorb moisture and nutrients. Their roots are only used to attach to other surfaces. Tillandsias use trichromes, specialized structures on their leaves, to trap moisture and dust. Because they get all their nutrients from the atmosphere, they grow without the need for soil, hence the term “air plant.”
There are over 500 different species of Tillandsia which are native mostly to the southern United States, Central America, and South America. In nature, the mesic types attach to other plants, typically trees, in the rainforest canopy. The xeric types are from desert-like climates and typically attach to rocks.
Do tillandsias produce flowers?
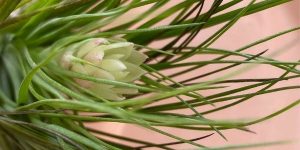
Not all tillandsias will flower indoors, but some will, and it may take years for this to happen. Blooming is the end of life for that individual plant, but typically blooming tillandsias will produce pups – small offshoots that will become full-grown tillandsias.
How can I display tillandsias?
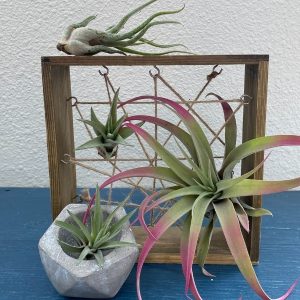
Because they do not require soil, tillandsias can be displayed in an infinite number of ways. They can be tucked into vignettes, tied on to displays using wire or string, and most are even happy in glass terrariums (so long as they get adequate air flow after being watered). It is best if the tillandsia can be removed from the display to be soaked in water, but it is possible to hydrate the tillandsia by misting it frequently (just be sure the mounting material does not hold water which could cause the plant to rot).
How do I care for tillandsias?
Since air plants typically receive bright, indirect light (for example, light filtered through a bit of the rainforest canopy), they prefer the same in your home. An east or west facing window is perfect!
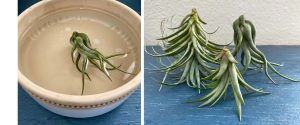
In our dry Colorado climate, soaking is the best method for providing water to your air plants. Simply soak in a bowl of water for one hour, once a week. Then dry the plants upside down for a few hours to prevent the center from retaining too much moisture and rotting. Tillandsias appreciate good air circulation, but do not put them near a fan or heat vent where they might dry out too quickly.
If the tips of the leaves become dry and brown, or if the leaves start to curl or roll, it may mean that the plant is dehydrated. If this happens, increase the humidity around your tillandsia by misting it with water on a regular basis or putting it in a terrarium.
While not required, tillandsias can benefit from light fertilization about once a month. Too much fertilizer can be detrimental to air plants, so it is best to use either an air plant specific fertilizer or dilute a typical houseplant fertilizer to about one-quarter of the suggested dosage. Apply the fertilizer by lightly misting the plant.
Visit us and find a new fabulous tillandsia to add a bit of flare to your home!
Resources
https://gardeningsolutions.ifas.ufl.edu/plants/houseplants/air-plants.html
https://extension.psu.edu/tillandsia-air-plants
https://aces.illinois.edu/news/tillandsia-air-plant-catching-eye-indoor-gardeners