Pond Plant 101
By PFC
Having a pond with plants seems at odds with our drought-ridden state, yet it can be a boon to any garden across the western slope. Ponds create a calming atmosphere and provide homes for wildlife, such as dragonflies and frogs, when stocked with the right plants. What makes our state special is its connection to wilderness, so why not try to replicate our waterways, too?
We likewise understand some are more interested in aesthetics. We also supply visually interesting and beautiful pond plants, though a majority of these beauties are not native, sadly. That doesn’t mean native insects and other animals don’t benefit from these plants, however! We’ll provide information on how to care for pond plants, along with some factoids on our favorite native and non-native varieties. Plus, how to safely handle non-native (and often invasive) pond plants. Happy gardening!
Creating A Pond
Creating a pond is easier than you think! If you lack space or want a cheaper option, consider creating a patio pond. These container-sized ponds are made with just that, a container, though it should be fully sealed to prevent water leakage. A pot that lacks a drainage hole, an old bird bath top, or a fountain basin are prime examples. This container should be at least 12” across and 10” deep to provide adequate space for aquatic plants (CSU, “Water Gardens”). For large plants, such as Victoria waterlilies, this may not be an optimal home for their size (CSU, “Planting”). For large ponds, you will have to dig out an area of the garden and line this spot with pond liner to prevent water from seeping into your soil and potentially eroding foundations (Wildlife Trust). To avoid puncturing the liner, remove sharp stones found embedded within the dug-out pond’s soil (Wildlife Trust). Here is an easy how-to guide on creating a pond: click here!
Substrate
Now that we have our container, the next step is substrate! Many aquatic plants, such as water hyacinth and hornwort, don’t require substrate because their roots are free-floating, acting similarly to gills. Things like our taro, zebra rush, and rain lily do require substrate for their survival. Pond substrates come prepacked, or you can forage your own! For packaged substrate, we actually sell bags of our recommended types in the pond section of our store. If you’re looking for more than 2 cu ft, however, we recommend visiting an actual pond store. Our local favorite is Crystal Ponds! (Click here). Sand likewise works as a substrate! Avoid any substrates with perlite, peat, moss, or bark, which will float to the pond’s surface (CSU, “Planting”). When it comes to foraging substrate for a pond, no need to visit a wild lake or aquatic habitat. In fact, the best substrate may just have been under your feet the whole time! Soils beneath cool-season grasses, like the standard bluegrass, make excellent pond substrate (CSU, “Planting”).
Planting
Regardless of substrate type, planting should take place in the shade or on an overcast day to avoid drying out the roots of aquatic plants (CSU, “Planting”). Depending on the type, pond plants must be planted at specific times of year. Hardy pond plants can be planted from mid-April through May, while tropical pond plants should be planted mid-June, when water temperatures are a constant 68 degrees Fahrenheit (CSU, “Planting”). Tropicals can remain in the pond until the first frost. Hardy pond plants can remain in large ponds over the winter after being pruned, yet pond plants in patio pots should be discarded at the end of the season because they will not return the following year (Zuri). If you wish to try keeping tropical pond plants happy in winter (which is incredibly difficult), they can be stored indoors in a makeshift container pond that must have full sunlight and continually warm water temperatures, at least above 60 degrees Fahrenheit (Zuri). Hardy waterlilies should have old foliage removed and dropped within the deepest part of the pond over winter, where they’ll attain dormancy until the following spring (Zuri).
Feeding Pond Plants
Fertilizing pond plants is one of the most difficult aspects of maintaining aquatic plants. This is especially true if you choose to keep fish, as fish (and other aquatic animals like snails and insects) are sensitive to chemicals found in fertilizers, both synthetic and organic. If you have a pond that does not have any animals contained within it nor is it near any wild waterways, you may fertilize pond plants with aquatic plant food tablets. The brand and its ingredients will determine how frequently you can fertilize. A pond with fish can be fertilized but under specfic guidelines. Fertilizer should be organic and animal-friendly! We sell API products, which are animal-friendly pond fertilizers and cleaners. Here is more information on them: click here! We do not recommend fertilizing ponds that are muddy or have undesirable plants within them (MSU). Fertilizer is non-selective, so it will end up feeding weeds and mud (MSU). Mud actually binds phosphorus from fertilizer, causing plants to become unhealthy (MSU).
Native Pond Plants:
This section’s a bit misleading, as at the moment we don’t have any truly native wetland or aquatic plants in stock. We, however, have a solution for you! We highly recommend you visit Highlands Plains Environmental Center (HPEC for short) either in person or on their website for anything native plant-related! We love this place and sell a few of their perennials ourselves, though nothing aquatic yet. To make it easy, we’ve provided a link for you to visit their website: click here!
Hornwort (Ceratophyllum demersum)
If you want to increase oxygen in your pond, look no further than the humble hornwort! This aquatic plant is native to all continents, save for Antarctica, though it’s considered invasive in Tasmania, Australia, and New Zealand (Monk).* Also known as coontail, hornwort is effective at maintaining a healthy pond environment through photosynthesis, absorbing CO2 and releasing O2 back into the water (thewatergarden.com). Highly oxygenated water improves clarity and reduces the risk of algae, positively impacting the health of your pond’s environment (thewatergarden.com). Because of its versatile nature and ability to survive both in pond substrate or floating in water without roots, hornwort spreads rapidly and easily. In the wild, hornwort forms large clumps in lakes, ponds, streams, and rivers, which create safe hideaways for fish hatchlings, dragonfly larvae, and daphnia (MDC). Waterfowl also love consuming hornwort (MDC). This is one of the most essential pond plants there is! These plants are cold sensitive, so they’ll do best in a heated pond. Plant them at a similar time to tropical plants, as they dislike cold.
Non-Native:
Water Hyacinth
A favorite amongst our aquatic gardeners! Known for its impressive growth, the water hyacinth produces beautiful purple flowers. Though the bulbous foliage can look unsightly, the bulbs are filled with air sacs, which increase the water hyacinth’s buoyancy (Michigan.gov). This, along with their feathery roots, incredible growth rate, and asexual reproduction, makes the water hyacinth one of the fastest-growing plants in the world, and thus an excellent invasive plant, which isn’t good for our local waterways (Gladisitch). Keep water hyacinth contained properly and avoid contact with wild waterways.
Taro
Another non-native pond plant. If you’ve visited the Denver Botanical Gardens, you may have noticed these lush-leaved plants alongside the aquatic scapes. They’re also often sold in corm form under their Latin name, Colocasia esculenta, and look very similar to Alocasia. Oftentimes, as demonstrated by the few featured taro within the pond area of the store, they come with colorful or patterned leaves, ranging from “black” colored foliage to leopard-like variegated spots. The taro, so long as it is kept properly wet in pond shallows, can tolerate high heat due to its tropical origins (Pondmegastore.com). It rarely becomes invasive in Colorado, but in Southern states it’s considered invasive. However, unlike many other tropical pond plants, the taro can make an excellent and extravagant houseplant! Its soil should remain continually moist, its lighting should be bright, and humidity is a must if you’re interested in overwintering taro.
Yellow Rain Lily
Though not truly native to Colorado, the yellow rain lily is native to the tropical Americas, primarily Central and South America (Wiki, Nov 2024). The rain lily is also known as magic lilies because they appear right after a heavy rain, blooming from thin air (Chalily). The flowers appear similar to crocus flowers, bright and cheery! In addition to their delightful visuals, certain rain flowers bear a sweet fragrance, particularly at night, which attracts nocturnal pollinators such as moths and beetles (Wiki, June 2024). There are over 3,000 moth species in Colorado, and many are essential to our garden’s health (Powell). Though there is potential for the yellow rain lily to become invasive, if handled with care, it is highly unlikely.
Water Spangles (Salvinia minima)
Also known as water velvet, water spangles are a type of floating fern which behaves similarly to duckweed (ISSG). Originally from South & Central America, water spangles behave similarly to duckweed; thus, they can spread excessively and are considered incredibly invasive (Tulane). It does have an attractive appearance, however, and can make a great cover for fish within ponds and aquariums so long as parts of the plant are occasionally removed to prevent overcrowding (Aquatic Arts). If left untreated, water spangle can easily smother a pond or aquarium, limiting O2 and potentially harming aquatic life, from fish to bugs to other plants. Due to its nature, water spangle should NEVER be near wild waterways.
Working With Invasive Pond Plants
In order to prevent the spread of non-native pond plants into our waterways, you must manage the keeping of and disposing of these plants with utmost importance. Any plant that grows rapidly must be safely disposed of to prevent overcrowding. While you may feel guilty about disposing of these plants, you are being a hero to our native flora and fauna, allowing them to thrive in their natural habitat by preventing ecological competition. There are a few ways to get rid of aquatic plants safely; the best practice is to “cook” invasive plants or to compost them (Mattrick). To cook a plant, simply leave it on a concrete surface and pin it down with a rock (Mattrick). Allow the sun to fry the plant for a month until it’s completely dead, and then it can safely be disposed of (Mattrick). To compost, simply add invasive aquatic plants to the top of the compost pile to dry out and eventually decompose. This should only be done with invasive aquatic plants, as invasive terrestrial plants can still spread seed via compost (Mattrick).
*Hornwort may be native to North America however this variety isn’t historically found in Colorado. Hornwort has adapted to Colorado waterways and isn’t considered invasive
Aquatic Arts. “Water Spangles (Salvinia Minima), Aquatic Arts Grown!” Aquatic Arts, 2026, aquaticarts.com/products/water-spangles-salvinia-minima-aquatic-arts-grown?srsltid=AfmBOorcqi3gRLve-PJDeVJlkSiPGllf7hz0_dEUGKPvzA-lCR7PxO5D. Accessed 29 June 2026.
Gladitsch, Haley. “Water Hyacinth (Eichhornia Crassipes).” Long Island Invasive Species Management Area (LIISMA), 18 July 2022, liisma.org/water-hyacinth/.
“Hornwort. One of the Best Oxygenators You Can Have!!!.– the Water Garden.” Thewatergarden.co.uk, 2024, thewatergarden.co.uk/hornwort-one-of-the-best-oxygenators-you-can-have/.
“How to Build a Pond | The Wildlife Trusts.” Www.wildlifetrusts.org, www.wildlifetrusts.org/actions/how-build-pond.
ISSG. “Issg Database: Ecology of Salvinia Minima.” Archive.org, 2026, web.archive.org/web/20121116204858/www.issg.org/database/species/ecology.asp?si=570&fr=1&sts=&lang=EN. Accessed 29 June 2026.
“Louisiana Invasive Species.” Tulane.edu, 2026, is.cbr.tulane.edu/Species_CommonSalvinia.html. Accessed 29 June 2026.
Mattrick, Christopher . “Managing Invasive Plants: Methods of Control.” Conservation Notes of the New England Wild Flower Society, 1 Feb. 2008. Accessed 29 June 2026.
MDC.“Coontail (Hornwort).” Missouri Department of Conservation, mdc.mo.gov/discover-nature/field-guide/coontail-hornwort.
Monk, Emma. “Hornwort | MPI Biosecurity New Zealand.” Archive.org, Biosecurity New Zealand, 2026, web.archive.org/web/20121205035215/www.biosecurity.govt.nz/pests/hornwort. Accessed 22 June 2026.
“POND|PLANTS|WATER LILIES|WATER|GARDEN|PLANTS|LOTUS.” Pond Megastore, 2026, pondmegastore.com/collections/taro-plants?srsltid=AfmBOopfWXy9FYwzzHfuMhQZRcFz-il_N5m8yzQRNLPUg5Brn0utQHni. Accessed 29 June 2026.
Powell, Lori. “Discovering the Hidden World of Nocturnal Pollinators – Cottonwood Institute.” Cottonwood Institute, 22 June 2026, www.cottonwoodinstitute.org/upcoming-events/hidden-world-of-nocturnal-pollinators/. Accessed 25 June 2026.
“Yellow Rain Lily Shallow Water Plant – Chalily Ponds & Gardens.” Chalily, 22 June 2026, www.chalily.com/product/rain-lily-yellow/?srsltid=AfmBOoqAv_BJILgcYmduz-zWJ1ocGBDGXu6dJtK67K81_kUDiD6-mI_d. Accessed 22 June 2026.
“Water Hyacinth.” Www.michigan.gov, www.michigan.gov/invasives/id-report/plants/aquatic/water-hyacinth.
“1026 – Water Gardens: Planting Aquatic Plants – PlantTalk Colorado.” Colostate.edu, 2026, planttalk.colostate.edu/topics/annuals-perennials/1026-water-gardens-planting-aquatic-plants/. Accessed 27 June 2026.
Wikipedia Contributors. “Zephyranthes.” Wikipedia, Wikimedia Foundation, 29 Nov. 2024.
Zuri, Jennifer. “5 Ways to Prepare Your Pond Plants for a Healthy Winter.” Aquascape, Inc., 22 Sept. 2025, www.aquascapeinc.com/water-gardening/pond-plants/5-ways-to-prepare-your-pond-plants-for-a-healthy-winter?srsltid=AfmBOoo7pwUTah2xSzrEjzrYzZIuLbP0gRZHfq56yqZV4qKgke7Mq5Xg. Accessed 27 June 2026.
Most Commonly Requested AI Plants & Real Alternatives
By PFC
Here at Rick’s Garden Center, we are unfortunately familiar with AI. From misidentifying plant species via plant identification apps to recommending “home remedies” to treat numerous plant diseases that cause more harm than good, we’re familiar with AI wreaking havoc for Colorado gardeners. In fact, it’s become such a nuisance that we’ve already written an article about it this year. If you’d like to check it out, it’s here: click here!
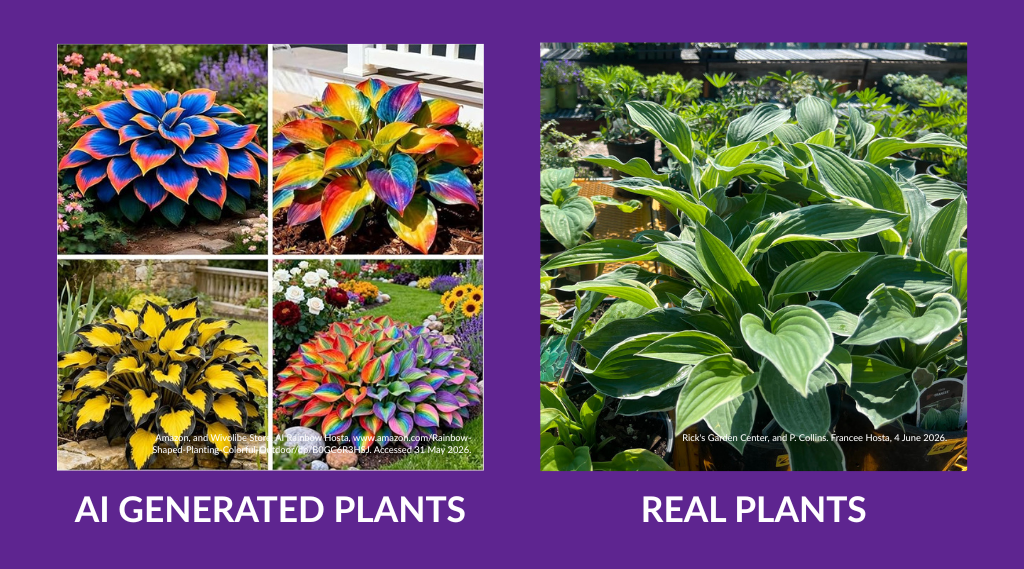
Because our perennials, annuals, trees, shrubs, and houseplants are available for sale, our biggest issue with AI stems from requests for “non-existent” plants. Gardners bring in a picture of a plant that looks too good to be true and want it for their gardens. Examples include plants with unreal foliage, such as perfectly spiraled leaves, perfectly striped, or rainbow-colored flesh instead of the standard green. We hate to break it to you, but that plant you provided a picture of is a computer-generated image, an AI-created plant! And don’t trust purchasing seeds for these generated plants, despite major retail stores listing them for sale; these are typically invasive plant species seeds or duds. Thus, we’d like to provide some pictures of AI plants commonly requested in comparison to the real deal.
Rainbow Hosta
A very popular plant that does not exist! AI-generated pictures display several “types” of rainbow hosta, some quite literally rainbow, whilst others have black or red variegated leaves. A majority of these pictures are fake, all computer-generated. An actual hosta will never contain color multitudes, at best, classic white or dark green variegation. A good example of a real hosta considered to be “rainbow” is the “Rainbow’s End,” which we often don’t carry due to popularity. A beautiful and colorful hosta we carry (and one which likewise exists) would be hosta “Patriot.”
Dwarf Lotus
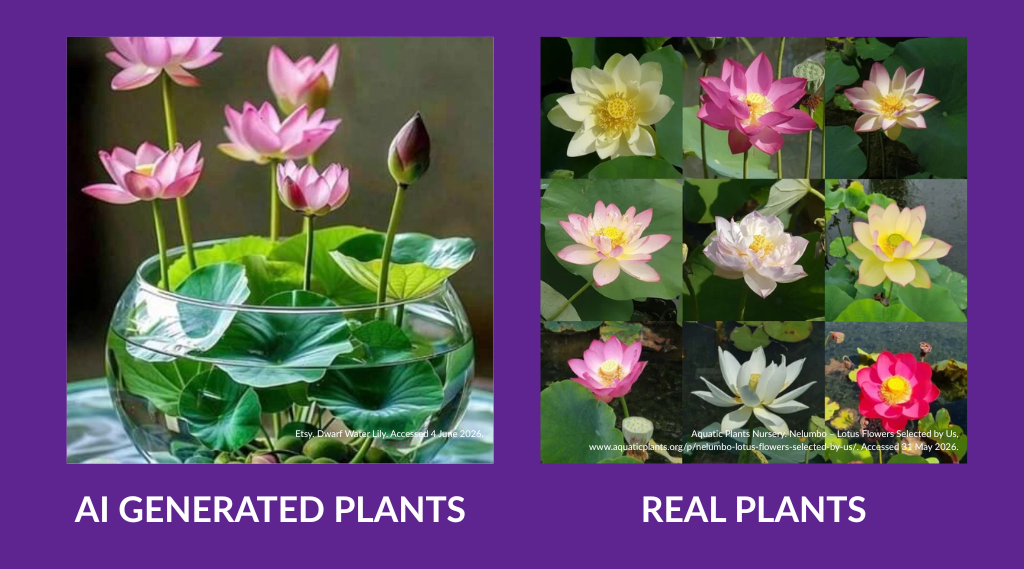
A bit of a trick question plant, as dwarf lotus does exist. The flowers are pale pink or white, and there are several different varieties. However, AI tends to replicate real pictures of dwarf lotus flowers and twist them into fantastical shapes or change colors beyond their usual range, like neon blue*, purple, orange, bright red, and other neon colors. The pink featured in the example image has been artificially saturated, giving the lotus a bright appearance. Plus, if you look closely, you can see “whisp” around the flowers and leaves of the AI lotus. Real lotus leaves and flowers lack such decorative anatomy. We don’t sell lotus rhizomes, but we do sell water hyacinth and other pond plants!
Butterfly Lily
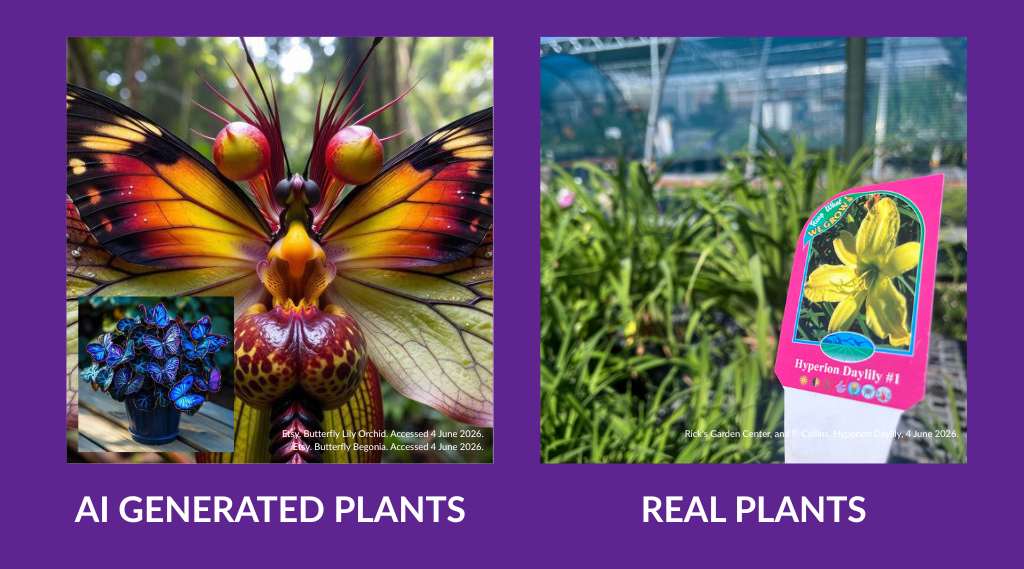
You’ve never seen a lily like this, and that’s because it’s not real. Another common AI indicator is if a plant looks too similar to another animal, object, or other plant. In this case, it’s a butterfly, but things like serpents, elephants, and tigers are common victims of becoming AI plant chimeras. Begonia and orchids are the typical flower victims. Again, there are always weird exceptions, such as the Monkey-Face Orchid (click here to see). If you’re unsure whether a flower is real, we recommend reaching out to Colorado State University Extension for identification. We’ll provide a link to their Q&A page: click here!
In terms of real plants that are visually as stunning, we carry a variety of day lilies in various colors and sizes!
Black Rose
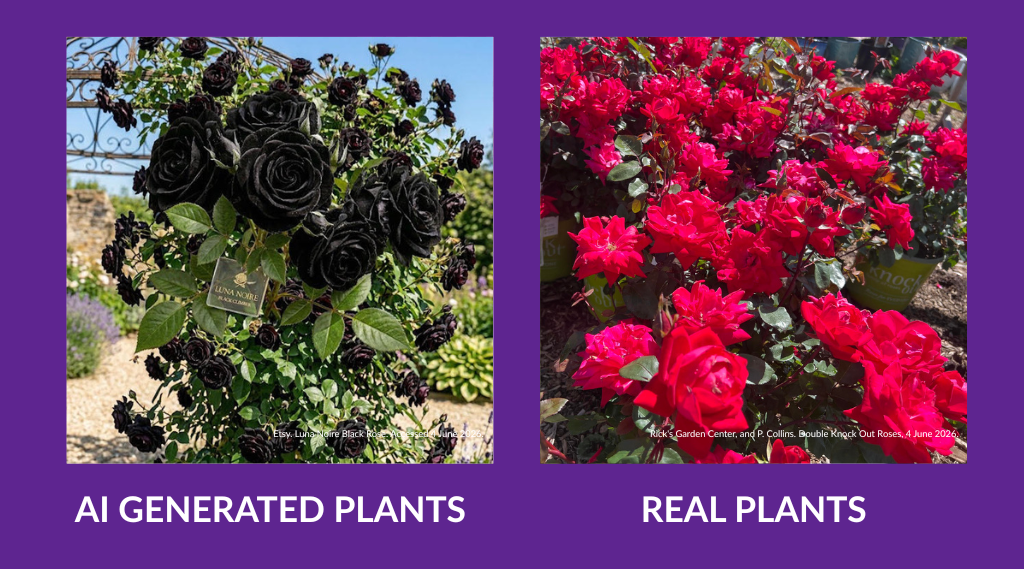
Roses, mentioned in the May 2026 newsletter, are a big focus for our nursery this year. We carry a variety of colors, from red to purple. Black roses, however, are something you’ll never see at Rick’s Garden Center. Black roses don’t naturally occur,as black rose plants are either deep red or purple, or, when sold in a grocery store setting, the flowers are dyed black. AI loves to promote real black rose shrubs as something that can be purchased. If the black appears too deep in tone, it’s probably not real. Likewise, be suspicious of variegated black roses, as those don’t exist either.
Our red roses aren’t dark enough to be considered “black,” but we carry two red rose varieties: “Ramblin’ Red” climbing rose and “Kashmir Red” shrub roses. A “purple” rose we carry is “Lotty’s Love.”
AI shouldn’t be trusted when it comes to gardening. Instead of relying on fantastically generated images for unique species, we recommend exploring plant-oriented locations like the Denver Botanical Garden or the local Xeric Garden! That way, you can identify which plant varieties you want, study their appearance in a garden setting, and then purchase your desired varieties through our nursery. And of course, we are always happy to help identify plants or refer you to Colorado State Extension for help. Don’t go to places like Etsy or Walmart for your exotic plants; rely on experts who are passionate about gardening and not just your wallet. Keep AI out of gardens!
*There is a species of lotus called the Egyptian Blue lotus. Learn more about them here: click me!
Sources For Images:
- Amazon, and Wivolibe Store. AI Rainbow Hosta, www.amazon.com/Rainbow-Shaped-Planting-Colorful-Outdoor/dp/B0GC6R3HSJ. Accessed 31 May 2026.
- Etsy. Dwarf Water Lily. Accessed 4 June 2026.
- Aquatic Plants Nursery. Nelumbo – Lotus Flowers Selected by Us, www.aquaticplants.org/p/nelumbo-lotus-flowers-selected-by-us/. Accessed 31 May 2026.
- Etsy. Butterfly Lily Orchid. Accessed 4 June 2026.
- Etsy. Butterfly Begonia. Accessed 4 June 2026.
- Etsy. Luna Noire Black Rose. Accessed 4 June 2026.
Growing Onions 101
Our onion, leek, and shallot sets have just arrived, which means it’s soon time to plant them! These flavorful plants are a clear favorite for cooking around the world and are surprisingly easier to grow than most expect. But there’s a first time for everything we understand, so with the recent arrival of these bulb producers, we thought we’d write an easy guide to allium care! So, don’t sweat about day length, fertilization, fungal disease, and soil types; we’ve got you covered!
Onion Day Length Guide Explanation
Figuring out and finding an onion that fits your area’s “day length” standards is initially intimidating. “Day length, that is, the duration of daylight hours within 24 hours, is influenced by the Earth’s tilt. Thus, various amounts of light reach different parts of the Earth throughout the year. Likewise, latitude influences what onions you can and can’t grow. Places with higher latitude (the closer you get to the poles), your day length is extended in summer” (Jameson). This is flipped for places closer to the equator in winter. Certain onions won’t survive beyond the equator, while others won’t survive near the equator, as onions are extremely light-dependent. Now, to keep it simple, our store typically only carries onion varieties suitable for Colorado, which typically has Intermediate-day summer growing periods. You can likewise grow Long-day onions further North in our state. To find out what day-length range your state is, click the link here: Click me!
Planting Time
“Plant onion sets from April to early May (for zone 4) or four to six weeks before your last frost date. If your soil isn’t workable, onion sets can be stored for roughly three weeks in a cool, dark, and well-ventilated space” (Dixondale). DO NOT put them in water.
Perfect Soil
One perk about onions is that they grow well in a variety of soil types! “So long as your soil has excellent drainage, to avoid rot, you can grow onions in sandy or clay-dense soil” (CSU). Just make sure to amend said soils with organic material to generate better aeration (especially for clay soils). We recommend organic materials, such as Cotton bur compost or humus, to help. The onions wouldn’t shy away from nutrient-dense soil! “To amend soil for onion beds, you’ll apply 1 1/2” of green compost or humus over the desired beds, and work said material 8” deep into the soil” (CSU). Likewise, the spot onions will be planted in MUST HAVE good sun (exemplified in the day-length paragraph).
Fertilizing
Start strong with fertilizing your onions by testing your soil. You’ll want a nutrient-rich soil with a balanced NPK ratio with no excess. “Onions require a good dosage of nitrogen; however, too much leads to early maturing and produces poor bulbs. While liquid fertilizers are fine for onions, slow-release solid fertilizers are better, especially if they’re organic. You’ll side-dress onions to fertilize them by scratching in the slow-release fertilizer above ground six inches away from the onion plants. You will want to do this after roots establish and only once or twice per growing season” (UM).
Watering
“Onion roots are shallow and thus sensitive to changes in moisture. Make sure to water frequently, never allowing their soil to dry out. If you allow them to dry during the bulbing stage, bulbs will be small and leathery” (CSU). Our 2025-2026 winter has been dry, and our summer will be too (most likely), so make sure to water your onion sets from now until harvest. An inch of water a week should be perfect, but keep a close eye on them regardless. “Cease watering entirely by August, or when the tops of the plant lie over on the ground. The food made in the leaves will supply the onion with nutrients from this point on” (CSU).
Fungal Issues & Insects
Sadly, it’s not all champagne and caviar with growing onions. “One infamous insect that loves onions are thrips” (CSU). These tiny flying lice-like bugs feed by puncturing leaves and sucking out the sap. They especially love onions, so non-systemic insecticides are essential for keeping them away and exterminating them. Onions also suffer from various fungal issues and diseases, from purple blotch to mildew. Always stick to organic fungicides when protecting onions and never systemics, otherwise you won’t be able to enjoy your crops! If you’re interested in learning more about onion diseases and fungal issues, check out a few articles featured below:
Disease & Fungus: Click me!
Insect Control: Click me!
Soil-Borne Diseases: Click me!
Weeds
Onions are susceptible to weed choking. “Get onion beds free from weeds with organic preemergents (such as corn meal), raking them into the top inch of the soil” (Dixondale). Preemergents will halt weed seed germination for six weeks, but established weeds will remain. Do not use any other herbicide and weed by hand with a hoe, dandelion popper, etc.
That’s just the basics when it comes to growing onions, shallots, and leeks from sets. For further questions, we highly recommend you check out the sources below or the others featured within this article. Feel free to visit the store for help from our staff or email Colorado State Extension Q&A for questions. Don’t let the onions frighten you, happy gardening!
Jameson, Molly. “Understanding Short-Day vs. Long-Day Onions | Panhandle Agriculture.” Ufl.edu, 2024, https://nwdistrict.ifas.ufl.edu/phag/2024/07/26/understanding-short-day-vs-long-day-onions/
“1808 – Growing Onions from Seed – PlantTalk Colorado.” Colostate.edu, 2025, https://planttalk.colostate.edu/topics/vegetables/1808-growing-onions-seed/
“Growing Onions in Home Gardens.” Extension.umn.edu,https://extension.umn.edu/vegetables/growing-onions
“Onion Planting Guide – Dixondale Farms.” Dixondale Farms, 16 Apr. 2020, https://dixondalefarms.com/onion-planting-guide/?srsltid=AfmBOopg3208TqFNnzA7QA7bRfa1G1ElBS05UPDSmU2tczB506uMrrrB
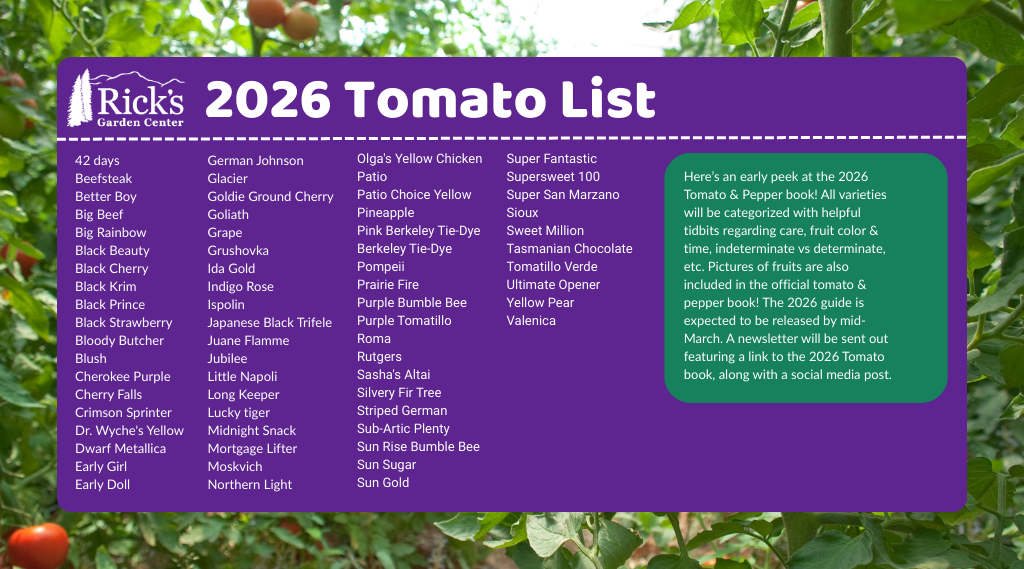
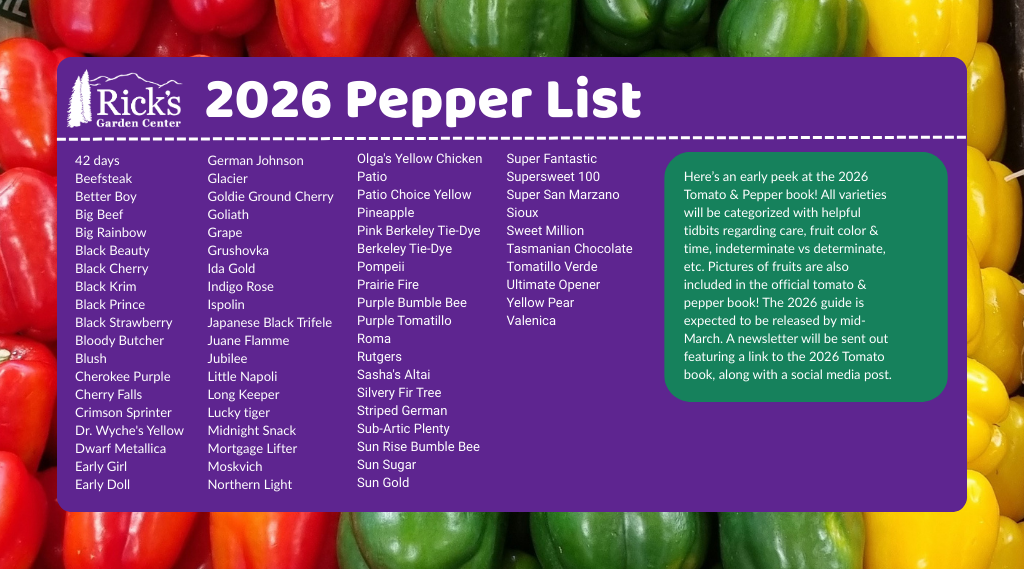
2026 Tomato & Pepper List
A Visit To Scotland: Learning About Gardening From The Scots!
By Katherine Placzek
Recently, I was able to go to Scotland for vacation. While I was there, I was blown away by the plant life, of course, but I also learned so many new ways to garden! In this blog, I want to share my main takeaways with you!
- Plant Small
I was able to briefly chat with someone who worked at McLaren’s Nurseries in Lugton, Scotland. This man told me that most of their plants are grown in smaller sizes because Scotland’s conditions are very harsh. They deal with a lot of wind, adverse weather, and salt from the ocean. With these conditions in mind, they think younger and smaller plants have a better chance of successfully transplanting and thriving. Many plants have severe transplant shock if they are larger. This made me think of what I have discovered on my own. Starting plants by seed or in smaller sizes in our harsh region has proven incredibly prosperous for me. I believe the premise is the same here in Colorado!
- Plant Wildflowers In Your Yard & Even In The City Roundabouts
The Scots are pollinator warriors! They interseed their lawns and roundabouts with wildflower seeds. They will mow a neat border, following the perimeter of the curb or the boundaries of their yard. BUT they leave the interior tall with poppies, scabiosa, daisies, other small wildflowers, and grass seed heads. It feels like a bit of the countryside has been transported into the heart of the city! I was happy to see bees and butterflies, as well as birds, enjoying the small habitat. What a beautiful way to encourage a little bit of wilderness into your yard, while keeping it tidy.
- Honor The Weeds
Scotland’s national flower is the thistle. The thistle. You read that right. We Americans have a vendetta against weeds- I just sold some Thistledown (a broadleaf chemical control for Thistle and its cousins) this morning. We do not see how beneficial weeds can be. The Scots have a different approach. Thistle is everywhere! In yards. By the sea. In the pasture. In the Highlands. Growing in a crack by a restaurant. It is honored in all forms of artwork in Scotland. It is found on postcards, in small artist studios as their main muse, below the statue of William Wallace in Sterling, and even on the handle of the sword of state held in Edinburgh Castle (gorgeous- btw). And it is not just thistle. They allow and sometimes even encourage the brambles- the wild blackberries. Brambles are by a stone wall overlooking the ocean. They skirt the perimeter of a park. They creep along the edges of a city forest. They climb over a rock wall where a couple of tourists are eating lunch. The brambles are even sometimes featured in local alcohol with the phrase, “sun-kissed bramble fruit.” All of these little corners where weeds are allowed to thrive remind us that we are part of nature, despite how much we try to separate ourselves. Pollinators and other wildlife benefit from these little habitats, also!
- Garden Even If The Plant Will Not Stay Perfect
I was able to visit many seaside towns in Scotland. While some shops and gardeners had given up on planting in the sea-sprayed side of town, many had not. They still planted window boxes or patio pots with begonias, impatiens, salvia, petunias, and the like. Many of these plants are not resistant to the salt in the seaside wind or spray from the ocean. There were pots that were protected from this, and they looked great, but others got the full brunt of the sea and looked very ragged or brown. It reminded me of Colorado. While we could throw up our hands and say that we live in the land of hail, deer, squirrels, and grasshoppers, and that “this is no place to be a gardner” we do not. We replant our tomatoes after hail. We install semi-permanent cages around tender trees and shrubs from the nibbling deer. Gardeners will garden, no matter the conditions. We believe in plants and we believe in beauty. We plant even if we know that the planter full of beautiful flowers will not stay perfect forever.
- Plant A Hedge
Hedges were the first fences. They border the road and soften sound pollution in Scotland. Hedges also create boundaries along property lines and offer privacy. I think that more hedges should be planted here in Colorado. While hedges sometimes are monocultures of one plant or shrub, they can also be very diverse. I saw Scottish hedges with cotoneasters, privets, various plants from the prunus family, shrub roses, beeches, etc. While many of these hedges were manicured, they had incredible diversity. Again, a variety of pollinators and other wildlife could find food and shelter in these hedges. If you are not into the “traditional hedge” that is trimmed into straight lines, feel free to check out Floret’s hedgerow guide. I think it is an excellent “new world” take on an “old world” idea. You can find that guide here: Click me!
Although building out a hedgerow can be expensive, if you go back to the first point (#1- Plant small), you might have a much better success rate and a less expensive ticket at the end of your hedgerow project. Some nurseries will even ship small seedlings if you want to start very small.
While Octorado Native Plants Nursery is only Wholesale, more nurseries are heading this way! Read more here!
- Plant In A Pot
Many people live in cities in Scotland, and you would expect those who live in small apartments or places without a yard to forgo gardening altogether. Not at all in Scotland! Window boxes and patio pots adorned nearly every block. Some may have been neglected or battered due to sea salt, but plant life was abundant and encouraged even in apartment living. Gardening really is for everyone!
- Develop Around What Already Exists
While Europe is known for its broad-scale deforestation in its historical past, we did see several old trees or portions of forests left intact. We saw an ancient yew tree that was the size of a building! This was in the middle of the city, Stirling. It was sitting close to a parking lot and was in the middle of the hubbub. This made me realize that city developers had left the tree. They purposely designed the parking lot around the tree. When development occurs in the States, oftentimes, we scrape the entire lot and then re-landscape with smaller trees and shrubs, denuding the lot of any remnants of what was there originally. I personally think this is sad. Think of the stories that you are removing from the land to put in a new shopping mall or a suburb. That yew tree had to be at least a century old. What a life to preserve and honor! I am glad someone decided to leave the yew tree.
- Make Plants Part Of Your Weekly Ritual
We were able to visit the city of Glasgow’s Botanical Gardens on a Sunday. While I know botanical gardens are not typically free in the States, these botanical gardens were free! It was packed. Small and large clusters of people walked the paths, exploring the grounds or the glass greenhouses, and lounged in the open spaces. Many of these people were locals, and this is how they had chosen to spend their leisure time. We also saw Scots recreating in the rural spaces-hiking, playing by the beach, running into the ocean, and taking picnics. It seemed that Sundays, especially when other things might be closed, were a time to reconnect with nature and enjoy the simpler things in life with loved ones. I think implementing a ritual or a regular habit of connecting with plants or nature is something Coloradoans could get behind!
- Water Is A Resource-Protect It
Several times we saw advertisements on bus stops or buses that had the message: “Water is always worth saving. Help protect your precious resource.” Scots are very proud of their water, and even brag about how it tastes. It really does taste very clean and refreshing! Scots receive their drinking water from rainfall. There are towns that are experiencing a lack of water due to recent dry spells, and have had to have water trucked in. This sentiment of protecting water can be applied to Colorado. Coloradoans receive much of our drinking water from snowmelt. We are also dependent on precipitation for our water needs. In dry years, watering restrictions are put in place. While this year was relatively wet, there have been decades of dry years along the Front Range in our recent past. I think we all should be mindful and proud of our water, like the Scots! One way to protect our water is to be aware of how we impact our watershed- and those downstream of us. Here is a throwback blog on how to protect our watershed while gardening, click the link here.
Travel is part of a gardener’s education. But you do not have to go abroad to learn about how other gardeners approach plants or garden resources. The public library has a wealth of information on various gardening techniques that are from other cultures or other regions. I also think it is valid to check out other gardens in Colorado. Paonia and Berthoud both have independently claimed the title of “Garden Spot of Colorado.” Visit a high altitude garden in Aspen- Betty Ford Alpine Gardens. Or see a world-renowned crevice garden in Arvada -APEX Crevice Garden. When you travel, ask gardeners what they do in their garden. What works for them might be your new way of gardening too!
The Short & Sweet Fall Bulb Guide
Fall bulbs, also known as hardy bulbs, are always much anticipated in the garden center. Capable of surviving (and often requiring) cold, through the gloom of winter, hardy bulbs provide beautiful early spring flowers! Compared to tender bulbs like dahlias, gladiolus, and begonias, hardy bulbs are easier to work with and rarely need to be dug up for storage. However, like with all plants, they do benefit from a little help. In this article, we’ll talk about how to best care for fall bulbs!
Selecting A Site
Before choosing any bulbs, we recommend selecting a planting site first, as this is a major contributor to their survival. Bulbs given a poor growing site aren’t given the best situation to survive over winter. Soil quality, drainage, light availability, and soil richness should all be considered for bulb planting. The most important aspect for bulbs is aerated soil (CSU Extension). Dense soil will retain water and prevent root displacement, causing rot or bulbs to over-exert their energy. Aeration can be done by digging up the area and adding organic material to not only enrich the soil but also increase porosity, allowing water and air to flow freely. If your soil bears heavy clay, we recommend using EKO Clay Buster, Tree & Shrub Mix, or humus. Avoid animal manure, as this can burn bulbs unless evenly distributed after planting to act as fertilizer.
Light is essential for bulbs, but depending on placement, it can cause disruptions in dormancy. Avoid planting hardy bulbs close to a southern-exposed foundation, as the heat can wake bulbs early and cause death (CSU Extension). Likewise, hardy bulbs need general amounts of sunlight, about 8 hours per day. Avoid planting bulbs in total shade. You cannot count on the sun to insulate bulbs. After planting bulbs and especially after the first freeze, it’s recommended to apply mulch over the area to keep in extra heat (CSU Extension). Cedar mulch works best, but any fine mulch will do. Using shredded leaf mulch is also excellent as it will return nitrogen to the soil and feed the bulbs over winter. Avoid places where high wind tears through or where frost collects (UM Extension).
Colorado soil contains poor nutrients, so planting bulbs with bulb fertilizer is a wise idea. Pick a bulb-centered fertilizer, like Espoma Bulb-Tone, as it will provide the ideal amounts of Nitrogen, Phosphorus, Potassium, and additional minerals over winter and into spring. Oftentimes, it’s recommended to plant this fertilizer into the hole for the bulbs. Manure can be laid over the bulbs after planting to act as fertilizer, but only after the bulbs have been buried. Mulch will be laid on top, so think of it as an earthen lasagna in a way. Bulb, soil, manure, mulch. As snow soaks into the ground over winter, the manure’s nutrients are absorbed into the soil and, in turn, absorbed by the bulb.
Picking Bulbs
Hardy bulbs are designed to survive long winters. They contain nutrients to keep the plant alive for months and even require cold in order to break dormancy (University of Minnesota). There is thus a direct correlation between the size of a bulb and eventual flower size, as the larger the bulb, the better and bigger the flower due to stored nutrients (CSU Extension). Choose firm bulbs, as squishy textures or mold signify poor health. The best bulbs are chosen from open-air containers, not packets (CSU Extension). There are exceptions, as if packages have air holes to increase circulation.
Bulb Depth
Bulb species determine appropriate soil depth and spacing. Larger bulbs demand more space and depth. Tulips and daffodils, for example, are considered to be large hardy bulbs. They can be spaced 4 to 6 inches apart, while small bulbs can be spaced 1 to 3 inches apart (CSU Extension). A general rule for bulb planting depth is “four times the height of the bulb between soil surface and tip of the bulb” (CSU Extension). Bulb distributors often have fact sheets or planting guides attached to or on bulb packaging. If provided, it’s recommended to follow those instructions for each varying bulb species.
When you’re planting bulbs, make sure to place the bulb within its hole with the pointed end facing up towards the sky (University of Minnesota Extension). Not doing so will cause the bulb to grow in the wrong direction and eventually die. Planting should be done in September to allow ample root growth to form before fully going dormant, but October is sufficient(CSU Extension). The earlier they’re planted, the longer they have to establish. After planting, water the bulbs to allow them to settle and get a drink after their long travels from the farm to your garden (University of Minnesota Extension). Snow and rain are expected to water the garden throughout the year however Colorado often has dry winters. The occasional soak throughout the winter months will greatly benefit your bulbs (CSU Extension). If bulbs sprout prematurely, simply prune them back.
About Garlic
How does garlic differ from hardy bulbs? In all honesty, hardly at all! Garlic too is a hardy bulb, though obviously its not flowers you’re after, but the cloves. There are two “types” of garlic, hardneck and softneck garlic. Hardneck garlic is typically larger and more flavorful, sometimes even spicy! Hardneck garlic varieties include Meteichi and Rocambole. Hardnecks are also the hardiest of the hardy and thrive in our winter climate. Softneck garlic is the more commonly found garlic in supermarkets and has a milder flavor. They have a longer shelf life than hardneck varieties but aren’t too winter hardy, preferring mild winter weather. Softneck garlic includes Pueblo Early and Inchelium Red.
Applying more fertilizer to the garlic is really the only difference compared to fall flower bulbs, as the more food garlic is fed, the larger the cloves you’ll get! We recommend keeping the fertilizer organic, as synthetic fertilizer isn’t always the best to ingest—even if its absorbed through the plant. You might also want to plant garlic in mid-October rather than September so as not to prematurely wake it (Denver Urban Gardens).
Sources Used:
Colorado State Extension: CLICK HERE!
Denver Urban Gardens: CLICK HERE!
University of Minnesota: CLICK HERE!
Helping Pollinators Through Fall
Fall will be fast upon us, and no one knows that better than native pollinators. Hummingbirds, butterflies, and bees all continue to toil before cool weather hits. Many of them are either gearing up to migrate to warmer places, like Mexico or South America, or hibernate over the winter. So why not give them a helping hand before winter starts? We have a few tips to help our local pollinators!
Hummingbirds
Hummingbirds migrate to and from Colorado two times a year. They arrive to stay the summer in May and June and leave for the winter between August & September. Many of our native hummingbirds fly to Mexico for the winter to subsist on the tropical flowers there. That’s a 1,392-mile journey!!! Amazing, but no feat is too steep for a hummingbird. After all, the Aztecs’ war god’s sacred animal was a hummingbird. These birds are fierce! In order to help them prepare for the long flight to Mexico, we recommend planting pollinator-friendly perennials with hummingbirds in mind. Native Beard Tongue, Giant Hyssop, Native Bee Balm, and Native currants are all wonderful for hummingbirds. They may not bloom this late in the season, but planting perennials in the fall is ideal! Most perennials are done flowering this time of year, so they’re putting all their energy into establishing roots for the winter. They adapt faster when planted in fall, though Fertilome Root Stimulator helps them establish quickly. Once established, those perennials will bloom for next year’s hummingbirds.
In the meantime, annuals are another great option. Salvia, Petunia, Geranium, and Fuchsia are all excellent options for hummingbirds, especially if the flower is red, purple, or pink! And if plants aren’t an option either, we sell hummingbird feeders with hummingbird sugar. We recommend a hummingbird feeder with red plastic flowers as the best choice. It’s also extremely easy to make your own sugar water for hummingbirds too. We’ll provide a link below this paragraph. When buying hummingbird sugar water, though, AVOID any with red colored dye, as it’s difficult for the little birds to digest. No one likes being car sick on roadtrips, not even hummingbirds! Hummingbird water made with white sugar, not powdered or brown sugar, is the best option.
Hummingbirds also need shelter in case it gets cold or stormy. While we don’t sell any hummingbird-specific houses, as hummingbirds tend to avoid birdhouses in general, providing them with areas or plants to roost in is a better option. Hummingbirds roost on fragile branches and stems of shrubby plants. Lilac and boxwood are popular choices for a hummingbird, but anything not easily penetrated by wind or cold is a good choice. Consider holding off from pruning the inner shoots of these plants and only prune those exposed to the elements at this time of year.
Perennials & Annuals Best for Hummers: Click here!
Sugar Water Recipe: Click here!
Butterflies
We all love the dazzling butterfly, and our flowers especially love them. Some butterflies, like the Monarch butterfly, migrate similarly to the hummingbird to Mexico over winter. Butterfly enthusiasts often plant Milkweed for hungry monarchs to feed on during their travels. We also sell Milkweed seed! Spreading these seeds in the fall is the best time for Milkweed to be exposed to cold temperatures to break natural dormancy. If you’re interested in other flowers for butterflies, check out our Beauty Beyond Belief Monarch Rescue blend or Butterflies & Birds blend. Because these are all native perennial and annual blends, putting down the seed in the fall breaks their dormancy as well. If you’re deadset on planting other kinds of perennials other than milkweed, here’s a great list to reference: Click here!
Butterflies are more delicate when it comes to shelter, and a storm can easily kill them. That’s why we recommend buying a butterfly house to keep them sheltered! Similar to a bird house, this little wooden structure has vertical slits carved into the front for butterflies to come and go as they please. With how narrow these entryways are, birds and other insects are deterred from entering. Attach a butterfly house on a solid structure like a fence or garage, and voila! A butterfly shelter! It’s ideal to place them around the flowers that butterflies frequent.
Bees: Native Bees & Honey Bees
America has diverse bee species. Numerous native bees pollinate our flowers and often live solitary lifestyles, whereas the European Honey bee has adapted to life in America and pollinate alongside its American brethren. These bees are also a popular choice for Beekeepers! Whatever kind of bee you’re trying to cater to, we have plants for you!
All bee species enjoy blue, violet, and red colored flowers. This is because bees see in the ultraviolet light spectrum, and these flowers are especially vibrant! That being said, they won’t turn away from orange or yellow flowers either; they are just more interested in things with a blue hue. Great plants to attract bees includes Blue Flax, Yarrow, Goldenrod, Rabbitbrush, Rocky Mountain Bee Balm, and the Common Sunflower. We carry grown perennials of many of these varieties; however, Rocky Mountain Bee Balm and Sunflowers grow best from seed. We have numerous sunflower seed blends and even bee-targeted seed blends, like Bumblebee Bonanza, Honey Source, and Bee Rescue blend (all by Beauty Beyond Belief). Spread seeds in the fall and watch them grow, and feed bees next spring and summer! Sometimes bees will take advantage of honeybird feeders too and use them alongside the hummers. Wasp will as well, which isn’t always desired, but wasps are also pollinators (if you don’t believe us check out this article: Click here ).
Native bees, unlike the honey bees, often don’t create hives. Instead, they’ll find shelter in dead trees, dense shrubs, logs, hollowed-out reed grasses, and nooks and crannies of houses. Sometimes, like the Mud Dauber Bee, they’ll create their own homes out of various materials nature provides them. And oftentimes it’s the female bee who builds the nest, as they’ll lay their eggs there. If you want to give these insects a helping hand, start collecting materials to make a bee nest! Deadwood, dried plant stems, or a pile of dead leaves are all excellent materials. Even leaving a spot covered with mulch bare for burrowing bees would be excellent! Keeping around that dead stump or avoiding pruning perennials likewise provides shelter to native bees. But if you prefer maintaining aesthetics or prefer not to have fire hazards lying around the yard, we recommend establishing a bug house/hotel. It acts just like a butterfly house, except it’s stuffed with hollowed reeds and sticks. Some just have tiny drilled holes for shelter, too. These materials are similar to the crannies and structures native bees inhabit in the wild, making these shelters cozy for winter-long stays. Sometimes they attract other insects like ladybugs and spiders as well, but that’s fine! The more beneficial insects, the better for your garden. You can create bug houses easily by following the instructions below. We also sell premade bee and insect houses.
Attracting Native Bees: Click here!
Attracting Sweat Bees/Native Bees: Click here!
Building Bug Houses: Click here!
More on Bee Houses: Click here!
Water
Setting up a water station also attracts pollinators. While most hummingbirds get their H2O from feeding off nectar, butterflies and bees appreciate a bit of water straight from the source. Creating water stations for insects can be difficult; a bowl can’t be too deep, or they drown. It also has to be clean water, so it should have a bubbling or filtering feature. Finding an exact product that does all this is difficult, and it might not be just a single product. Beekeepers who visit our store mention making their own insect watering stations out of saucers and coco coir. They load the saucers with little floating squares of the coco coir and fill them daily with water. The bees will stand on these “rafts” and lean over the edge to drink the water. Another technique we’ve seen is a saucer filled mostly with gravel or clay pebbles (aka lecca) and filled halfway with water. So long as the water is changed daily and insects have an easy place to land and stand, the saucer can be any size!
DIY Bee Water Station: Click here!
DIY Bug Water Station: Click here!
Pollinators are the reason our gardens thrive and continue to fill the world with beauty. To show our appreciation, especially in these unpredictable times, let’s lend them a helping hand as fall approaches. With some TLC, we guarantee pollinators will come back both next year and also for our children’s children to admire.
Protecting Tomatoes Against Heat
Temperatures are rising, and plants are taking a beating, especially tomatoes. From blossom loss to poor growth, this South American fruit can’t always beat the heat. “Tomatoes grow best at uniformly moderate temperatures between 65 to 85 degrees Fahrenheit,” claims Colorado State University, “This is why a high altitude, semiarid climate like Colorado with wide daily temperature swings is not a favorable area for tomato growing (PlantTalk, 2025).” It’s important to identify heat stress compared to fungal issues. We’re going to go over some techniques for identifying heat stress and keeping tomatoes cool!
Heat Stress Signs
Are your blossoms falling off the tomato plant? Or has their growth suddenly halted? What about wilting? These are all signs of heat stress in tomatoes. Blossom loss is caused by high temperatures interfering with pollination. Dry winds don’t carry pollen well, so blossoms go unfertilized and die off. Halted growth is caused by cool night temperatures and scorching hot day temperatures, the contrast induces stress. And wilt is caused by numerous factors, not just heat. If the soil is dry, then it may be caused by accelerated evaporation due to heat. Fungal wilt disease is another issue caused by heat, due to the combination of a moist environment and then sudden heat. There are several varieties of fungal wilt, so we recommend checking out this article to fight them accordingly: Click here!
Fighting Heat
Time to beat the heat! Anything that retains moisture and shields plants from the sun will protect your tomatoes. We recommend a shade hail cloth, preferably one with a percentage like 30% light blockage. This filtered shade cloth will allow the tomatoes to get enough light while also creating a cool environment. Shade cloth shouldn’t be draped on the plant, it should be supported by PVC pipe or a tomato cage. Plus, it will also protect against hail when it hits!
Applying mulch will help retain moisture. Apply mulch in vegetable beds and containers. Make sure not to layer mulch right against the stem of the plant. Leaving space between mulch and plants helps prevent further fungal infections. Make sure the mulch isn’t dyed either. Dye isn’t safe for human consumption. Leaf mulch will also do the same thing! Leaf mulching involves shredding leaves that fall from trees to make your own mulch! It retains moisture like shredded wood mulch but also gives back precious nitrates, helping your tomatoes grow! To make leaf mulch you can buy a leaf mulcher or smash them with a weed whacker or mower. It’s obviously July, so leaves aren’t expected to fall until autumn but garden centers often have leaf mulch piles people drop off for others to take. We certainly do! Give us a call before driving home to make sure we have bagged.
Regardless if you choose to add mulch you may have to water more as the heat increases. We recommend following Colorado Springs Utilities for watering times. But when watering, water deep. Use a bubbler sprinkler or slow-release irrigation system and water in intervals. This is so the water penetrates the soil and soaks deeper, ensuring lower evaporation rates. This also helps strengthen roots and drought immunity in the plant!
Fighting heat isn’t easy, Colorado is a semi-arid high desert after all. Not all tomatoes will survive super hot summers, but these cool techniques will help preserve them! Plus, these techniques can be used on other plants too, from vegetables to annuals!
“Colorado State University.” PlantTalk Colorado. Accessed June 26, 2025. https://planttalk.colostate.edu/topics/vegetables/1835-tomato-questions-abound-heat/.
Preventing Water Loss
We understand it’s not easy to garden this year-especially with how expensive watering can be. Trust us, it’s no easy feat to maintain watering our plants either. But we don’t think you should have to give up gardening entirely. Knowing and understanding water loss will help prevent it, saving you money and protecting the environment! Gardening is for everyone and water costs shouldn’t stop you.
Reduce Evaporation
Colorado is notoriously dry. Combined with a hot summer, it creates treacherous environments for gardens. “Thanks to capillary action throughout the soil, which draws water up from below,” says Rhonda Massingham Hart, author of “The Dirt Cheap Green Thumb,” “evaporation can deplete water from deep in the ground.” If you don’t want water to leave your soil, mulch over the top. Gorilla hair maintains water the best and as a perk clumps, so it won’t blow away either. Another good mulch is straw! And if you lay gravel on top, which is also an excellent mulch, it will keep the straw down for you. Gravel mulch however retains heat. In the dog days of summer, this can lead to trouble. If you’re interested in free mulch and willing to work up a sweat, check out the cities free mulch pile: Click here!
Likewise, consider putting down a drip system or soaker-style sprinkler head. Sprinklers that disperse through the air lose more water than these close-contact irrigation systems. If you don’t have the funds for an irrigation system consider purchasing or making olla pots! This technique hails from ancient Northern Africa & China and involves an unglazed terra cotta pot used for underground irrigation. Due to the porous nature of the unglazed terra cotta, the water leaches slowly into the soil. And because the olla put is partially buried or almost totally buried underground, water is less likely to evaporate. To make your own gather terra cotta pots (they cannot be glazed), plug the drainage holes, and place a lid over the top of it. To learn how to make your own olla pot, watch this short video: Click here!
You can also use plastic containers, like old milk jugs, to create olla pots. Wash out milk containers then puncture three holes on the bottom with a hammer and nail, knife, or other cutting tool. These holes shouldn’t be large. Bury the container up to the neck and remove the cap. Fill with water, screw the cap back on, and viola! Plastic olla pot! Keep an eye on when to refill your olla pot and tailor the size of the container to the plant. This too goes for terra cotta olla pots.
Amendments & Native Plants
You can add amendments to your soil to retain and even attract water. Ever heard of humus? Humus is essentially composted plant and animal matter, yet it’s different from typical compost. Our brand of humus we sell is made only with plant product and is one of thew few vegan style compost we provide. Dark in color and rich in nutrients, humus is also excellent at conserving water. Its presence within your soil lessens water percolation and keeps it “in reach” for plants. Likewise, it also slowly releases nitrogen, sulfur, and other essential amendments to plants over time. If you’d like to learn more about humus, read this article and scroll to pages 212-3: Click here!
On hot summer days, plants sweat like us. “One large shade tree can transpire several hundred gallons of water through its leaves,” remarks Rhonda Massignham Hart. While this tidbit of information seems contrary to the information above about reducing water evaporation, misting plants on especially hot days will likewise retain water. This shouldn’t be done every day however, reserve misting for only the hottest and driest of summer days. Native plants are less likely to transpire as non-native because they are adapted to Colorado’s semi-arid climate. If you’re tight on cash for water yet are looking to plant something new, always always ALWAYS choose native. Not only will these plants be saving you money but also you’ll also be helping the environment by returning native plants to the ecosystem! Don’t be surprised if your plants attract more beneficial bugs, birds, and even larger wildlife. Here at Rick’s we’re especially focused on trying to increase our native perennial selection for this reason. If you want certain qualities of native plants, here is a great way to select what you want before shopping at Ricks: Click here!
Conserving water doesn’t have to be scary or expensive. With these hacks, you’re sure to save on your water bill. Here at Rick’s, we’re excited to share more gardening tricks and tips. No one should ever have to give up gardening due to money or to the environment. Gardening is for everyone!