The Importance of Winter Watering
The Importance of Winter Watering
While your favorite ski resort may be open for business, snowfall in the mountains as well as the front range is down this year. Reports show that snowpack levels across the state are 47% of normal levels. The southern Colorado region has below-average snowpack for this point in the season. While snowfall has been variable and not consistent even as far back as the 1800’s, there are some trends that we need to consider as gardeners. While not very strong, there is a correlation that has become apparent for lower elevation areas in the state (and could be an indicator for us in future years). If the first snowfall is not until November or later, this correlates to a lesser snowfall total for the area as a whole. This concern aligns with recorded temperatures, indicating that our region is experiencing warmer and drier autumns. This is significant for our landscape plants: trees, shrubs, and perennials. To break it down further, without any supplemental water, our outdoor plants are going longer without moisture after the main growing season and receiving potentially less water even when they do finally get snow. Additional food for thought includes that every foot of snow is roughly one inch of rain.
This corresponds to what we hear and see from our customers who come in the spring to replace plants that have experienced “winter kill.” While the term winter kill is traditionally used to describe icy or extremely cold temperatures that cause plant death, customers are using this term to describe plant death in general over the winter season. The type of death these plants are experiencing is completely preventable. They are dying of dehydration. Dry soils do not insulate roots, and thus plants are more susceptible to freeze damage and the swings of freezing/ thawing that we experience in this region.
When we have mild months, like this past November or December, we need to be winter watering. Winter watering requires you to manually water after irrigation or sprinklers are turned off prior to a freeze. Manually watering sounds labor-intensive in our world of automation, but it is rather simple. Remember, dear reader, gardening is one of the last bastions of manual labor. Enjoy the little labor it takes to have beautiful plants! There is a reason the phrase, “labor of love,” exists after all. I digress. Take a garden hose, if you are up for connecting and disconnecting a hose to a spigot, and let the hose trickle at the base of your plant(s) for a little bit. If you have a mature tree, let it trickle for about an hour or two. Less for smaller or less mature plants. If you don’t want to deal with a hose, take a bucket of water and pour it at the base of the plant for a drink. If you want to water your tree properly, you are shooting for ten gallons of water per inch of the tree trunk’s diameter. Which may be even more work than just pulling out your garden hose, that may or may not be mangled under your lawn mower. Pouring buckets of water repeatedly in the same spot may also cause some erosion, so I prefer the slow trickle method. Do this at least once a month on warm days (above 40- 50 degrees Farenheit).
Some individuals look for quick fixes, so they do not have to manually water. I caution against these methods, even if we carry the implements at Rick’s. Tree donuts, water gators, or water bags that have been designed to slowly water trees should only be used during the growing season, and outside of freezing temperatures. If the tree donut freezes at the crown of the tree, this can also cause death. This invention does not mimic snow. Snow slowly melts without creating a solid barrier. A frozen tree donut of ice prevents the tree’s surface roots from “breathing” or completing their nutrient exchange and absorption. Do not look for a shortcut on winter watering.
While many people believe that plants go to sleep during the winter and therefore do not need any care, this is not the case. This would be like a human being in a coma, but never being given an IV. An IV is to ensure that they are receiving liquids and nutrients until they wake back up! Apply this metaphor to your landscape plants. When we do not have the winter moisture and fail to winterwater our landscape plants, they die a perfectly preventable death. Enjoy the sunshine that is common in a Colorado winter, and pull out that garden hose to give your tree a drink!
2025 Fall Donations: Giving Back to the Local Community
By Katherine Placzek
November is the month where humans best emulate nature-we participate in the magic of giving without the expectation of receiving in return. I hope you all find abundance in your lives, and pass it along to others in small and big ways.
This fall, Rick’s Garden Center donated over $22,000 worth of trees and shrubs to local organizations that benefit the Colorado Springs community. Read on as we highlight their missions. Maybe you can find a way to support their mission or be inspired to find another non-profit group you can volunteer at, or share your monetary gifts. Rick’s vision has always been to help beautify El Paso County and beyond with plants. What is yours?
Mountain Song Community School
An elementary and middle school (grades K through 8), Mountain Song Community School, is a public school that is also a member of the Alliance for Public Waldorf Education. The Waldorf model nurtures the body, mind, and heart of each student. Mountain Song’s curriculum also includes the Agricultural Arts- something Rick’s Garden Center can get behind! Our donation helped further build the berry and native plant portions of their gardens. You can check them out here: Click here!
Flying Pig Farm
Flying Pig Farm is an educational farm located in Manitou Springs. They “… nourish our community and the land we steward by hosting school and community groups and events, facilitating workshops, supporting community gardens, consulting and collaborating with partners, cooking and sharing food, promoting creative expression, holding seasonal festivals, and advocating for healthy relationships with people and the planet.” What a cool mission! They consistently create exciting new community events and educate the local population of all ages about agriculture and self-sustaining techniques. Our donation helped build a “fledgling hedgerow” to offer further privacy and a noise barrier on the farm property. Please check out their programming here: Click here!
TESSA of Colorado Springs
TESSA offers immediate safety for victims of abuse. They have safehouses for women, children, and other victims. They empower and support these individuals while helping them build a safer future. They have several sister programs and are an important part of our community in Colorado Springs. We were able to help re-landscape a portion of their office outdoor space to feel welcoming, but still safe. TESSA provides space for victims to know they are worthy of goodness. This donation will allow them to know they are worthy of beautiful things. Support them in their brave mission: Click here!
Rock Ledge Ranch (in Partnership with the CSU Extension Office)
The Rock Ledge Ranch is a historic ranch, and park at the cusp of the Garden of the Gods Park. They have educational programming while maintaining historic grounds. The CSU Extension is working with them to rehabilitate soil and build a historically authentic greenhouse that will further their educational offerings. We were able to donate native trees/shrubs as well as berry bushes that will help make their grounds feel appropriate to the time, while continuing to support the vision of soil restoration. To support their continued efforts in raising money for the greenhouse construction and to attend their programs, head here: Click here!
Colorado Springs City Horticulture Department and Forestry Department
Our city runs on the funds from the local sales tax. When consumers slow buying, or there is a dip in tourism, like we saw this summer, that revenue becomes strained for our local city departments. Some departments are beginning to see budget cuts or hiring freezes. We were able to help both the Colorado Springs City Horticultural Department and Forestry Department. They both obtained trees/shrubs for beautifying our city and community spaces. Berry bushes and grapevines will be planted in community gardens, and shrubs and trees will find homes in parks, medians, and other public recreation spaces. Check out the City of Colorado Springs website here: Click here!

New School Fall Gardening Stretegies
By Katherine Placzek
With fall approaching, many of you are getting ready to put your garden beds and other portions of the landscape to bed. With a more eco-friendly mindset, we would like to suggest a couple of tweaks to your typical routine.
Old school: Raking and bagging leaves, tossing them out for the trash.
New school: Rake leaves from below trees, and use them as mulch around your perennials, shrubs, or on top of your vegetable garden beds. You can also run these over with a lawn mower to mulch them into your grass.
Why: Organic matter, including yard waste, is the most prolific item in United States landfills. Consequently, this unsustainable practice directly contributes to greenhouse gas emissions. Conversely, organic material returned to the soil reduces your environmental impact while providing a useful garden resource. These local sources of organic material and nutrition (from your own yard’s leaves) will feed and insulate your yard all winter long! Decomposing leaf matter enriches the soil, adding carbon and nitrogen to the soil, while plants “sleep.” Leaves also create safe places for native bees and other pollinators. Did you know that almost three-fourths of Colorado’s native bees nest and overwinter underground? Tip: Deeply water the leaf litter in after it has been placed. This creates a wet decomposing mat that will not blow away as easily.
If you have excess leaves that you are not going to be using, please feel free to bring your bagged leaves by our nursery gate (located at 600 N. 18th St. Colorado Springs, CO 80904). This is a community pile that other members come to gather for their own gardening usage.
Old School: Trim any perennials and remove them before the first snow.
New School: Leave all of your woody stalks, leaf matter, and ornamental grasses all winter long!
Why: This allows for winter interest and provides shelter for any hibernating insects. This is especially true for native plants that act as habitat for many native and beneficial insects. Larger life forms, including birds and mammals, will also benefit from grass seed heads left standing, and other plants that provide shelter in the harshest months. If this is unsightly for you, trim your plants, but leave the stems and other leaf matter on the ground to help create shelter throughout the winter. When soil temperature has reached 50 degrees Fahrenheit it’s the preferred time to begin trimming these perennials in the spring, after many insects have completed their wintering cycle.
Old School: Let the winter snows water your outdoor plants.
New School: Water trees, shrubs, and perennials on nice days throughout the winter.
Why: Unfortunately Colorado Springs does not get enough reliable winter moisture to overwinter many plants. This is especially true for newer plants that do not have an established root system yet. Many trees and shrubs, even those that are well-established, should continue to be watered on warm winter days from October through March. When it gets up to 40 degrees Fahrenheit, pull out a hose or dust off your watering can and soak up some of those winter rays, yourself, while you water. Make sure you unhook any hoses after use, as temperatures can cause freezing in the hose bib and other hardware.
Old School: Say goodbye to gardening until spring.
New School: Fall and winter sow, including vegetable and perennial flower seeds.
Why: Many annual vegetables and perennial flowers have a natural cycle where they drop seeds or fruit in the fall. Mimic nature and plant some of your own seeds in the fall to see what comes up earlier and hardier in the spring! In the vegetable garden, this especially works for cold hardy greens. Think spinach, lettuce, arugula, radicchio, etc. For perennial flowers, like wildflowers, it is recommended to put these seeds down in the fall, as many of our native flowers require a cold stratification period. While many people may set up sections in their freezer and fridge for cold stratification processes, direct seeding in the fall eliminates the juggling of space in your fridge/ freezer. Let the ice cream stay where it is!
Old School: Wait until spring to amend any of your garden beds.
New School: Amend your garden beds in the fall so you can plant right away in the spring.
Why: Fall is a good time to test your soil so you know how to amend your beds. Our soils typically fall in the basic pH range here in the greater Colorado Springs area. This can impact how readily available nutrients are to our plants. Do your research and get your soil properly in shape for your spring! Remember that you can also amend with what nature provides; leaves, manure, compost, and other organic matter. These sources do not have a precise N-P-K (macronutrients: nitrogen, phosphorus, potassium), nor spelled out micronutrients (calcium, magnesium, iron, etc) so it is recommended to test your soil in the spring again to see how your soil has changed due to any unregulated organic material. We offer pH and N-P-K, testing in-store, but the CSU extension office also offers a wide range of soil tests.
Now that you know these new school techniques, you might just try other new gardening techniques in the growing season. I know, I know- I am getting ahead of myself! Happy gardening!

Embracing Nature’s Way: Integrated Pest Management
Integrated Pest Management is like the Gandalf of gardening – a wise, all-encompassing strategy that balances the forces of nature to keep your greenery flourishing. At its core, IPM is a holistic approach that combines biological, cultural, and physical/ mechanical control methods to manage pests and diseases. Instead of reaching for a pesticide or other control products, we tap into the power of Mother Nature herself to maintain a thriving and balanced ecosystem.
Some of our IPM practices include:
- Biological: Releasing ladybugs or other beneficial insects inside our greenhouses, or hoop houses to feast on those insects that are a bother; aphids, scale, mealy bugs, leafhoppers, etc. We also let spiders do their good work eating larger insects, like grasshoppers.
- Cultural: Reducing watering if fungal or pest problems crop up.
- Mechanical: Manually removing bugs from plants by hand or with water (aphids, mealy bugs, scale, potato bugs, etc)
While we lean into biological, cultural, or mechanical solutions, the last part of IPM is responsibly utilizing chemical products to rid of pests. This means we use more natural controls, such as Neem oil or Spinosad Soap, before other products. It is also important for us to factor in when pollinators or other beneficial insects may be around. So we try to spray when these individuals are not active. We also follow recommended application methods to avoid pollution of our environment or incur undue costs.
Why does Rick’s Garden Center Choose IPM Over Pesticides?
Environmental Harmony:
- Pesticides can disrupt your garden’s delicate ecosystem – effective, but with unintended consequences. IPM, on the other hand, dances with nature rather than against it. By embracing natural predators, beneficial insects, and environmentally friendly practices, we create a harmonious balance that keeps the pests at bay without harming the environment. By mostly avoiding synthetic chemicals, we reduce the environmental impact and create a garden that’s both beautiful and a haven for beneficial insects and wildlife.
Economic Sense:
- Let’s face it – pesticides can burn a hole in our pockets. IPM, however, is cost-effective in the long run. By relying on natural solutions, we reduce the need for constant reapplication of expensive chemicals, improving our bottom line.
Happy and Healthy Plants:
- Picture this: a garden where plants are not only surviving but thriving. That’s the magic of IPM. By addressing the root causes of pest problems and fostering a healthy soil environment, we ensure that your green companions are resilient and ready to face whatever life throws their way.
Community Connection:
- We believe in building a community that shares our love for the earth. By choosing IPM, we invite our customers to join us in creating a garden that is a testament to the power of working hand in hand with nature.
At Rick’s Garden Center, IPM isn’t just a gardening strategy – it’s a philosophy. It is about embracing the rhythms of nature and inviting others to join us toward a more sustainable future. So, next time you visit, know that you are not just buying plants; you are becoming a part of our eco-minded family.
Too Deep in Love: Two Common Killers of Freshly Planted Trees
Trees are the cornerstones of our landscapes. No other kind of plant impacts the local ecosystem as broadly and effectively as trees; they create shady, cool microclimates, provide erosion control with their expansive roots, and supply habitat and food for many creatures. Planting trees is not difficult, but with their slow growth and considerable price, it pays to get it right the first time. Here are two common problems we see with freshly planted trees at Rick’s Nursery.
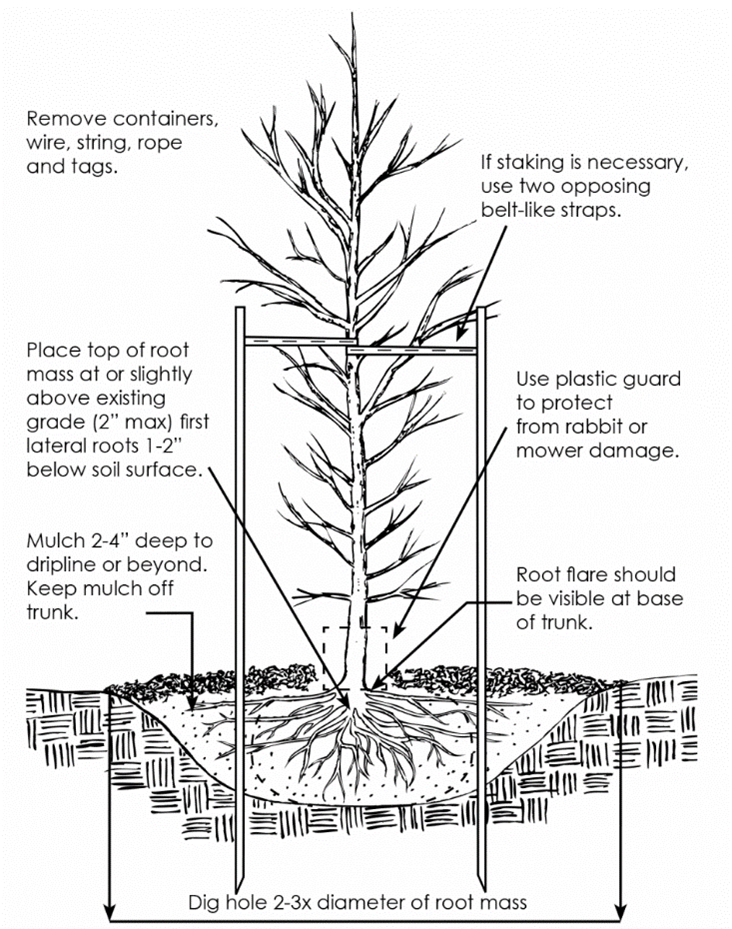
The most common and fatal error in planting trees is burying the root ball too deep. It only takes a few inches of soil on top of the root ball to smother it. When you plant your tree, take it out of the pot, then lightly brush off the loose soil on top-assume that the tree was never planted at the correct depth in the pot by the nursery that grew it. Then, after you finish planting the tree, you should still be able to see the top of the potting soil. In areas of poor soil drainage, it may be appropriate to leave the “shoulders” of the root ball as much as 2 inches above grade. Top with mulch to prevent the surface roots from drying out, but be careful not to contact the trunk. It will look wildly incorrect when created for the first time, but it is essential to the plant’s health. When you plant too deep, you starve the roots of oxygen, and the tree is prone to dying within the first 2-7 years of planting. Once you start observing trees, you may even begin to notice mature ones that are planted too deeply; trees should never look like a telephone pole sticking out of the ground, there should always be a distinct root flare. If you have already planted your tree too deep, you can carefully excavate by hand around the root flare to expose it. You can even mitigate too-deep planting in mature trees, though care should be taken not to damage roots. Just carefully remove the soil until you find the root flare, then mulch.
Our soil in most parts of Colorado is notoriously poor. Whether you have sand, clay, or just decomposed granite on bedrock, amending your soil with organic matter can solve several soil problems. We often forget, however, that in life and gardening, moderation is key. When you amend the backfill of your planting hole, you should use a maximum ratio of 1 part compost to 4 parts native soil. When you amend by more than 20% organic matter, you risk “containerising the hole.” This happens when you over-prepare the backfill of your planting hole; the roots of your tree are content with the fluffy, rich soil, and never establish outside the new hole. This creates circling roots and other problems associated with container trees, thus “containerising the hole.” Trees whose soil is over-amended are more prone to overwatering because the soil holds on to excess moisture. Trees may also begin to sink and list to one side as the extra compost decomposes and shrinks in volume, especially when the compost is dug under the root ball. Thus, the bottom of your planting hole should always be firm, unamended soil. Fresh compost should never contact the roots directly and should be mixed thoroughly into the backfill soil. Depending on what kind of tree, and the soil condition, it might be wisest to skip amendment altogether, and just let the wood mulch on top do the soil work. Generally, though, just a dab of compost will do the trick. Ultimately, we gardeners see soil amendment as an act of caring; just make sure not to love your tree to death.
Nothing makes us happier at Rick’s Garden Center than seeing your nursery plants thrive. For more information on planting, see our Tree and Shrub Planting Guide, available on our website. Happy planting!

Tree and Shrub Planting Guide
Tree & Shrub Planting Guide
Call before you dig! Dial 811
1. Measure the depth of the root ball. Your planting hole should be approximately one inch less in depth than the root ball itself (Example: 14” root ball should be planted in a 13” deep hole). Lay your rake or shovel handle across the hole, the root ball should be just slightly higher than the handle. The tree should sit on undisturbed, firm, soil. You need a firm foundation so the tree doesn’t settle after it is planted.
2. Dig a large saucer shaped hole approximately 3 times the diameter of the root ball (Example: the root ball is 16” across, the diameter of the hole should be 48”). The saucer shaped sides of the planting hole help the new root growth to move outward and upward, away from the trunk or crown. This helps prevent the new roots from girdling the trunk and maintains proper oxygen and nutrient flow to the root system.
3. Gently remove container, for large trees or shrubs, it may be easier to cut the container off. DO NOT pick up the tree or shrub by its trunk and attempt to “shake” off the container.
4. Check the root ball for roots that are growing in a circular pattern. If the roots are “Pot Bound” it is recommended to shave off an inch to an inch and a half of the exterior of the root ball. Use a hand saw to slice off strips from the exterior of the root ball around the perimeter. Prune any remaining circling roots. This has been found to be more effective than vertical slices through the root ball and prevents root girdling of the tree. Do this in several sections around the root ball. This will stimulate the roots to begin growing out of their circulating pattern.
5. Dust the root ball and cut root ends with a mycorrhizae inoculant, such as Mykes, Soil Moist or other product, so that there is good contact with the root system per the product directions. If possible, dampen the root ball to help adhere the dust to the root ball.
6. Place the tree in the hole and backfill with the original soil, remove any large dirt clumps or rocks. Water in the soil to settle it down, do not tamp down. Continue backfilling up to the top of the root ball. If you have any excess soil, use it to build a raised berm around the outside of the hole. This will aid in proper watering. NOTE: If you have heavy clay soil, consult our Nursery Manager. It is NOT recommended to try and adapt trees to soil they cannot tolerate.
7. Mix the Ferti-lome Root Stimulator or Bonide Root & Grow according to the directions on the label. Water the tree or shrub thoroughly with the mixture throughout the first two growing seasons.
8. Add mulch to the planting area, keeping the mulch 4-6 inches from the trunk of the tree or crown of the shrub. This will help retain moisture, moderate the soil temperature and prevent mower/trimmer damage, ensuring a good consistent growing area for your new plant. It looks great too!
9. Large, tall trees will require staking and guying. This will prevent any wind damage that could topple or shift your tree causing severe root damage. Tree straps should be loose to allow the tree to move a little in the wind. Remove tree straps after one year.
RECOMMENDED:
TREE WRAP We highly recommend using tree wrap on any smooth barked /and/ or dark colored tree trunks. Winter sun can cause frost cracking in young trees, especially trees with southwest exposures. Wrapping should be applied around Thanksgiving and removed by April Fools Day or Easter.
TRUNK BARK PROTECTORS The only trees that may not need Deer Guards are those planted behind a 6’ fence that the deer can’t see through; or have thick rough bark! It is never worth risking the damage that deer WILL do! This can also protect against mechanical damage from mowers.
WATERING:
Newly planted trees will need 5-10 gallons of water a week for the first two years until they are established. It is better to water more deeply and infrequently than lightly and frequently. If the soil is still wet a couple of inches down around the root ball, avoid watering.
Don’t forget to Winter Water!! Trees still lose moisture during the dormant period. If there has been no measurable precipitation for over a week and temperatures are above freezing, water lightly once a week, 2-3 gallons. This goes a long way to preventing winter dye-back and root damage!